Introduction and specifications 4. operation, Assembly – Sealey PC477 User Manual
Page 2
2.1
Introduction
High powered, lightweight industrial units. Stainless steel drum with dual
filtration system for superior performance. Features safety shut-off for
wet operation. Trolleys with swivel bin and two rear locking wheels for
easy emptying plus front swivel castors for added manoeuvrability. Foot
operation for squeegee adjustment. Supplied with Ø38mm accessory kit,
3.2mtr cable with 3 pin plug, cloth and cartridge filters. PC477 is fitted
with twin motors offering superior vacuuming power to collect any type of
solid from dust to rubble and is particularly suitable for industrial and
commercial applications where extra capacity and power are required to
clean large areas or large volumes of waste. PC455 features blower
facility. Optional front mounting squeegee available, as illustrated in fig.9.
2.2
Specifications
Model No ................................................ PC455 ...........................PC477
Motor Power ...........................................1200W .......................... 2400W
Supply ........................................................230V ............................. 230V
Air Flow ................................................132m³/hr ....................... 174m³/hr
Drum Size ................................................... 55ltr ...............................77ltr
Weight ........................................................ 28kg .............................. 39kg
Vacuum Accessories Ø ............................ 38mm ............................38mm
Filter Type ...................................... Paper, Cloth ..................Paper, Cloth
Replacement Paper Filter ..................PC455.PF ..................... PC477.PF
Replacement Cloth Filter Basket ...... PC455.CF ..................... PC477.CF
Optional Squeegee ........................PC455AK1 ....................PC477AK1
Overall Squeegee Length ...................... 670mm .........................670mm
2. INTRODUCTION AND SPECIFICATIONS
4. OPERATION
3.1
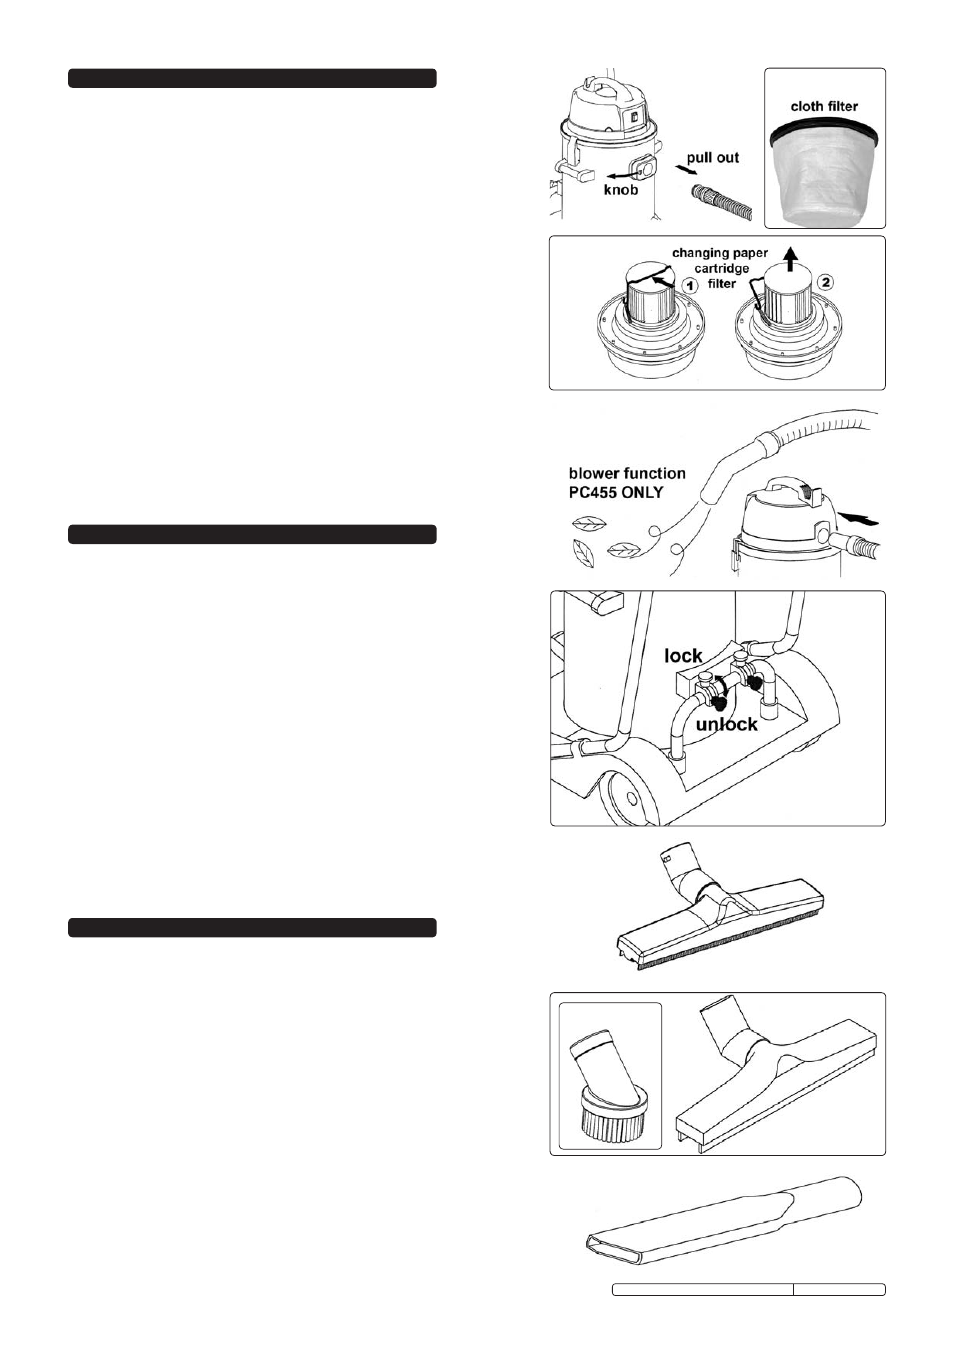
Hose Installation. Fig. 1.
3.1.1 Fully insert the hose into the suction coupler on the main drum. It will
automatically snap into place.
3.1.2 To release the hose, slide the release knob in the direction of the arrow
and pull the hose out of the suction coupler.
3.2
Filter Removal. Fig. 2a/2b
3.2.1 To access the filter, unclip and remove the upper part of the cleaner from
the metal tank.
3.2.2 To change the paper cartridge filter push the retaining clip in the
direction of the arrow (fig.2b) and remove the filter from the motor unit.
3.2.3 For wet vacuuming remove the paper cartridge filter and install the fabric
filter over the filter basket. The filter basket (fig.2a) sits in the top of the
drum and is held in place when the upper part of the vacuum cleaner is
clipped onto the tank.
3.3
Blower Function. Fig. 3. (PC455 only)
3.3.1 Connect the hose to the air vent on top of the vacuum cleaner.
3.3.2 Turn the power supply switch to ON.
3.4
Locking and Unlocking the Tank. Fig. 4.
3.4.1 Lock the tank to the frame support by pushing the knobs DOWN.
3.4.2 Unlock the tank from the frame support by pushing the knobs UP.
3.4.3 When the tank is unlocked it can be lifted from the frame.
3.4.4 The tank must only be tipped for emptying in the locked position. See fig.13.
Fig. 1
Fig. 2b
Fig. 2a
Fig. 3
Fig. 4
3. ASSEMBLY
4.1
Nozzles
4.1.1 The brush nozzle is used on large, dry areas such as a floor or a bed.
Refer to Fig. 5.
4.1.2 The squeegee nozzle is used on water, cement or other non-volatile
substances. Refer to Fig. 6.
4.1.3 The round brush is used on small areas such as a sofa, window or the
corner of a floor. Refer to Fig. 7.
4.1.4 The crevice tool is used on narrow grooves or windows. Refer to Fig. 8.
4.2
Optional Squeegee. Figs. 9, 10 and 11.
4.2.1 The optional squeegee should be attached to the underside of the
vacuum cleaner as shown in Fig. 11.
4.2.2 Depress the operating pedal. The squeegee will drop on to the surface
to be cleaned. Refer to Fig. 10.
4.2.3 If necessary, adjust the height of the squeegee using the butterfly nut at
the front of the cleaner. This sets the height of the front guide wheel.
Refer to Fig. 9.
4.2.4 With the squeegee in contact with the surface to be cleaned, lock the
guide in position.
4.2.5 Operate the squeegee by pushing the vacuum cleaner across the area
to be cleaned.
4.2.6 When cleaning is completed, raise and lock the squeegee by depressing
the rest and lock pedal.
Fig. 5
Fig. 6
Fig. 8
Fig. 7
Original Language Version
PC455, PC477, PC455AK1, PC477AK1 Issue: 3 - 17/11/10