Operating instructions – Euro-Pro EP604H User Manual
Page 6
OPERATING INSTRUCTIONS
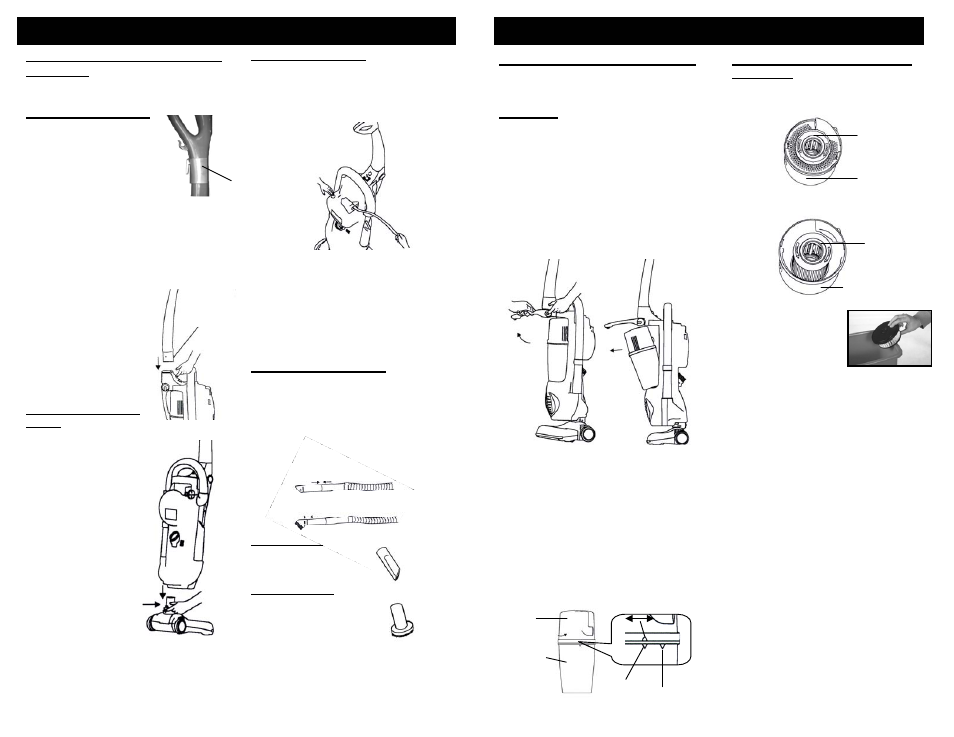
OPERATING INSTRUCTIONS
3. Hold the HEPA-Type
filter by the edges and
vigorously “TapClean”
the HEPA-Type filter
on a hard, flat surface
until no more dust is
observed falling out
from between the pleats of the filter.
(Fig. 11)
4. The HEPA-Type filter may also be
washed by running it under the tap
allowing the water to run on the dirty
side. We recommend washing it once a
month or when suction appears
reduced. Always allow 24 hours for air
drying before replacing into the vacuum.
5. Reinstall the HEPA-Type filter into
dust cup cover.
6. Replace the filter cover.
1. To remove the filter cover inside the
dust cup cover, turn counter clockwise
and lift. (Fig. 9)
Filter Cover
Dust Cup Cover
Fig. 9
HEPA-Type
Filter
Dust Cup
Cover
Fig. 11
Fig. 10
Cleaning / Replacing the HEPA-
Type Filter
2. To remove HEPA-Type filter, turn filter
counter clockwise and then pull up.
(Fig. 10)
Floor Brush
Release Button
Attaching The Handle
When removing the unit from
the box, please note that the
handle storage clip is attached
to the handle when it is shipped.
(Fig. 1) Remove the handle
storage clip and attach it to the
back of the unit onto the clip
mounting slot.
1. Insert the handle into the hole above
the dust cup handle.
2. Make sure that the slot in the handle
fits correctly into the opening. (Fig. 2)
3. The metal pin should be on the same
side as the handle release button.
Depress the metal pin
and then firmly push in
the handle.
4. To remove the handle,
press the handle
release button and
pull the handle up.
5. Attach the handle
onto the handle
storage clip if desired.
Attaching The Floor
Brush
1. Insert the floor brush into
its location, in the direction
of the arrow. (Fig. 3)
2. To remove the floor
brush from the vacuum,
press on the floor brush
release button and
pull the floor
brush out.
Metal Pin
Fig. 2
Fig. 3
Fig. 4
Using The Attachments
1. Remove the long end of the hose
from hose holder.
2. Attach the desired accessory to the
hose. (Fig. 5)
NOTE: The provided accessories can
only be used with the hose. Do not
attempt to attach to the base of the
vacuum.
Dusting Brush
The dusting brush is used
for the furniture, Venetian
blinds, lamp shades,
shelves, etc.
Crevice Tool
For radiators, crevices,
corners, baseboards and
between cushions.
Fig. 5
3. To rewind the power cord, press the
cord rewind button with one hand
and guide the power cord with the
other hand to ensure that it does not
whip causing damage or injury.
NOTE: Do Not use dust cup handle to
transport the unit, always carry from the
carry handle.
Fig. 1
Handle
Storage
Clip
Using Your Vacuum
1. Insert the power plug into the wall
outlet.
2. Press the power On/Off button
located on the unit to turn the
vacuum cleaner “On”. (Fig. 4)
WARNING:
Always remove the power
plug from the wall outlet before
assembling or removing accessories.
Assembling Your Vacuum Cleaner
4
Dust Cup
Cover
Dust Cup
Container
Closed
Opened
Warning:
Always unplug the unit from
electrical outlet before opening the dust
cup (container).
Important:
Do NOT use the vacuum
without the HEPA-Type filter in place.
Warning:
After each Use - Always
remove the HEPA-Type filter and the dust
cup cover, then vigorously “TapClean”
HEPA-Type filter until no more dust can
be removed.
1. To remove the dust cup container,
press on the dust cup retainer
handle release button and lift the
retainer handle upwards. (Fig. 6)
2. Grasp the dust cup from the top, tilt
downwards and pull it out. (Fig. 7)
Fig. 6
Fig. 7
3. To empty the dust cup (container),
turn the dust cup cover clockwise.
(Fig. 8)
4. Separate dust cup cover from dust cup
(container).
5. Empty dust cup (container).
6. The dust cup (container) and dust cup
cover can be wiped down with a damp
cloth or rinsed under lukewarm tap
water.
NOTE: Ensure that dust cup (container
and dust cup cover are completely dry
before re-installing into vacuum.
Removing / Cleaning the Dust Cup
Fig. 8
5