Operating instructions – Euro-Pro UV209H User Manual
Page 8
OPERATING INSTRUCTIONS
OPERATING INSTRUCTIONS
Changing & Cleaning the Exhaust
Filter
Warning: To reduce the risk of electric
shock, the power cord must be
disconnected before removing the dust
cup, HEPA filter,changing the filters or
performing maintenance/trouble shooting
checks.
Cleaning the Dust Cup
Warning:
To reduce the risk of electric
shock, the power cord must be
disconnected before removing the dust
cup, HEPA filter,changing the filters or
performing maintenance/trouble shooting
checks.
The dust cup can be
washed in lukewarm
water. Do not use strong
detergents. Ensure that
the dust cup is fully dry
before putting back on the
vacuum cleaner.
(Fig. 18) Do not wash in
dishwasher.
Fig. 18
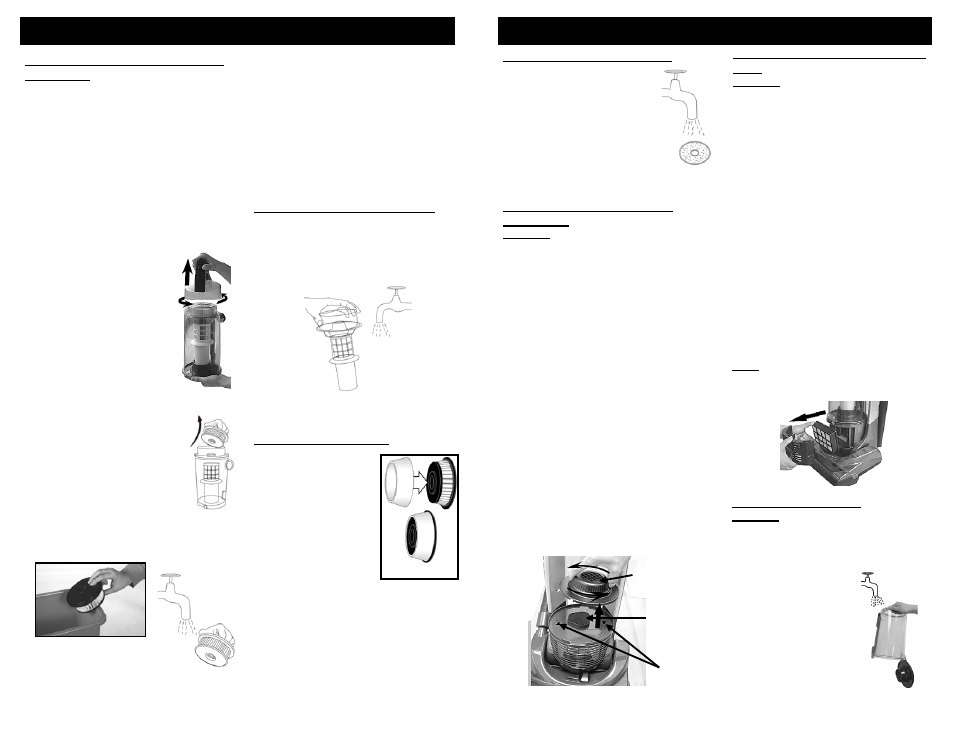
Pre-Motor
Filter
Cover
Pre-Motor
Filter
Lug
Holes
Fig. 16
The exhaust filter is located on the
front of the unit below where the dust
cup is. To remove the exhaust filter,
you must first remove the filter cover.
1. Check the exhaust filter frequently
and replace with new filters when
dirty.
2. Remove the exhaust filter cover.
(Fig. 17)
3. Remove the exhaust filter.
4. Rinse in lukewarm water and let the
filter air dry for 24 hours before re-
installing into the vacuum. Do not
use a washing machine to rinse the
filter. Do not use a hair dryer to dry
the filter. Air dry only. Never
operate the vacuum without ALL
the filters in place.
5. When the filter is dry, replace into
the vacuum and replace the filter
cover.
Note: A severely soiled or clogged
filter should be thoroughly washed with
fresh tepid water. A mild detergent may
be used if required.
Fig. 17
Cleaning the Secondary Filter
1. Underneath the HEPA filter
there is a secondary filter.
This is washable in
lukewarm water. (Fig. 15)
We recommend washing it
when you are washing your
HEPA filter. Always allow the
secondary filter to air dry for
24 hours before replacing into
the vacuum. Never run the
vacuum without the secondary
filter in place.
Fig. 15
Please Note: The white material in the
HEPA filter will discolor over time - This is
NORMAL and will NOT affect the
performance of the filter.
Fig. 9
Fig. 12
IMPORTANT, Please Note : The Rinseable
“TapClean” HEPA Dust Cup Filter will stop
most of the tiniest dust particles from re-
entering the air you breathe. In fact, it stops
99.97% of all particles as small as 0.3
microns - many times smaller than a human
hair!!! Because of this incredible filtration
performance, the HEPA Dust Cup Filter will
quickly accumulate many fine dust particles
inside the white filter folds that are difficult to
see but which will eventually block or
reduce your suction power - if not cleaned
properly. Clean the HEPA Filter after each
use as described in this section.
Cleaning the HEPA Dust Cup Filter
1. To remove the HEPA
filter, remove the dust cup from the
unit.
2. To remove the dust cup
cover, hold the cover by
the handle, turn counter
clockwise and lift the
cover off. (Fig. 9)
3. Remove the HEPA
Rinseable "Tap Clean"
filter from the dust cup.
(Fig. 10)
4. Remove the filter ring
that is around the HEPA
filter. Vigorously
"TapClean" the HEPA
dust cup filter on a hard
surface until no more dust is
observed falling out. (Fig. 11)
The HEPA filter may
also be washed by
running it under the
tap allowing the water
to run on the dirty side.
(Fig. 12) We recommend
washing it once a month
or when suction appears
reduced. Always allow 24 hours for air
drying before replacing into the
vacuum.
Fig. 10
Warning: Always empty the dust cup
and clean the HEPA dust cup filter
before each use and during prolonged
usage. Never over fill the dust cup -
remove dirt and clean the HEPA dust
cup filter each time the dust cup is
emptied during prolonged usage or risk
motor damage.
Changing & Cleaning the Pre-
Motor Filter
Cleaning the HEPA Filter Frame
1. Before replacing the HEPA filter in the
HEPA filter frame, you can (should)
rinse the frame in lukewarm water by
just running it under the tap to remove
any dust that is adhering to the frame.
(Fig. 13) Do NOT place in dishwasher.
Fig. 13
2. Make sure that the filter frame is
completely dry before replacing into
the dust cup. Always air dry.
Cleaning the Filter Ring
1. Around the HEPA filter
there is a filter ring.
This is washable in
lukewarm water.
(Fig. 14) To remove
the filter ring, slide it
off the HEPA filter.
2. We recommend
washing the filter ring
when you are
washing your HEPA
filter. Always allow the
filter ring to air dry for
24 hours before replacing onto
the HEPA filter. Never run the vacuum
without all the filters in place.
Note: This is a washable filter, but we
recommend replacing it every three (3)
months.
Fig. 14
Warning: To reduce the risk of electric
shock, the power cord must be
disconnected before removing the dust
cup, HEPA filter,changing the filters or
performing maintenance/trouble shooting
checks.
The pre-motor filter is located in the
vacuum underneath the dust cup.
Please note that this filter is a
washable filter and can be cleaned by
rinsing under lukewarm water. Always
allow the pre-motor filter to air dry for
24 hours before replacing in the
vacuum. Do not use a hair dryer to dry
it. Air dry only. To remove the pre-
motor filter:
1. Remove the dust cup. (See
instructions on page 5 for removing
the dust cup).
2. Hold the Pre-Motor filter cover and
turn counter-clockwise to unlock
and lift to remove. (Fig. 16)
3. Remove the pre-motor filter and
clean by rinsing under lukewarm
water.
4. After air drying for 24 hours, replace
in the vacuum.
5. To replace the pre-motor filter
cover, insert the locking lugs into
the lug holes and turn clockwise to
lock.
Fig. 11
7
6