Casio EX-FC200S User Manual
Page 2
6.
Press [0] (Movie) to record.
Movie recording will start approximately 10 seconds after you press [0] (Movie)
and will continue for about five seconds.
• The camera’s front lamp will flash while the countdown is being performed.
• The camera focuses automatically when you first start recording a movie, but
focus is fixed while movie recording is in progress.
• You can interrupt an ongoing self-timer countdown by pressing [SET].
• You can change the self-time countdown duration setting to “2 sec” if you want.
Note that Triple Self-timer cannot be used during this type of recording.
NOTE
• Precautions and the shooting procedure are the same as those for High Speed
Movie recording, except that the following functions are disabled.
– Prerecord Movie
– YouTube movie recording
High Speed CS provides you with a variety of options to suit exactly the type of image
you are trying to record. Recording continues as long as you keep the shutter button
depressed. Swing Burst uses Prerecord CS, so half-pressing the shutter button starts
continual pre-recording of images to a temporary buffer. Then when you press the
shutter button the rest of the way down, the camera stores what is currently in the buffer
and starts continuous shutter recording of new images. Recording continues until you
release the shutter button or until the maximum total number of images (buffer images
plus new images) are recorded. Some of the images are of action that occurred before
you full-pressed the shutter button and some are after. This helps to ensure you capture
exactly the moment you want, even if your timing is slightly off. To eliminate troublesome
setup requirements, Swing Burst is pre-configured with initial default settings that are
optimized for shooting a total of five Prerecord CS images of a golf swing.
*
You can record up to a maximum of 30 images (pre-recorded buffer images plus real-
time images) for each Prerecord CS operation.
1.
In the REC mode, press [BS] (BEST SHOT).
2.
Select “Swing Burst” and then press [SET].
The following are the initial default Prerecord CS settings used for Swing Burst.
• You can change the High Speed CS fps, Max CS shots, and Prerecord CS
shots settings if you want.
3.
Half-press the shutter button.
The camera will continually pre-record images to a temporary buffer to a buffer as
long as you keep the shutter button half-pressed.
• If you release the half-pressed shutter button before pressing it the rest of the
way down, all of the pre-recorded images currently in the buffer will be deleted.
• The camera will not emit a shutter sound when you half-press the shutter
button while Prerecord CS is selected.
4.
When you are ready to shoot, press the shutter button the rest of the
way down and keep it depressed.
This will record the images in the pre-record buffer and start recording new
images in real-time. Images continue to be shot as long as you keep the shutter
button depressed.
5.
Real-time shooting will stop when you release the shutter button or
after the maximum number of shots is reached.
Recording a Golf Swing with High Speed CS (Swing Burst)
High Speed CS fps
Max CS shots
Prerecord CS shots
10 fps
30 (3 seconds)
5 (0.5 seconds)
Shutter button half-press
Recorded images (up to 30 images)
Continuous recording of images until shutter
button released*
Shutter button release
Shutter button full-press
Pre-recorded images
NOTE
• If you full press the shutter button without first half-pressing it to pre-record images,
only real-time images are recorded. Whenever possible, be sure to half-press the
shutter button, aim the camera, and then full-press the shutter button.
You can analyze a swing that was shot from the front (face on) or from behind.
1.
Press [p] (Play) and then use [4] and [6] to display the movie of the
swing you want to analyze.
2.
Press [SET] to start playback. When playback reaches the image of the
golfer addressing the ball, press [SET] again to pause playback.
• You can fast forward and fast reverse playback by holding down [4] or [6]
during playback.
• To play the movie at high speed, start playing the movie and then press
[AUTO]. Note that this operation is not supported while playback is paused.
3.
Press [8] (DISP) to display blue, red, and green
red alignment lines.
4.
Press [BS].
5.
Use [8], [2], [4], and [6] to move the point of
intersection of the blue and red lines until it is
located at the ball.
6.
Press [SET].
7.
Use [8], [2], [4], and [6] to move the
intersection of the red and green lines until it is
located at the bend of the hips of the golfer.
8.
Press [SET].
9.
Use [8], [2], [4], and [6] to move the
intersection of the blue and green lines until it is
located at the golfer’s neck.
10.
Press [SET].
11.
Press [BS].
This will start playback of the movie with all of the lines
superimposed, which you can use to check the swing
plane and analyze the swing.
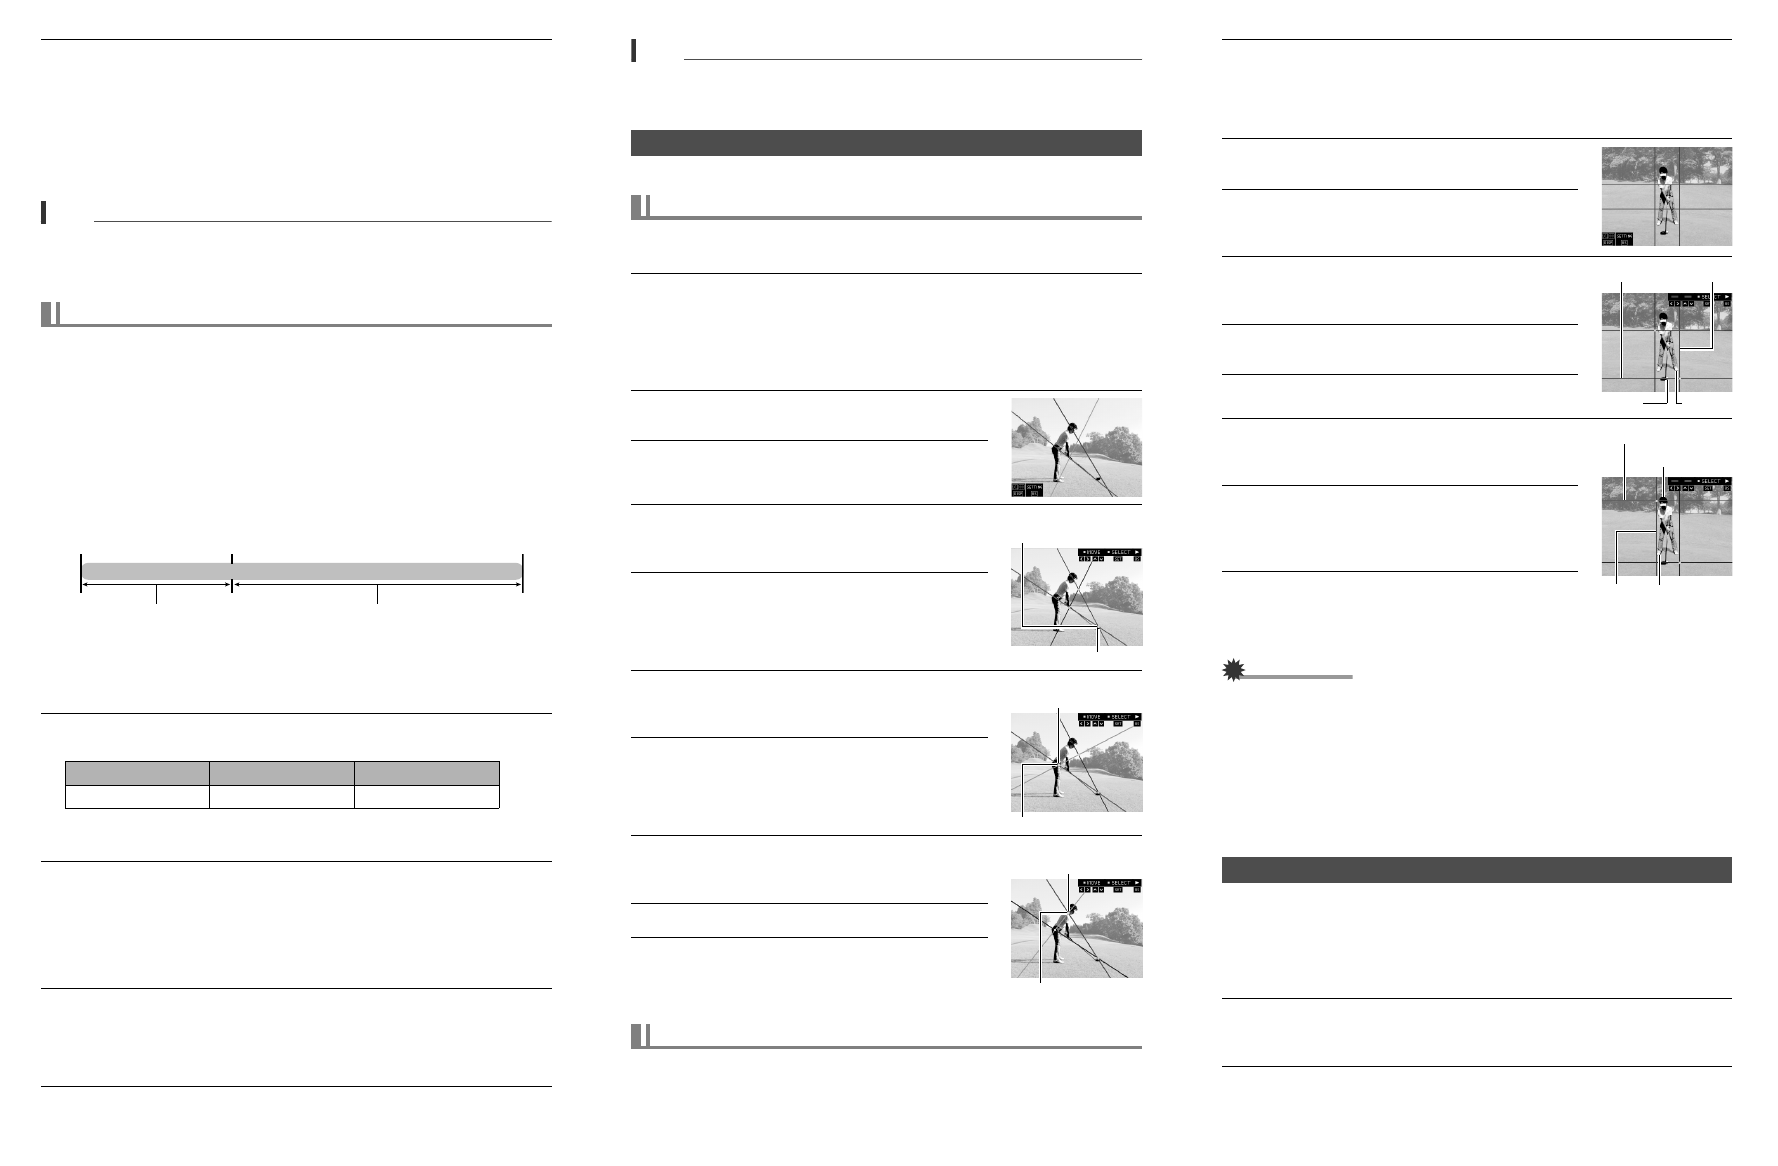
1.
Press [p] (Play) and then use [4] and [6] to display the movie of the
swing you want to analyze.
Analyzing a Swing
To analyze a swing shot from behind
To analyze a swing shot from the front
Intersection of blue
and red lines
Ball
Intersection of red and
green lines
Waist
Intersection of blue
and green lines
Neck
2.
Press [SET] to start playback. When playback reaches the image of the
golfer addressing the ball, press [SET] again to pause playback.
• You can hold down [4] or [6] to fast forward or fast reverse to the frame you want.
• To play the movie at high speed, start playing the movie and then press
[AUTO]. Note that this operation is not supported while playback is paused.
3.
Press [8] (DISP) to display vertical and
horizontal lines.
4.
Press [BS].
5.
Use [4] and [6] to move the vertical blue line
on the right until it is aligned with the golfer’s
left foot.
6.
Use [8] and [2] to move the lower horizontal
red line until it is aligned with the ball.
7.
Press [SET].
8.
Use [4] and [6] to move the vertical blue line
on the left until it is aligned with the golfer’s
right foot.
9.
Use [8] and [2] to move the upper horizontal
red line until it is aligned with the top of the
golfer’s head.
This completes the adjustment procedure.
10.
Press [BS].
This will start movie playback during which you can
view the arc of the club head and check for any
vertical or horizontal movement.
IMPORTANT!
• The camera remembers the positions of all of the lines you insert into a movie shot
with this type of camera. The next time you press [8] (DISP) while playing the
movie, the lines will be at the same positions you last adjusted them to. You will be
able to change the positions of the lines again, if you want.
• The camera does not remember the positions of lines you insert into a movie shot with
another type of camera. The next time you press [8] (DISP) while playing the movie,
lines will be at different positions. You will be able to adjust the positions of the lines.
• The lines will also appear during playback of the movie on a TV connected to the
camera with an AV cable or HDMI cable. The lines will not appear on a computer
screen or on the screen of another digital camera.
Use the following procedure to extract a frame from a swing movie and save it as a
still image.
1.
To pause movie playback, press [SET].
• To play back the movie at high speed, press [AUTO] during playback. Note that
this operation is not supported while playback is paused.
2.
Use [4] and [6] to scroll through the frames of the move and display
the one you want.
Holding down [4] or [6] scrolls at high speed.
3.
Press [0] (Movie).
This saves the displayed frame as a snapshot, exits movie playback, and
displays the extracted image.
Extracting a Still Image of a Swing Movie Frame (MOTION PRINT)
Blue line
Red line
Left foot
Ball
Blue line
Right foot
Red line
Top of head