Select language, Install ink cartridges, Start here – Epson Stylus NX515 User Manual
Page 2: Series, Unpack, Turn on and adjust, Load paper
*411638300*
*411638300*
If anything is missing, contact Epson as described on the back.
Note:
The model name of your product may vary slightly from the one shown above.
The included CD and documentation apply to all products in the series.
Caution:
Do not open ink cartridge packages until you are ready to install the ink.
Cartridges are vacuum packed to maintain reliability.
Canada only: For French speakers, remove sticker(s) from the backing sheet and
place over corresponding text on the control panel.
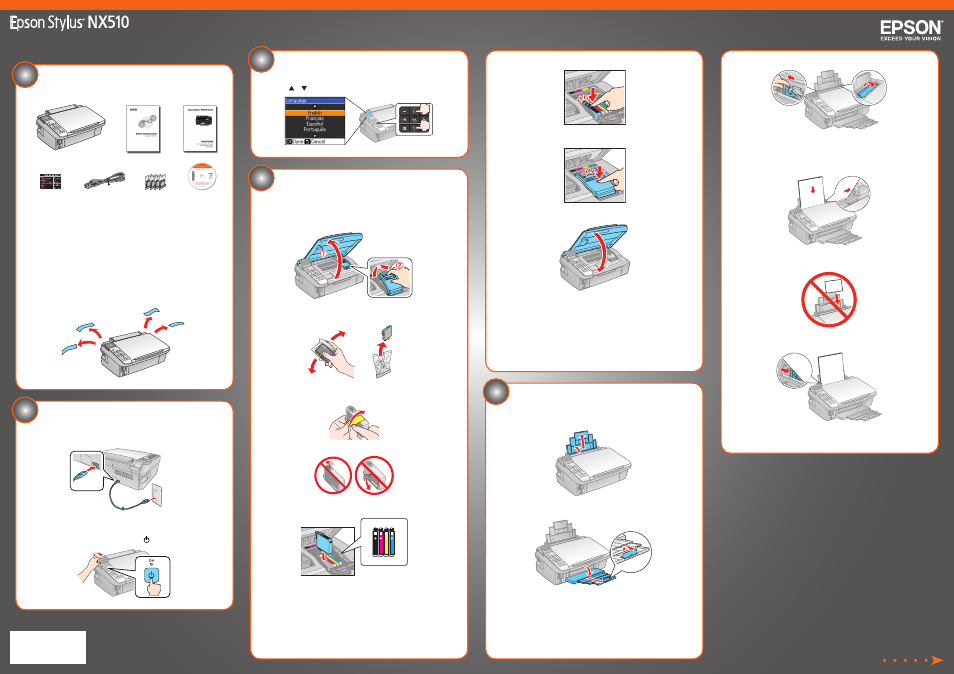
Remove all protective materials.
Unpack
1
Start Here
Select language
3
Press
or
to select your language, then press
OK.
3
Squeeze the edge guide and slide it left.
Tip:
If the feeder guard is in the way, flip it forward.
4
Load paper against the right edge and behind the tab, with the printable
side face up.
Note:
Don’t load the paper sideways; always load it short edge first.
5
Slide the edge guide over.
Continue with section 6 to choose your connection type and install software.
5
Press each cartridge down until it clicks.
6
Close the ink cartridge cover. Press it down until it clicks.
7
Lower the scanner.
8
Press the
OK button to charge the ink. Charging takes about 3 minutes.
Note:
Your NX510 Series ships with full cartridges and part of the ink from the
first cartridges is used for priming the NX510 Series.
Caution:
Don’t turn off the NX510 Series while the ink system is charging or
you’ll waste ink.
(Included for
Canada only)
1
Connect the power cable.
Caution:
Do not connect to your computer yet.
2
Raise the display screen, then press the
On button.
Turn on and adjust
2
Power cord
Series
Install ink cartridges
4
Note:
Do not load paper yet.
1
Lift up the scanner, then open the cartridge cover.
2
Shake the ink cartridges gently 4 or 5 times, then unpack them.
3
Remove only the yellow tape from each cartridge.
Caution:
Don’t remove any other seals or the cartridges may leak.
4
Insert the cartridges in the holder for each color.
1
Open the paper support and pull up the extensions.
2
Open the output tray, pull out the extensions, and raise the stopper.
Note:
If you are using legal-size paper, do not raise the stopper.
5
Load paper