Operating instructions – Euro-Pro SHARK PURSUIT UV209B User Manual
Page 5
OPERATING INSTRUCTIONS
OPERATING INSTRUCTIONS
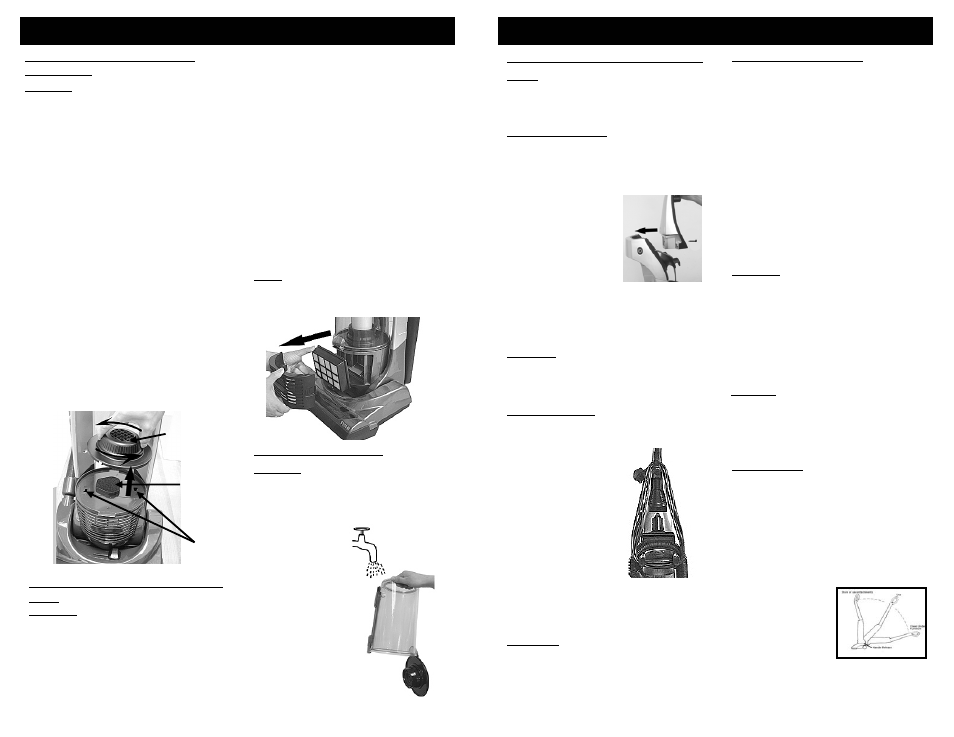
Changing & Cleaning the Pre-
Motor Filter
Using the Attachments
1.
Place vacuum in its upright position.
Make sure that the vacuum cleaner
is NOT plugged into the electrical
outlet when adding or removing
accessories.
2.
Turn the carpet height selector
to the highest position and set the
Carpet to Floor selector to the
“Floor” position.
3.
Remove the hose connector from
the rear of the unit and push in the
desired attachment firmly onto the
end of the hose.
4.
If additional length is required,
attach the extension tubes to the end
of the hose and then attach the
crevice tool, round brush or
upholstery brush to the end of the
extension tube.
Assembling Your Vacuum Cleaner
The exhaust filter is located on the
front of the unit below where the dust
cup is. To remove the exhaust filter,
you must first remove the filter cover.
1. Check the exhaust filter frequently
and replace with new filters when
dirty.
2. Remove the exhaust filter cover.
(Fig. 16)
3. Remove the exhaust filter.
4. Rinse in lukewarm water and let the
filter air dry for 24 hours before re-
installing into the vacuum. Do not
use a washing machine to rinse the
filter. Do not use a hair dryer to dry
the filter. Air dry only. Never
operate the vacuum without ALL
the filters in place.
5. When the filter is dry, replace into
the vacuum and replace the filter
cover.
Note: A severely soiled or clogged
filter should be thoroughly washed with
fresh tepid water. A mild detergent may
be used if required.
Note:
Do not plug the power cord
into an electrical outlet until
the vacuum is fully
assembled.
Warning:
To reduce the risk of electric
shock, the power cord must be
disconnected before removing the dust
cup, HEPA filter,changing the filters or
performing maintenance/trouble shooting
checks.
Handle Assembly
1. Carefully unpack all components,
set aside packaging.
2. Lift vacuum body to upright position.
3. Remove the screw (1) that comes
attached to the
body.
4. From the rear of
the vacuum, align
the handle with
groove and slide
onto vacuum. If
necessary, use
thumb and finger
pressure to slide
handle into position.
5. Once handle is in place, secure the
handle with the screws (2). (Fig. 1)
Fig. 1
The pre-motor filter is located in the
vacuum underneath the dust cup.
Please note that this filter is a
washable filter and can be cleaned by
rinsing under lukewarm water. Always
allow the pre-motor filter to air dry for
24 hours before replacing in the
vacuum. Do not use a hair dryer to dry
it. Air dry only. To remove the pre-
motor filter:
1. Remove the dust cup. (See
instructions on page 5 for removing
the dust cup).
2. Hold the Pre-Motor filter cover and
turn counter-clockwise to unlock
and lift to remove. (Fig. 15)
3. Remove the pre-motor filter and
clean by rinsing under lukewarm
water.
4. After air drying for 24 hours, replace
in the vacuum.
5. To replace the pre-motor filter
cover, insert the locking lugs into
the lug holes and turn clockwise to
lock.
Warning:
Avoid tipping the vacuum or
setting it on furniture, fringed area rugs or
carpeted stairs while you are using the
hose with the attachments. When using
the unit to vacuum floors or with
attachments, set the Carpet to Floor
Selector to the “Floor” position. This will
stop the beater brush from rotating. When
vacuuming carpets, avoid leaving the
vacuum in one place for an extended
period of time, particularly on thick carpet.
How to Start
The upright vacuum can be used on
multiple types of carpeting, bare floors or
upholstery with attachments. When using
the attachment tools such as the crevice
tool, round brush or the upholstery brush,
place the handle of the vacuum in the
upright position.
1. Turn the quick release cord holder
to either side 180° to release the
power cord.
2. Plug the power cord into the electrical
outlet.
3. Push the On/Off
button to the "On"
position to turn
the vacuum on.
4. To release the
handle, step
on the power
head and pull the handle back.
5. When using the attachments, the
vacuum must be in the upright
position. (Fig. 3)
Caution:
Do NOT pull the vacuum
cleaner around the room by the hose as it
could tip over and cause damage. When
using the attachments, do NOT over
extend the hose length when reaching.
Trying to reach beyond the hose reach
could cause the vacuum to tip over.
Fig. 3
Fig. 16
Caution:
Do not over tighten. Over
tightening could strip the screw holes.
Do not operate the vacuum without
the handle screws in place.
Cord Assembly
1. Make sure that the quick release
cord holder is in the upright
position.
2. Remove the wire
tie from the power
cord.
3. Wrap the cord into
place by wrapping
it in a clockwise
direction around
the quick release
cord holder and
the lower cord
holders. (Fig. 2)
4. Turn the quick
release cord holder
to the left or to the right to unwrap
the power cord. (Fig. 2)
Warning:
Always make sure that the
vacuum is turned off
before unplugging.
Fig. 2
Pre-Motor
Filter
Cover
Pre-Motor
Filter
Lug
Holes
Fig. 15
Cleaning the Dust Cup
Warning: To reduce the risk of electric
shock, the power cord must be
disconnected before removing the dust
cup, HEPA filter,changing the filters or
performing maintenance/trouble shooting
checks.
The dust cup can
be washed in
lukewarm water.
Do not use strong
detergents.
Ensure that the
dust cup is fully
dry before putting
back on the
vacuum cleaner.
(Fig. 17) Do not
wash in
dishwasher.
7
Fig. 17
Changing & Cleaning the Exhaust
Filter
Warning: To reduce the risk of electric
shock, the power cord must be
disconnected before removing the dust
cup, HEPA filter,changing the filters or
performing maintenance/trouble shooting
checks.
4