頁面 6, Getting started, 12 pin harness cable connection – Aquatic AV AQ-DM-2BX User Manual
Page 6
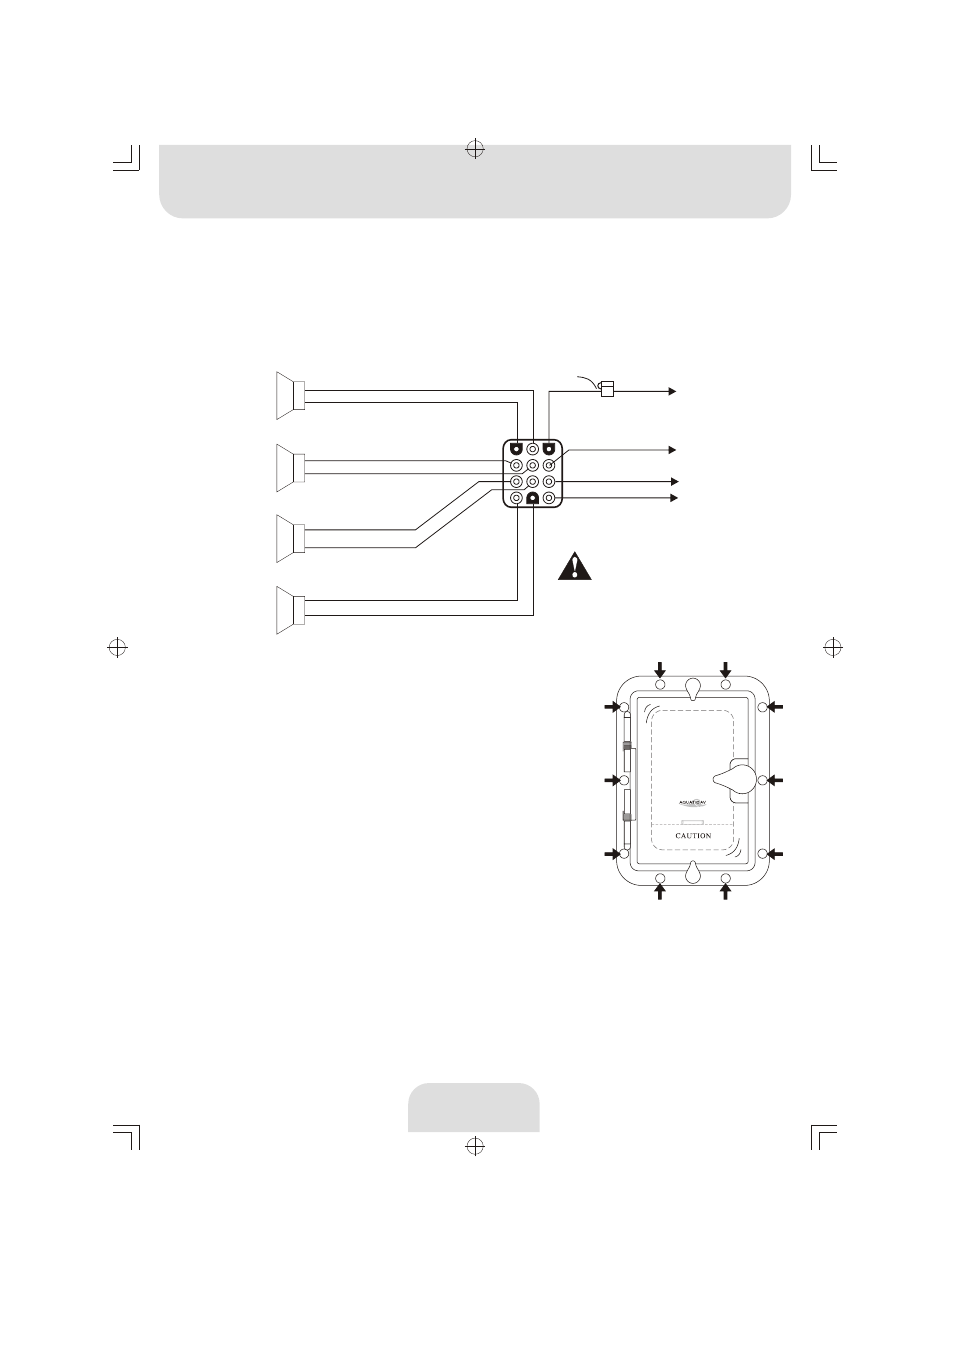
External
Trigger +12VDC (7)
DC Ground (10)
LR-(2)
+12VDC(1)
LR+(3)
LF-(5)
LF+(6)
RF-(8)
RF+(9)
Not connected (4)
RR-(11)
RR+(12)
FUSE BOX
Left Rear Speaker
+
-
Left Front Speaker
+
-
+
-
+
-
Right Front Speaker
Right Rear Speaker
Please put a
fuse into the box
4
(Red color)
(Blue color)
(Green/Black color)
(Green color)
(White/Black color)
(White color)
(Gray/Black color)
(Gray color)
(Purple color)
(Purple/Black color)
(Black color)
12 Pin Harness Cable Connection
GETTING STARTED
Aquatic AV recomm ends the use of a optional "plug and play" connector for best
performa nce (AQ-UNH-1). This connector is not included.
For detailed informa tion, please call the re-seller. If you choose
not to use the "plug and play" option, you can use the wiring schema tic below.
All open wire connections should be soldered, and protected against
Water/Dust for best long term performa nce.
8 ohm
8 ohm
8 ohm
8 ohm
Must use 8 ohm speaker or
damage may occur to the AQ-DM-1R
(Yellow color)
Once the mounting hole is complete, make sure
the outside surface is clear of debris. The
AQ-DM-2 has an external water/dust proof
gasket, but it needs a clean surface for best
performance.
2.
Mounting templates are included. Aquatic AV
recommends to utilize the "measure twice, cut
once" Method.
1.
Review all outside surfaces of the AQ-DM-2 to insure proper water/dust
seal. This is important for the long term environmental protection
performance for iPod or MP3 devices.
4.
The AQ-DM-2 has ten (10) front wood screws.
Drive the 10 pcs of screws with a screw driver.
During final mounting, apply equal pressure to
all points for best water/dust outer seal performance.
3.
After the installation is complete, install the finishing covers over the
stainless screws with silicone. We recommend a marine grade silicone as
an adhesive.
5.
Mounting the Unit
AQ-DM-2B
Keep Dry