AIRLESSCO MP400 User Manual
Page 17
Maintenance
332882A
17
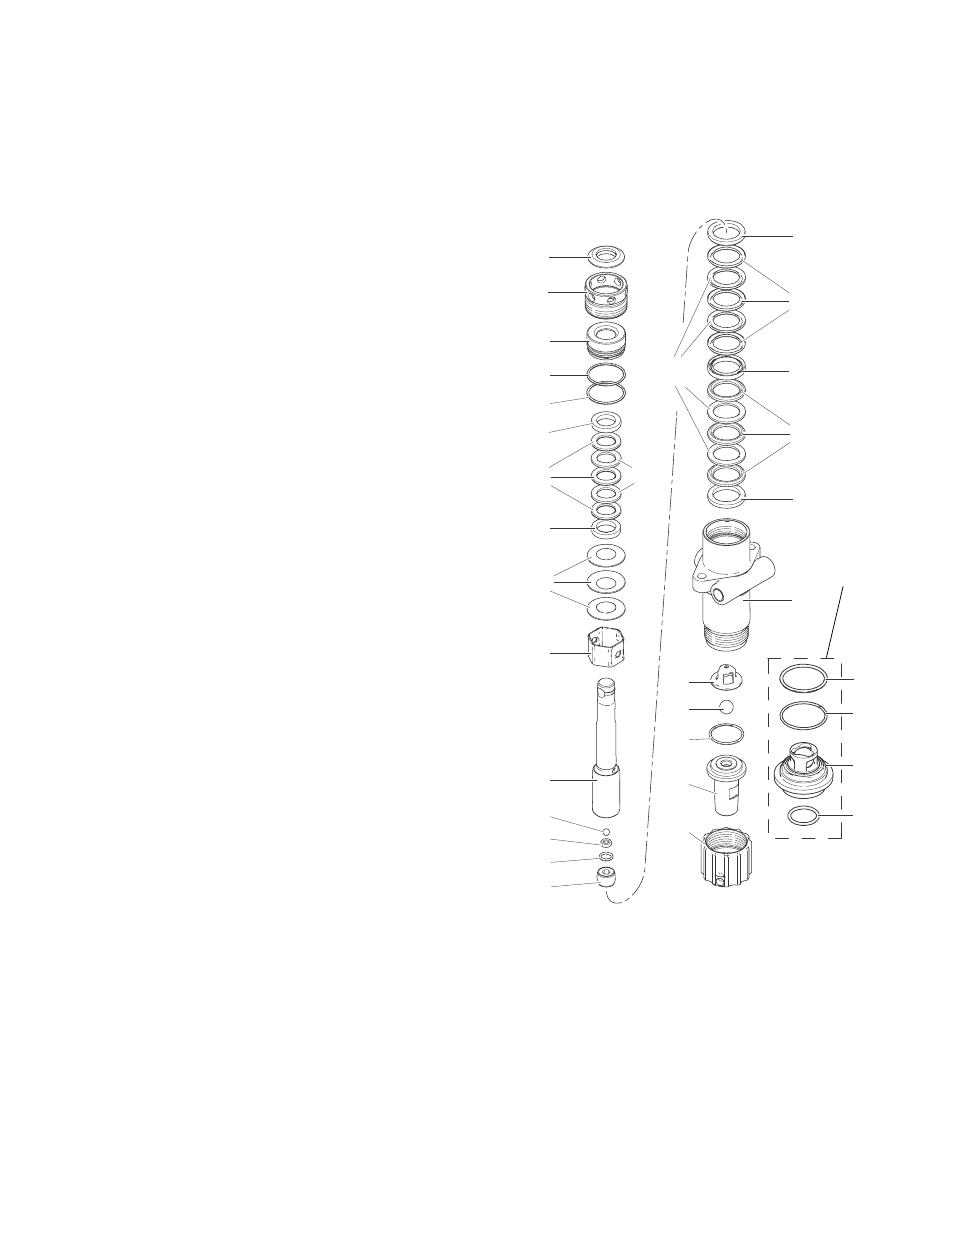
8. Take three spring washers (16) and slide over the
top of the piston (14) in the following order:
•
First spring - curve facing up
•
Second spring - curve facing down
•
Third spring - curve facing up
9. Take the upper male gland (17) and place it
rounded side up.
10. Take three upper polyethylene packings (18) and
two leather packings (22) and assemble with
inverted side down, on to the male gland (17) in the
following order:
•
Polyethylene
•
Leather
•
Polyethylene
•
Leather
•
Polyethylene
11. Take upper female gland (19) and place on top of
assembled upper packings with the inverted side
down.
12. Take assembled upper glands and packings (7
pieces) and slide on over the top of the piston (14),
making sure inverted sides are down.
13. Take the packing holder (20) and replace the white
O-ring (24) and the black O-ring (25) with new ones
from the packing kit.
14. Slide the packing holder (20) over the top fo the
upper packings so they fit inside.
15. Lubricate inside of the fluid pump body (4) and the
outside of the packings with a light weight oil.
16. Slide assembly into fluid pump body.
NOTE: To keep packings secured in correct position,
hold the pump body upside down and push the com-
pleted assembly upwards into the pump body. Once
placed inside, tilt pump body back up to keep all pieces
in.
17. Tighten packing nut (21) onto the top of the fluid
pump body and tighten until you feel slight resis-
tance against the Belleville Springs (16). Using the
Packing Adjustment Tool, tighten another 3/4 of a
turn.
18. Reinstall Fluid Pump, page 15.
1
2
3
1
4
2
2
2
2
2
159
160
157
158
9
8
7
6
5
23
23
23
23
14
15
13
11
12
10
16
16
16
17
18
18
18
22
22
19
24
25
20
21
26
ti16115b
Stand model