Ksr-sr-db – Thermon KSR-SK-DB User Manual
Page 4
4
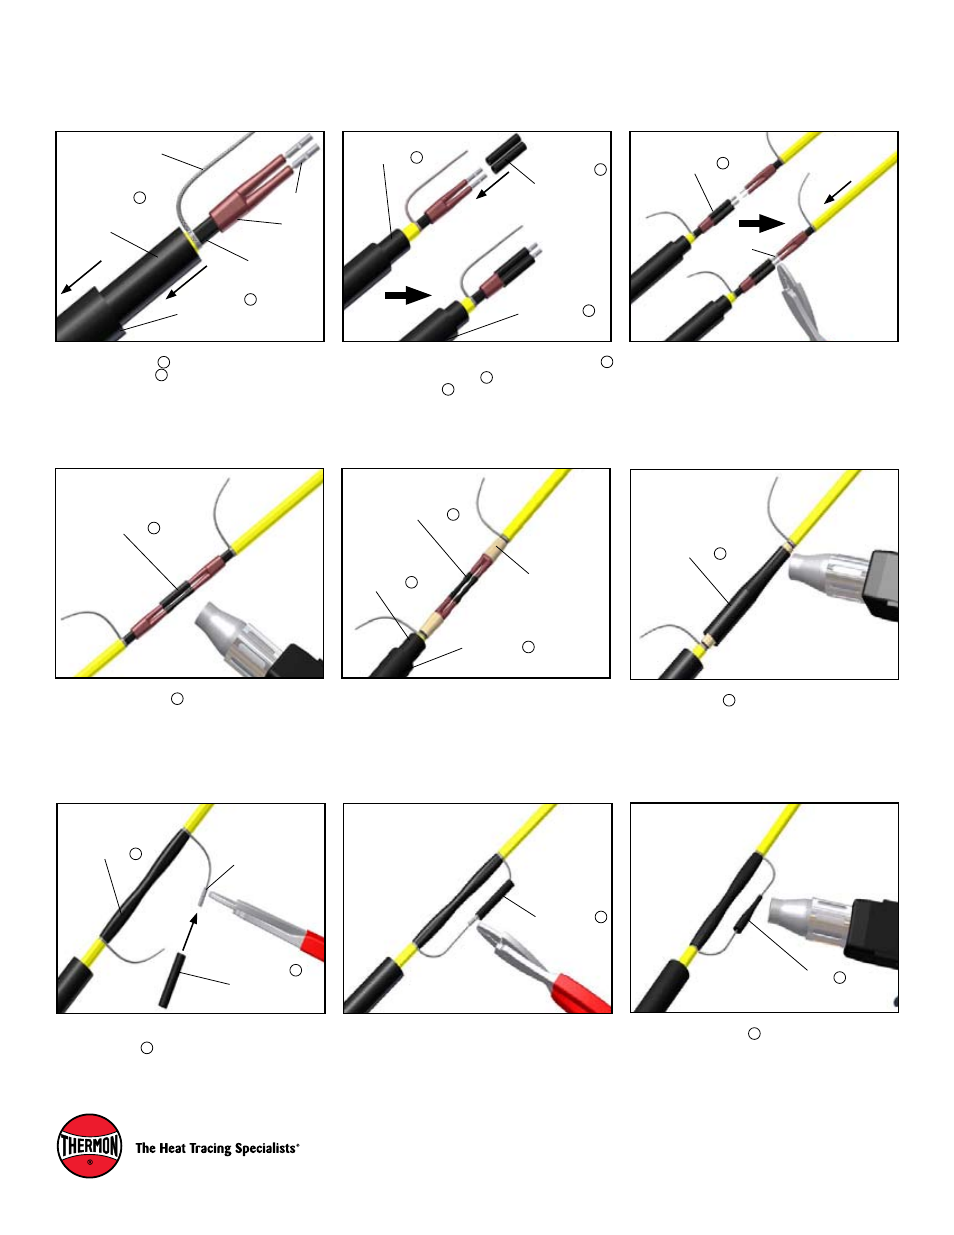
10.
Slide heat shrink 1 8mm x 35mm (1.10” x 1.80”)
then heat shrink 0mm x 10mm (.79” X 4.7”)
onto cable as shown.
12.
Repeat steps 1-8 for second cable to be spliced.
Crimp the small lugs to the second cable.
11.
Cut 10mm X 15mm (.39” X 5”) into 3 pieces : 3
pieces @ 35mm (1.38”) 4 1 piece @ 55mm (.16”).
Slide heat shrink 3 10mm X 35mm (.39” X 1.38”) over
small lugs on each splice connection boot legs.
KSR-SR-DB
Cable
Boot
Heat Shrink 1
8mm X 35mm
(1.10 X 1.80”)
Heat Shrink
0mm x 10mm
(.79” X 4.7”)
Ground Braid
Small Lug
Heat Shrink 3
10mm X 35mm
(.39” X 1.38”)
Heat Shrink 1
Heat Shrink
Heat Shrink 3
Small Lug
Crimped
13.
Center heat shrink 3 over crimped small lugs. Using
heat gun, heat until heat shrinks firmly set.
14.
Cut pieces of mastic tape about 5mm (1”) long.
Stretch mastic tape to cover the end of each splice
connection boot and cable primary insulation jacket
up to metallic braid.
16.
Crimp large lug on one of the braid as shown. Slide
heat shrink 4 over the braid with large lug.
17.
Crimp large lug to the end of the other braid.
Mastic Tape
Heat Shrink 3
Heat Shrink
Heat Shrink 1
Heat Shrink 3
Heat Shrink
Large Lug
Heat Shrink 4
10mm x 55mm
(.39” X .17”)
Heat Shrink 4
15.
Center shrink over splice connection area. Using
heat gun, heat until heat shrink firmly sets.
18.
Center heat shrink 4 over crimped lug. Using heat
gun, heat until heat shrink firmly sets.
Heat Shrink
Heat Shrink 4