Repairs (continued) optional accessories – Sea Eagle FastTrack Kayaks (385FT, 385FTG, 465FT) User Manual
Page 13
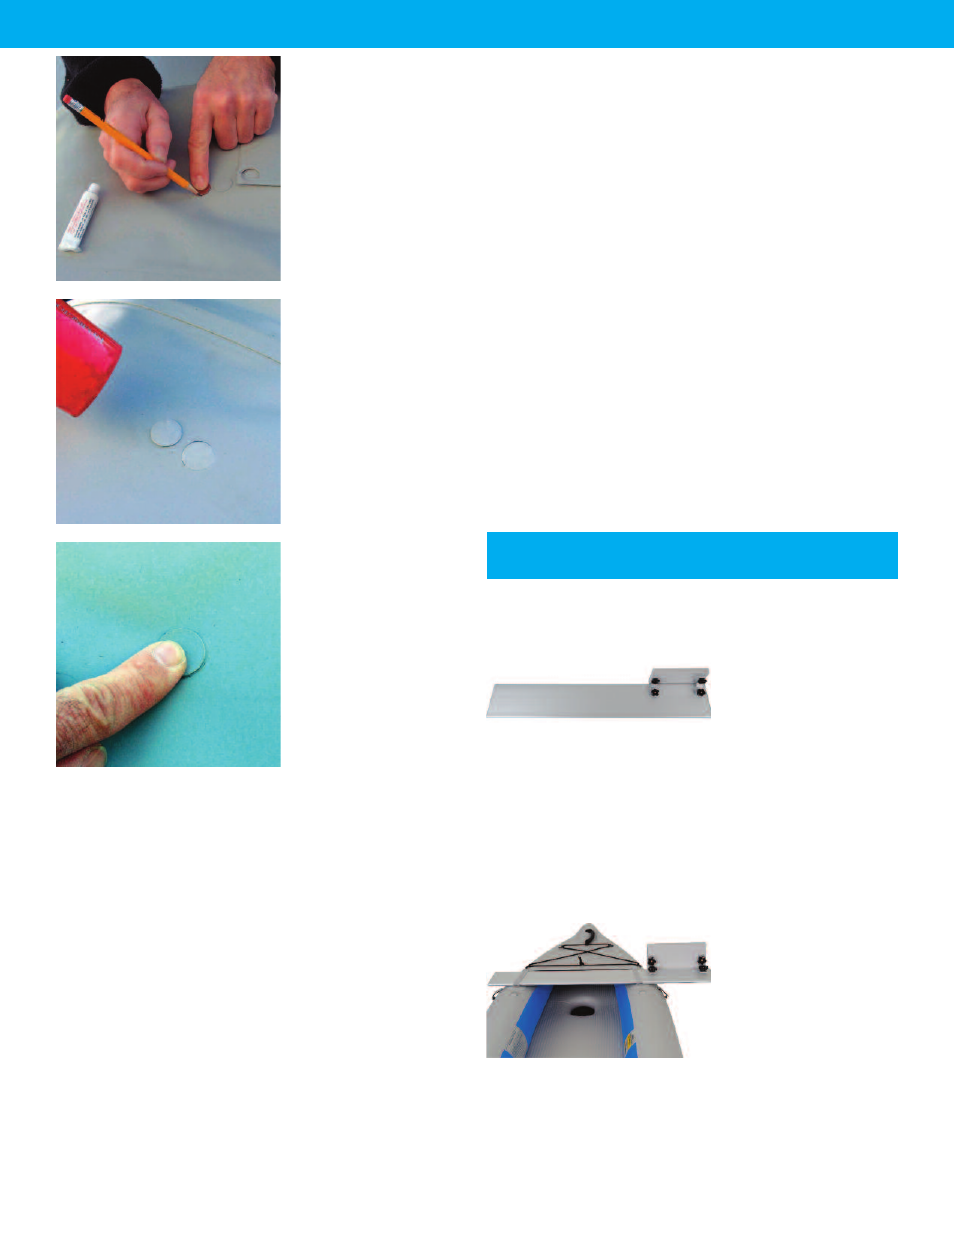
Wait about 5 minutes or
until the surface of the
glue hazes over then
apply the patch. Do not
apply wet glue to wet
glue.
If you have access to
electricity, heat the glue
with a hair dryer then
apply the patch. This
method produces the
best results.
Mate the patch to the
boat and smooth down
until the patch adheres.
Do not inflate, allow at
least 24 hours to cure
before inflating.
Patching Tips:
The the chamber must be deflated or the air will force a
•
path through the glue.
Keep the patch size to a minimum, the bigger the
•
patch, the harder it is to seal. The most common repair
failures occur because the patch is too big.
For repairs larger than a puncture, overlap the damage
•
area by about ½” on each side.
Do not apply the patch while the glue is wet.
•
Covering a leaking patch with another patch rarely
•
fixes the problem. To remove a patch, heat it with a hair
dryer and peel it off.
Never use a heat gun on your boat.
•
Clamps and weights are not needed.
•
For a demonstration of good patching technique, please
view the How to Repair video on the instruction page of our
web site. There is a link at the bottom of every page at
SeaEagle.com or type “instructions” into the search box.
Warped Skeg or Skeg Base
If the skeg is bent from storage or use, heat it up with a hair
dryer and bend it back into shape. It will hold it’s shape
after it cools. The same can be done with the skeg base. If
not folded properly, the base can get warped in storage.
Never hammer the skeg into a warped base as it will break
the skeg.
Leaking Drain Valves
If you suspect the drain valves are leaking they can be
tested by pouring some water in the boat and checking
under the boat for water dripping from the valves.
Flush any sand or debris from the threads. Check where
the caps screw into the floor that the O-rings are smooth
and without dents.
If you see a dent in an O-ring, heat it up with a hair dryer,
and the dent will ease out and return to its original shape.
This also works if the base is bent or misshapen.
Kayak Motormount
(OPTIONAL)
The motormount kit in-
cludes an aluminum
board, brackets and the
wooden motormount.
Simply install the motor-
mount to the aluminum
board using the brack-
ets, and align them with
the pre-drilled holes on
the aluminum boad.
Next, insert the board
through the D-Ring han-
dles on the back of your
kayak. You may find
that this is easier to do
when your kayak is fully
inflated. Push the motor
mount over until the
bracket meets the D-
ring handle.
12
REPAIRS (continued)
OPTIONAL ACCESSORIES