Dynex DX-DPF9 User Manual
Page 2
2
Contents
Dynex DX-DPF9
9” Digital Picture Frame
Contents
Introduction . . . . . . . . . . . . . . . . . . . . . . . . . . . . . . 2
Safety information . . . . . . . . . . . . . . . . . . . . . . . . . 2
Features . . . . . . . . . . . . . . . . . . . . . . . . . . . . . . . . 2
Setting up your digital picture frame . . . . . . . . . . . 3
Using your digital picture frame. . . . . . . . . . . . . . . 3
Maintaining your digital picture frame . . . . . . . . . . 4
Troubleshooting . . . . . . . . . . . . . . . . . . . . . . . . . . . 5
Specifications . . . . . . . . . . . . . . . . . . . . . . . . . . . . 5
90 Day Limited Warranty . . . . . . . . . . . . . . . . . . . . 7
Français . . . . . . . . . . . . . . . . . . . . . . . . . 9
Español . . . . . . . . . . . . . . . . . . . . . . . . 15
Introduction
Congratulations on your purchase of a high-quality Dynex product. Your
DX-DPF9 represents the state of the art in digital picture frame design,
and is designed for reliable and trouble-free performance.
Safety information
Always follow these basic safety precautions when using your digital
picture frame. This will reduce the risk of fire, electric shock, and injury.
Warning: To reduce the risk of fire or shock hazard, do not expose the
digital picture frame to rain or moisture.
Warning: To prevent the risk of electric shock, do not remove the cover.
There are no user-serviceable parts inside. Refer all servicing to
qualified personnel.
Power and Power Cord—Protect the power cord. Route power cords
so that they are not likely to be walked on or pinched by items placed on
or against them. Pay particular attention to the point where the cord
attaches to the digital picture frame.
Only use the AC adapter included with the digital picture frame. Using
any other power adapter will void your warranty.
Unplug the power cord from the outlet when the digital picture frame is
not in use.
Placement—To prevent fire or electric shock, do not expose this digital
picture frame to rain or moisture. To prevent it from falling do not place it
on an unstable cart, stand, tripod, bracket or table. Keep it away from
strong magnets, heat sources, direct sunlight, and excessive dust.
Installation—Make sure that the frame is used in accordance with the
instructions and illustrations provided in this manual.
Objects and Liquids—Do not push objects of any kind into the frame
through openings; do not spill or spray liquid of any kind on or into the
frame (this may result in a fire or electric shock). Do not place anything
heavy on the unit. To ensure proper ventilation and proper operation,
never cover or block the slots and openings with a cloth or other
material.
Disassembly—Do not attempt to disassemble the cabinet. There is a
risk of electric shock. Contact qualified service personnel if your frame is
in need of repair.
Cleaning you frame—When cleaning, make sure the frame is
unplugged from the power source. Do not use liquid cleaners or aerosol
cleaners. Use a cloth lightly dampened with water for cleaning the
exterior of the frame only.
Features
The digital picture frame includes these key features:
• A 9” LCD (Liquid Crystal Display) 16:9 aspect ratio display.
• Compatible memory cards include SD, MMC, MS, XD, and CF cards,
as well as USB memory devices.
What's In the Box
• 9” Digital Picture Frame (1)
• AC to DC Power Adapter
• User's Guide
• Remote Control with battery (CR2025)
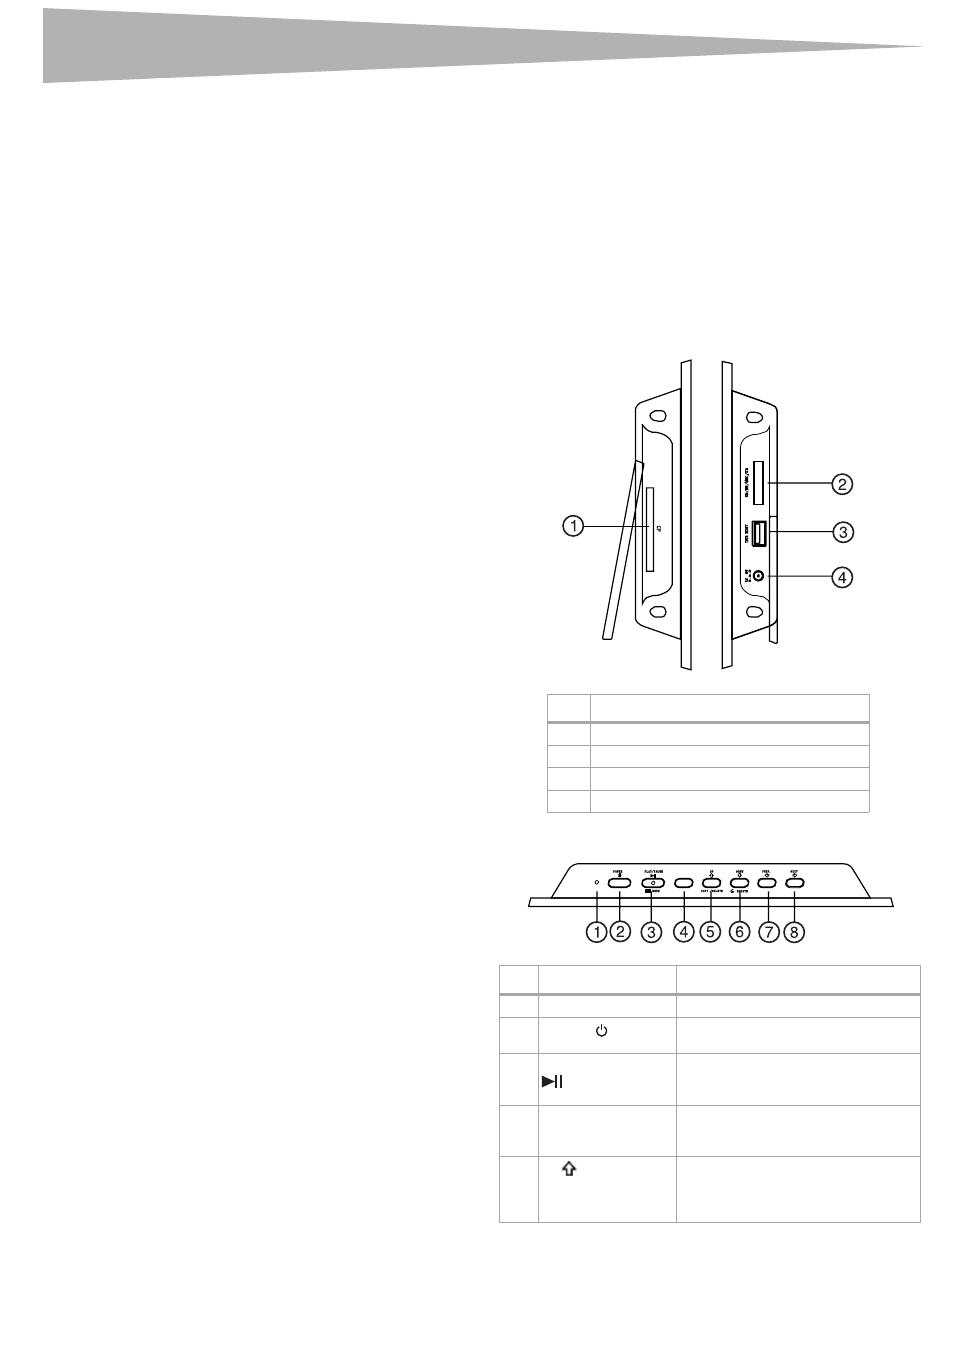
Left and right side view
Top view
#
Description
1
CF card slot
2
SD, MS/MMC, XD card slot
3
USB port
4
DC 9 V port
#
Item
Description
1
Power LED
Lights when the power is on.
2
POWER
button
Press to turn on the frame. Press again
to turn off the frame.
3
PLAY/PAUSE/MODE
button
Press to confirm a selection, pause a
slide show, or change modes (Slide
Show, Browse, Thumbnail).
4
EXIT button
Press to open the Main screen. On the
Main screen, press to enter the card
selection screen.
5
UP /COPY/DELETE
button
Press to navigate the on-screen menus,
to copy a photo, or to delete a photo
(the options are displayed when the
button is pressed).
EXIT