Marantz SR6001 User Manual
Page 58
55
ENGLISH
NAME INPUT OF THE PRESET STATION.
This function allows the name of each preset channel
to be entered using alphanumeric characters.
Before name inputting, you need to store preset
stations with the preset memory operation.
DIGITAL
R
L
VIDEO
S-VIDEO
AUX 1 INPUT
AUDIO
VOLUME
UP
DOWN
STANDBY
PHONES
INPUT SELECTOR
AV SURROUND RECEIVER SR6001
MultEQ
MENU
PURE DIRECT
HT-EQ
7.1CH INPUT
MODE
AUTO
MULTI
A/B
T-MODE
MEMORY
CLEAR
DISPLAY
EXIT
SPEAKERS
BAND
MIC
PURE DIRECT
SURROUND
SPEAKER
MULTI
DSD
POWER ON/STANDBY
ENTER
L
C
R
SL
S
SR
LFE
DIGITAL
SURROUND
V-OFF
DISP
MULTI
AUTO
TUNED
ST
SPKR A B
NIGHT
PEAK
ANALOG
DIGITAL
ATT
SLEEP
SURR
DIRECT
AUTO
DISC 6.1
MT X 6.1
EQ
PCM
AAC
READY
5.
2. 5. 6.
4.
CAT
-
T.DISP
F.DIRECT
PTY
PRESET
+
7
8
9
0
+10
CAT
CAT
TUNING
TUNING
-
-
+
+
HT-EQ
MULTI/
MENU
SPKR A/B
EXIT
INFO
T.TONE
/SET UP
M-SPKR
MUTE
DVD
VCR
DSS
TV
VOLUME
BASS
TREBLE
7.1CH IN
REC
AUDIO
ANGLE
SUB TITLE
DISC+
CH-SEL
V-OFF
ATT.
A/D
CL
ENTER
ENTER
MEMO
MEMO
CH/
CH/
2. 5. 6.
5.
4. 6.
1.
Recall the preset number to be inputted name
with the method described in “Recalling” a
preset station.
2.
Press
the
MEMORY button on the front panel
or press the MEMO button on the remote for
more than 3 seconds.
3.
The left most column of the station name
indicator fl ashes, indicating the character entry
ready status.
4.
When you press the
3 or 4 cursor buttons on
the front panel or the TUNING + or – buttons on
the remote control unit, alphabetic and numeric
characters will be displayed in the following
order:
A → B → C ... Z → 1 → 2 → 3 ..... 0 → – → +
→ / → (Blank) → A
UP
→
→ DOWN
SORTING PRESET STATIONS
DIGITAL
R
L
VIDEO
S-VIDEO
AUX 1 INPUT
AUDIO
VOLUME
UP
DOWN
STANDBY
PHONES
INPUT SELECTOR
AV SURROUND RECEIVER SR6001
MultEQ
ENTER
MENU
PURE DIRECT
HT-EQ
7.1CH INPUT
MODE
AUTO
MULTI
A/B
T-MODE
MEMORY
CLEAR
DISPLAY
EXIT
SPEAKERS
BAND
MIC
PURE DIRECT
SURROUND
SPEAKER
MULTI
DSD
POWER ON/STANDBY
L
C
R
SL
S
SR
LFE
DIGITAL
SURROUND
V-OFF
DISP
MULTI
AUTO
TUNED
ST
SPKR A B
NIGHT
PEAK
ANALOG
DIGITAL
ATT
SLEEP
SURR
DIRECT
AUTO
DISC 6.1
MT X 6.1
EQ
PCM
AAC
READY
If you have stations memorized, and there is a gap in
the sequential order:
I.e. the stations are stored as follows
1)
87.1
MHz
2)
93.1
MHz
3) 94.7 MHz
10)
105.9
MHz
(notice there is no stations programmed for pre sets
for 4-9), you can have pre set 10 become pre set 5:
To sort the numbers, press and hold the MEMORY
and the
4 cursor buttons.
“PRESET SORT” will appear on the display and
sorting will be done.
CLEARING STORED PRESET STATIONS
You can remove preset stations from the memory
using the following procedure.
CAT
P.SCAN
CAT
T.MODE
1
2
3
4
5
6
7
8
9
0
+10
HT-EQ
MULTI/
MENU
SPKR A/B
INFO
CH/
INPUT
M-SPKR
MUTE
EX/ES
VIRTUAL
CS
VOLUME
dts
7.1CH IN
STEREO
NIGHT
M-CH ST
AUTO
A/D
LIP SYNC/
CL
CL
MEMO
MEMO
BAND
2.
3.
DIGITAL
S-VIDEO
AUX 1 IN
VOLUM
DOWN
MultEQ
ENTER
A/B
T-MODE
MEMORY
CLEAR
DISPLAY
EXIT
SPEAKERS
BAND
MIC
AKER
LTI
L
C
R
SL
S
SR
LFE
DIGITAL
SURROUND
V-OFF
D
ST
SPKR A B
NIGHT
PEAK
ANALOG
DIGITAL
ATT
DISC 6.1
MT X 6.1
EQ
PCM
AAC
3.
2.
1.
Recall the preset number to be cleared with
the method described in “Recalling” a preset
station.
2.
Press
the
MEMORY button on the front panel
or press the MEMO button on the remote.
3.
The stored preset number blinks in the display
for 5 seconds. While blinking, press the CLEAR
button on the front panel or press the CL button
on the remote.
4.
“xx CLEAR” appears on the display to indicate
that the specified preset number has been
cleared.
Note:
• To clear all stored preset stations, press and hold the
CLEAR and the ENTER buttons for two seconds.
5.
After selecting the fi rst character to be entered,
press the MEMORY or ENTER button, or press
the MEMO button on the remote.
The entry in this column is fi xed and the next
column starts to fl ash. Fill the next column the
same way.
To move back and forth between the characters,
press the
1 / 2 cursor buttons or press PRESET
+ or – button on the remote.
Note:
• Unused columns should be filled by entering
blanks.
6.
To save the name, press the MEMORY or
ENTER button on the front panel, or press the
MEMO button on the remote for more than 2
seconds.
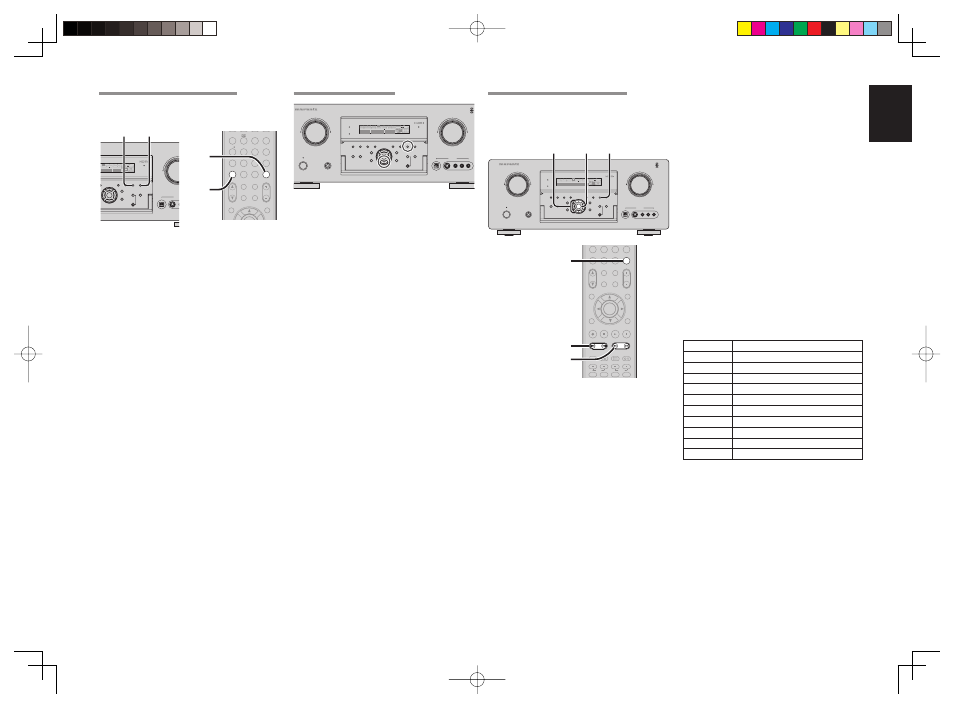
Instead of using the
3 and 4 cursor buttons
or the TUNING + or – buttons of the remote
controller unit to select characters, characters
can be input from the numeric keys of the
remote control unit. See the below table for
a correspondence between characters and
numeric keys.
Ten keypad
Press, press again, press again, etc.
1
A → B → C → 1 → A
2
D → E → F → 2 → D
3
G → H → I → 3 → G
4
J → K → L → 4 → J
5
M → N → O → 5 → M
6
P → Q → R → 6 → P
7
S → T → U → 7 → S
8
V → W → X → 8 → V
9
Y → Z → space → 9 → Y
0
– → + → / → 0
SR6001U DFU_1_ENG 3_4.indd 55
SR6001U DFU_1_ENG 3_4.indd 55
06.12.21 4:15:43 PM
06.12.21 4:15:43 PM