Dometic 630515.336 User Manual
Page 14
620515, 620525, 620526, 630515 & 630516 Installation Instructions
14
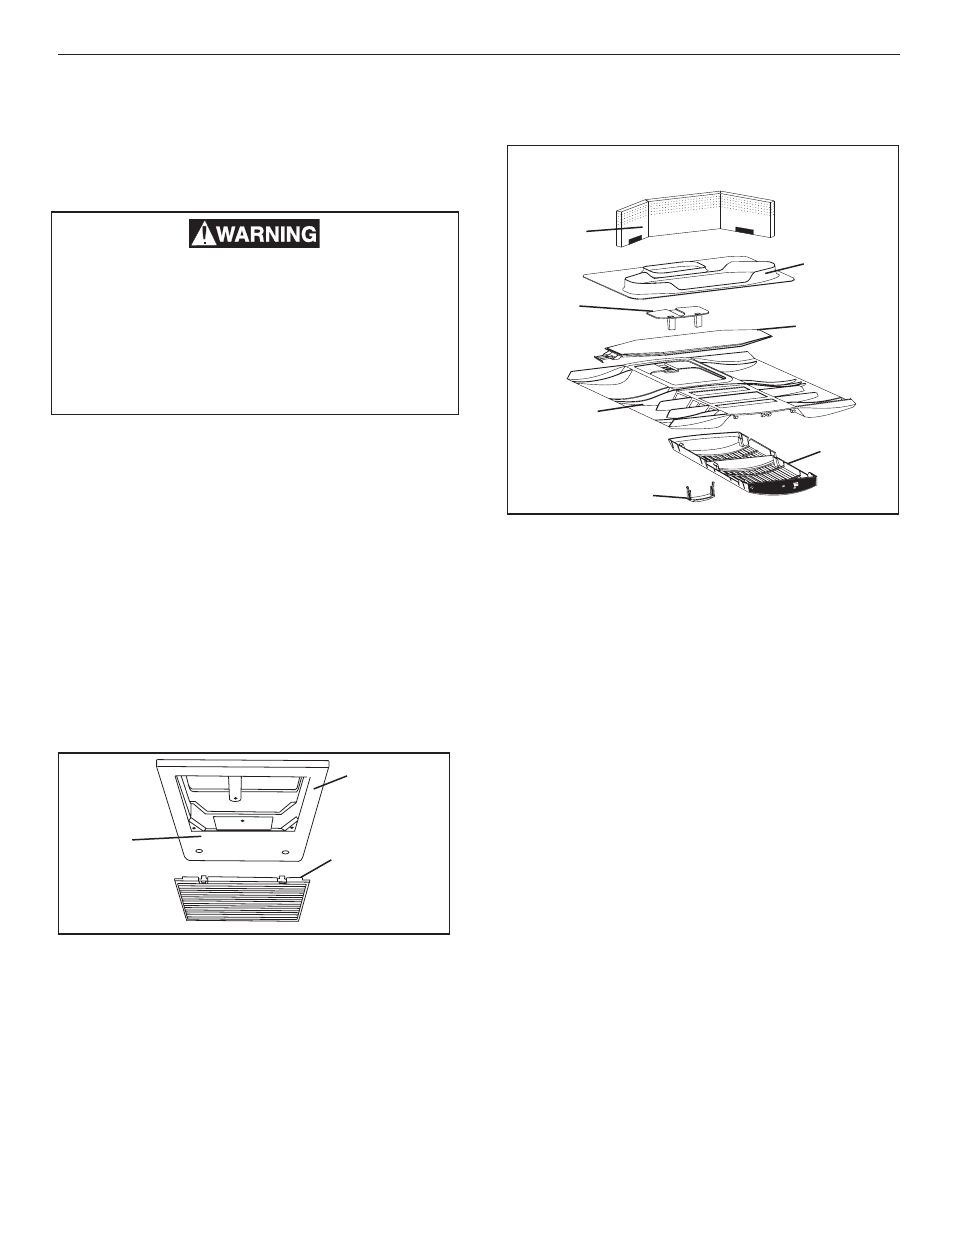
Installing unit with 3308120 Genesis Air Filtra-
tion System Return Air Kit. For 3105007 or
3105935 Return Air Kit, see page 14.
1.
Install the slider in the return air cover and raise it
to the ceiling template. Route the filter indicator
wires from the return air cover through the template
slot leaving about 3” between. Place the front of
the return air cover against the ceiling and slide
towards the rear. The flange on the ceiling tem-
plate will catch in the groove on the return cover.
Adjust the position (right to left) and install the front
two screws. Start and tighten the remaining screws
to hold it in place. Connect together the wires from
the thermostat, unit and filter indicator.
Note:
If solar panel is installed see instructions packaged
with solar panel option.
a.
Connect the red wire from the unit, the red wire
from the filter indicator light with the red DC
positive power lead. See FIG. 21.
b.
Connect the black (-12V) wire from the unit,
the black wire from the filter indicator light with
the black (-12V) power lead.
Note: Number 10 cabinet screw can be used to replace the
two front screws when the ceiling material is hard.
2. Tighten the screws holding the return air cover. Slide
the filter from the right side (looking toward the RV
front) over the wires. Make sure the wires are above
the filter and are out of its way.
3.
Place grill on return air cover and snap in place,
and install decal on end over circuit board.
4.
Place slide handle through slots in grill into the
slide posts. Handle will fit in either direction.
5. This completes the installation of the air conditioner.
We recommend that power be supplied to the air
conditioner and check for proper operation. Refer to
Operating Manual or User’s Guide for a description
of the air conditioner operation.
This product is equipped with a 3-wire
(grounded) system for protection against
shock hazard. Make sure that the appliance is
wired into a properly grounded 120 volt AC
circuit and the polarity is correct. Failure to do
so could result in death, personal injury or
damage to the equipment.
a.
Route power supply line through Romex con-
nector into junction box on side away from the
ceiling template. Tighten connector, being care-
ful not to pinch or short wires.
b.
Connect white to white; black to black; and
green to green or bare copper wire using appro-
priate sized twist connectors.
c. Tape the twist wire connectors to the supply
wire to assure they don't vibrate off.
d. Push the wires into the box.
e. Install the cover onto the junction box.
I.
Installing Decorative Inside Cover
Installing unit with 3105007 or 3105935 Return
Air Cover. For Genesis Air Filtration System
Return Air Kit, see page 14
.
1.
Remove the return air grill from the return air cover.
2.
Place the return air cover up to the ceiling tem-
plate.
3.
Install cover to template with #8 x 3/8” blunt point
Phillips head screws provided (6 required).
4.
Reinstall filter return air grill into return air cover.
Align tabs with mating notches and snap into place
5.
Install two hole plugs into screw holes in back of
return air cover. See FIG. 24.
6.
This completes the installation of the air conditioner.
We recommend that power be supplied to the air
conditioner and check for proper operation. Refer to
Operating Manual or Users Guide for a description
of the air conditioner operation.
Micro-Therm Filter System
Micro-Therm Filter System
FILTER
RESET
FILTER
RESET
CLEAN
FILTE
R
CLEAN
FILTER
Return Air
Cover
FIG. 25
Grill
Foam
Divider
Ceiling
Template
Slider
Filter
Handle
Genesis Air Filtration System
Return Air Kit
FIG. 24
Return Air
Cover
Hole
Plugs
Return
Air Grill