Flowserve Desuperheaters User Manual
Page 18
Desuperheaters FCD VLENIM0115-00– 09/11
18
6. Inspect manifold for wear, leaks, or cracks. Replace or repair if necessary.
7. To reassemble nozzle assembly install plug through seat. Install spring and screw on retainer. Set
maximum stroke of plug by screwing retainer until dimensions A and B are met as shown in Figure
12 and Table 5. After maximum stroke is set with retainer, screw on castle nut to lock retainer posi-
tion and reinsert expansion pin through plug. Be careful to retain stroke dimension during castle
nut and expansion pin assembly. On MCX 025 bend washer to lock nut.
8. Install the nozzle assembly onto the nozzle seat retainer with torque values shown in Table 5.
9. Apply tack weld in two places to face of nozzle seat retainer by flats of nozzle assembly seat. The
tack weld should create bumps by the flats to keep nozzle assembly from unscrewing. Care should
be used to not apply weld to nozzle assembly seat. See Figure 13.
10. Install new gaskets in the nozzle housing. Install the nozzle seat retainer with nozzle assembly into
nozzle housing. Install nozzle housing cap flange and cap flange bolting. Torque cap flange bolting
to values listed in Table 6.
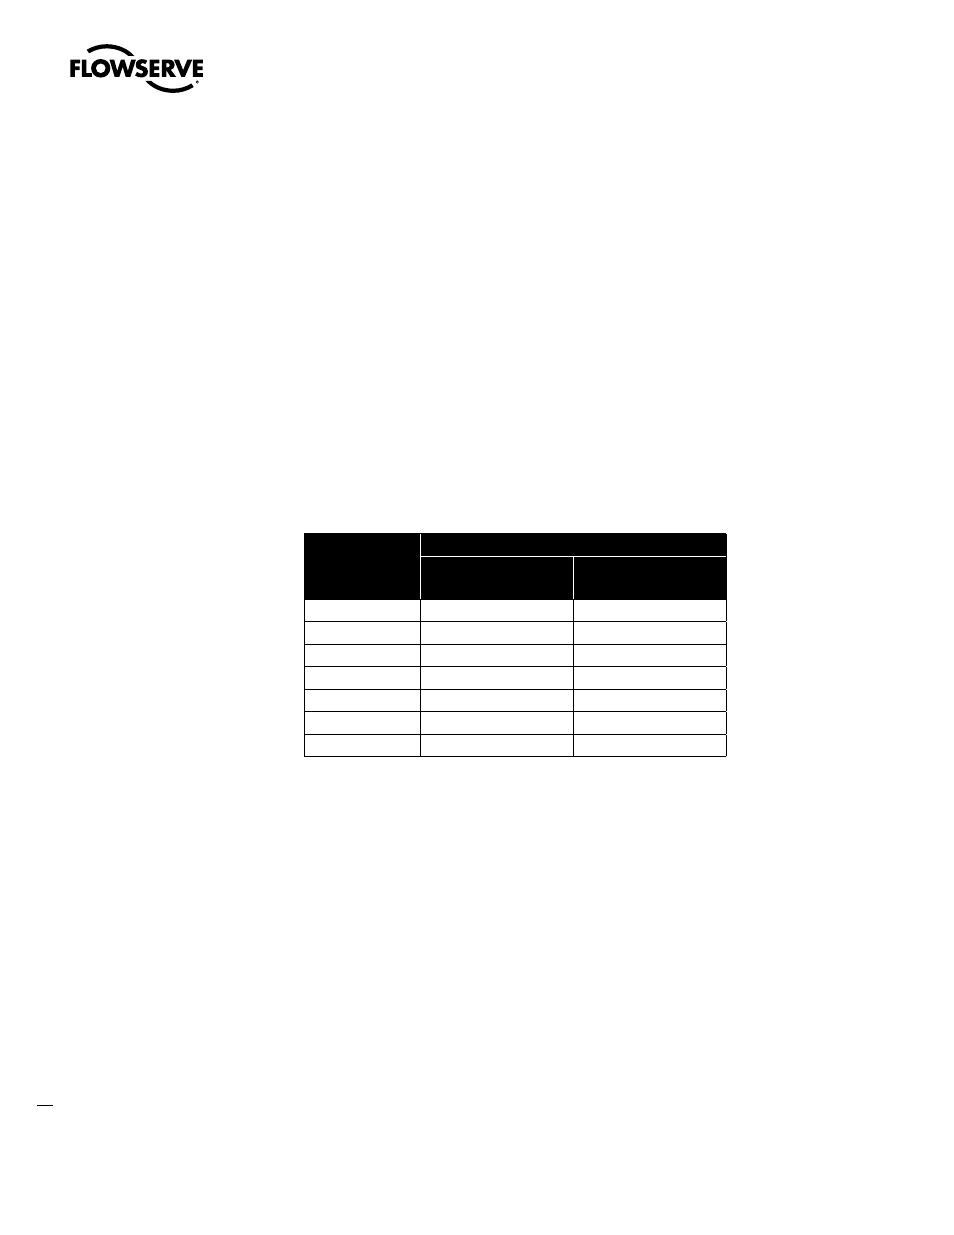
Table 6: Suggested Cap Flange Bolting Torque Values
Bolt Size (in)
Bolt/Stud Material
Carbon Steel or Cr-Mo
(ft-lbs / Nm, ± 10%)
Stainless Steel
(ft-lbs / Nm, ± 10%)
3/8
16 / 22
10 / 14
7/16
26 / 35
16 / 22
1/2
40 / 54
25 / 34
5/8
80 / 108
50 / 68
3/4
140 / 190
90 / 122
7/8
230 / 312
150 / 203
1
350 / 475
220 / 298
VaporCool MicroNozzle
Follow steps 1-10 and refer to Figures 2, 3, and 8 to clean or replace the VaporCool MicroNozzle
desuperheater.
1. Depressurize the steam and cooling water lines. Drain the cooling water line. Remove cap flange
bolting from nozzle housing and remove nozzle housing cap flange. Remove nozzle seat retainer
with nozzle. Remove gaskets.
2. Carefully grind off the tack weld between the nozzle and the nozzle seat retainer.
3. Unscrew the nozzle off of the nozzle seat retainer. With a straight screwdriver, unscrew the orifice
insert inside the nozzle.
4. If cleaning is required: With compressed air blow out the passageways of the nozzle and orifice
insert. Inspect each part for contamination, blockage, and wear. If necessary replace with new
nozzle. Reassemble orifice insert into nozzle and securely tighten with a screwdriver.
5. If different capacity nozzles are required: Obtain the new nozzles from the Flowserve factory.