Dexaplan TA 603 User Manual
Door alarm ta 603, Area of use, Pack contents
Area of use
The door alarm is designed to monitor closed doors and emits an
acoustic signal when the door is opened.
It is installed inside the house and is suitable for doors opening to the
right or the left.
The door alarm is switched on and off with a key.
2 different operating modes can be selected with a function switch:
-
“Immediate alarm” mode (when house is occupied)
-
“Delayed alarm” mode (when house is unoccupied)
This allows you enough time to leave or enter your home with-
out triggering the alarm. The alarm emits a loud signal.
Pack contents
1 x Door alarm
1 x Magnet
2 x Switching keys
1 x Fixing material
1 x Operating instructions
1 x Drilling template
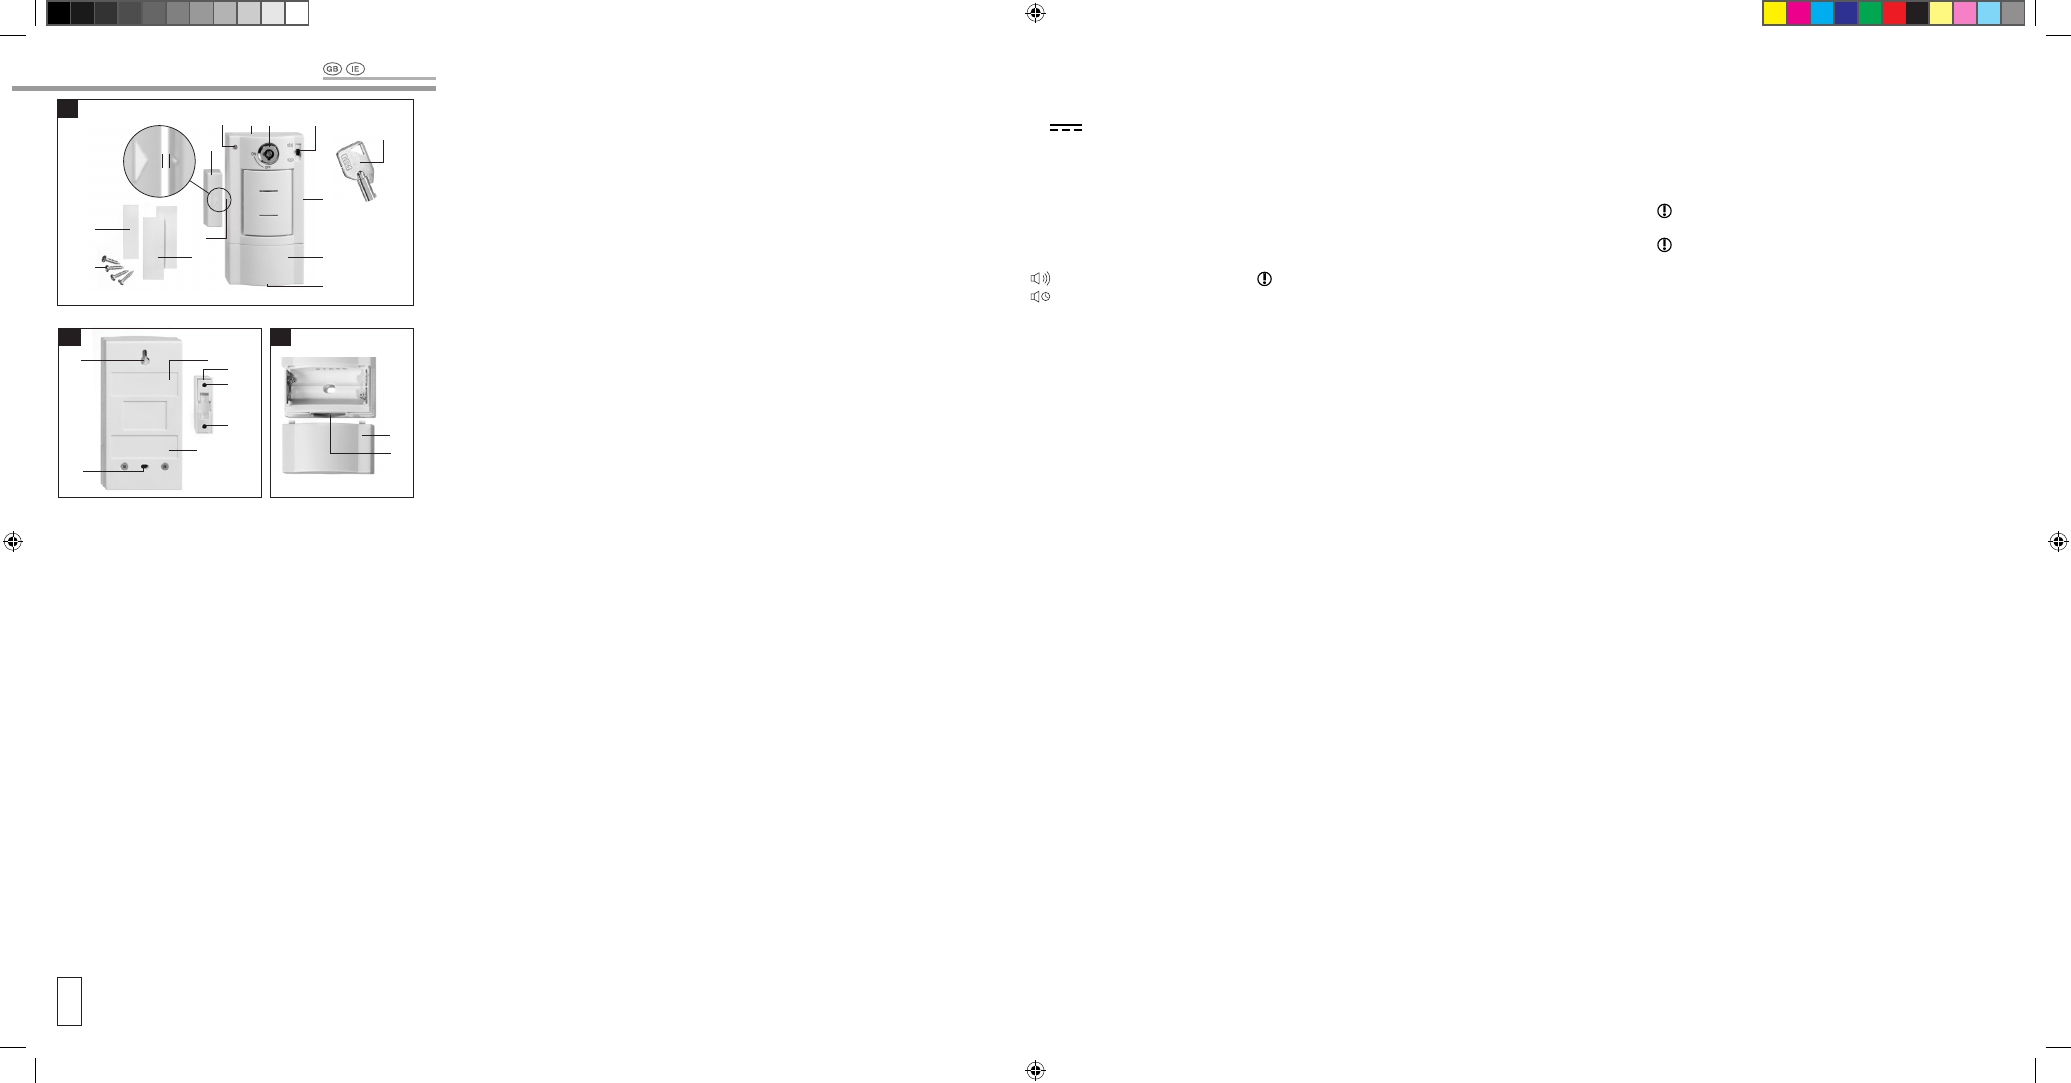
Description
On the front of the casing (see Fig. A)
Q
Door alarm
W
Switching lock
E
Function switch
R
Switching key
T
Marking showing right-hand magnetic switch
Y
Battery compartment cover
U
Fastening screw for the battery compartment cover
I
Marking showing left-hand magnetic switch
O
Magnet
P
Light-emitting diode (LED)
On the rear of the casing (see Fig. B)
{
Upper mounting surface
}
Lower mounting surface
q
Upper screw mounting
w
Lower screw mounting
On the rear of the magnet casing (see Fig. B)
e
Base plate
r
Screw mounting
t
Screw mounting
Fastening material
y
Adhesive tape 2x
u
Fixing screws 4x
i
Adhesive tape 1x
Technical data
Operating voltage:
3 V
DC
Current consumption:
max. 200 mA
Power supply:
2 x batteries of type LR03 –
1.5 V (AAA)
Sensors:
2 x magnetic switches in the side
areas of the device casing
Switching distance:
approx.15 mm
Alarm signal sound level:
approx. 95 dB(A) at 1 meter distance
Alarm duration:
max. 90 sec
Operating modes:
(immediate alarm)
(delayed alarm)
Casing material:
ABS plastic
Dimensions of door alarm casing: 54 x 104 x 26 mm (wxhxd)
Dimensions of magnet casing: 12 x 40 x 13 mm (wxhxd)
Safety instructions
The following instructions are provided for your safety and satisfaction
when the device is in operation. Please remember that failure to follow
these safety instructions can lead to significant risk of accident.
To avoid mortal danger and personal injury:
•
Warning! Danger of suffocation! Never leave small children
with packing materials or small parts without supervision.
•
Danger of electric shock! Always ensure that the device is kept
away from dampness and is never submerged under water!
•
Warning! Danger of explosion! Never bring the device close to
fire, heat or long exposure to temperatures over 50 °C!
• Always ensure that the batteries are not short-circuited or thrown
into fire. The batteries must also never be recharged.
•
Warning! Take care to prevent all damage to pipes and connections
for gas, electricity, water or telecommunications. Damage to gas
pipes can lead to explosion and risk to life and limb. Damage to
electrical connections can lead to mortal danger from electric shock.
Damaged water pipes can result in material damage from leaked
water. To identify any such damage use suitable detectors or con-
sult a specialist.
•
Warning! The alarm signal is very loud! Avoid operating the
device close to ears and do not expose yourself to the loud alarm
signal over a longer period, as this could lead to serious damage
to your hearing!
• Never have the device operate close to sick or handicapped peo-
ple or animals! The state of shock resulting from the loud alarm
signal could cause mortal danger and risk of injury!
•
Warning! Danger of chemical burns! Leaking or damaged bat-
teries can cause acid burns if they come in contact with skin.
Therefore always use suitable protective gloves when handling.
To avoid material damage:
• Use the device only with batteries LR03 1.5 V (AAA) batteries!
• Always ensure the correct + and - alignment when inserting the
batteries.
• Protect the device against strong magnetic or electrical fields!
• Before assembling and starting the device, always check the
delivery for damage and completeness!
• Make sure no glass or mirror surfaces of the door leaf are dam-
aged during assembly!
• Remove the batteries when the device is not in use over a longer
period.
• Use always new and never used batteries.
• If the alarm device is faulty, always have it repaired only by
authorised specialists!
Tip: Test the function of the door alarm at the planned assembly
location before final assembly.
Positioning
You can fit the door alarm for use on doors with the stop on the left or right.
Affix the device with the adhesive tape or fastening screws. The efficiency
of the magnet may be reduced on metallic doors. In this case reduce the
distance between the magnet and the door alarm to below 10 mm.
You will need a pen with removable ink to mark the mounting points.
o Place the magnet O vertically at a level of approx. 150 cm on the
door frame, directly next to the edge of the door leaf.
o Make sure that the arrow symbol on the magnet is pointing to-
wards the door leaf (see also Fig. A).
o Make sure that the magnet does not touch the door leaf.
o Mark the outline of the magnet casing on the door frame.
o Close the door completely.
o Place the door alarm at a max. 10 mm distance from the magnet on
the edge of the door leaf.
o Make sure that the marking on the magnetic sensor T or I is
directly next to the arrow symbol on the magnet (see also Fig. A).
o Make sure that the door alarm does not touch the magnet.
o Mark the outlines of the casing of the door alarm on the door leaf.
Assembly with adhesive strip
Use the adhesive tape y + i to affix the door alarm and the magnet
to e.g. glass and plastic doors.
Assembly of the door alarm
o Remove the protective film from one side of the adhesive tape.
o Stick the adhesive tape y flush and fully onto the mounting surfaces
of the door alarm casing { + }.
o Remove the protective film from the other side of the adhesive tape.
o Affix the door alarm at the marked position on the door leaf.
o Remove the marked outline of the casing.
Assembly of the magnet
o Remove the protective film from one side of the adhesive tape i.
o Stick the adhesive tape flush and fully onto the base plate e of
the magnet.
o Remove the protective film from the other side of the adhesive tape.
o Affix the magnet at the marked position on the door frame with
the arrow pointing at the door alarm.
o Remove the marked outline of the casing.
Assembly with fastening screws
Tip: you will need a crosstip screwdriver for inserting/removing
screws and a slotted screwdriver for levering work.
Tip: A drilling template is enclosed with the original packing.
Use the fastening screws u to affix the door alarm and the magnet to
e.g. wooden doors. Holes are provided on the back of the door alarm
casing for screw mounting q + w. These holes must be marked in-
side the marking of the outline of the casing.
Assembly of the door alarm
o Release the fastening screw U for the battery compartment cover Y
in anticlockwise direction.
o Remove the battery compartment cover from the casing of the
door alarm and take out the batteries.
o Mark the holes inside the marking on the door leaf.
o Screw one fastening screw approx. 9 mm into the door leaf at the
position marking the hole for the upper screw mounting q.
o Mount the door alarm on the head of the upper fastening screw
through the hole for the upper screw mounting.
o Screw a fastening screw approx. 9 mm into the door leaf through
the lower screw mounting hole w.
o Replace the batteries.
o Fasten the battery compartment cover on the door alarm casing.
o Tighten the fastening screw on the battery compartment cover in
clockwise direction.
o Remove the marked outline of the casing.
Assembly of the magnet
The holes for screw mounting r + t are located on the underside of
the magnet casing. These holes must be marked inside the marking of
the outline of the casing.
o Lever the base plate e carefully out of the magnet casing.
o Mark the holes inside the marking on the door frame.
o Screw one fastening screw approx. 9 mm into the door frame through
each hole for screw mounting r + t of the base plate.
o Make sure that the base plate is screwed flush onto the door frame.
o Press the casing of the magnet completely onto the base plate.
o Remove the marked outline of the casing.
Initial operation
Inserting the batteries
o Before inserting the batteries make sure that the alarm function is
deactivated.
o Insert the switching key R into the switching lock W and turn it
to OFF position.
o Pull the switching key out of the switching lock. The arrow marking
points to the OFF position. The door alarm is switched off.
Door alarm TA 603
Dexaplan
A
Q W
E
R
T
Y
U
I
O
P
y
i
u
max. 10 mm
C
Y
U
B
{
r
}
w
q
t
e
Operating and safety instructions
Introduction
Please read these operating instructions thoroughly and carefully. They
are part of this product and contain important instructions relating to
its operation and handling.
Please always observe all safety instructions. Before initial operation,
please check that all parts are fitted correctly. Please contact your
service centre if you have any questions or are uncertain regarding
correct handling of the device. Keep these instructions in a safe place
and provide them to any third party who may require the information.
Proper use
This door alarm is suitable for monitoring doors. The device is designed ex-
clusively for operation in dry, enclosed spaces in private households. This
product is only licensed for operation with two batteries of type LR03 – 1.5
Volt (AAA). Any other use or modification of the device constitutes improper
use and poses a serious risk of accident. The manufacturer is not liable for
damage caused by improper use or incorrect operation of the device.
T
82
KOE362_T82_GB.indd 1-5
25.10.2006 13:27:20 Uhr