Code reader 2.0 - cabled, Quickstart guide, Cr2 accessories – Code CR2 Cabled Quick Start User Manual
Page 2: Reader & handle assembly, Reading tips
Quickstart Guide
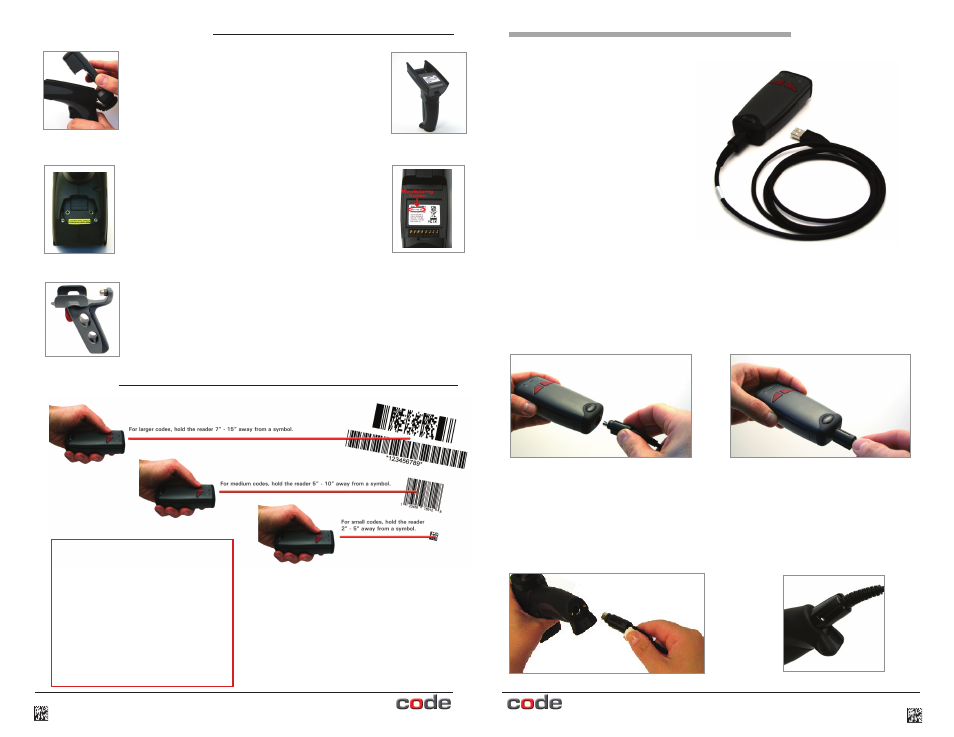
Hand Held CR2 - To install a cable directly to the CR2, correctly line up the 8-pin DIN
connector into the back end of the unit. The arrows on the connector should be facing
down (Figure 1). When the unit and the cable connector are lined up, firmly push the cable
into the reader. The cable has a locking mechanism that will firmly hold the cable in place
(Figure 2). To unattach the cable from the reader, you must pinch the plastic on the 8-pin
DIN and pull back to disengage the connector.
Figure 1
Figure 2
CR2 with Cabled Handle - If a handle was purchased for use with the CR2, the 8-pin
DIN connector is at the bottom of the handle (Figure 3). Insert the 8-pin connector and
firmly push the cable into the handle. The cable has a locking mechanism that will firmly
hold the cable in place. If using the H2 cabled handle, for additional stability, there is an
optional cable attachment clip that can secure the cable to the handle with two threaded
screws (Figure 4).
Figure 3
Figure 4
The Code Reader 2.0 (CR2) is a
Multi-Interface Unit (MIU) and is
available with USB (6 ft. or 12 ft.),
RS-232 and PS/2 cables. All of the
cables are connected to the CR2
with a 8-pin DIN connector.
Code Reader 2.0 - Cabled
C002652_03_CR2_MIU_Cabled_Quickstart
1
Reader & Handle Assembly
H2 Cabled Handle or BH1/BH2 Battery Handle
The CR2 utilizes the battery compartment to ‘snap
to’ the handle. For the H2 (only) push the 8-pin DIN
connector at the end of the reader into the flexible
connector at the end of the handle (Figure 10). For
all three handles, snap the reader onto the handle
matching the battery compartment to the battery
connectors, visible inside the handle (Figure 11).
Figure 10
Figure 12
Note: Readers with a MFG # of 012_05 can be
secured to H2 & BH1/BH2 handles with threaded
screws (Figure 12). To determine the Manufacturing #
of the reader, look at the reader’s battery compartment
and view the MFG # displayed (Figure 13).
H1 Handle
Slide the CR2 into the handle, aligning the 8-pin
DIN connector to the stationary connector pin on the
handle (Figure 14). Push reader and Handle together
firmly until you feel the reader ‘click’ in place.
Reading Tips
Figure 13
CR2 Accessories:
Protective Boot
•
Handles
•
Battery Handles
•
Battery Chargers (single/two bay)
•
Lanyard Hook Attachment
•
Reader Stand
•
Visit www.codecorp.com for
information on all Code readers and
accessories.
Figure 11
Figure 14
4
C002652_03_CR2_MIU_Cabled_Quickstart