Assembly – Brinly PA-40 BH Plug Aerator User Manual
Page 8
L-1762 Rev. E
8
5
10
12
15
13
12
26
26
26
26
9
15
13
28
15
20
24
(20)
Hex Head Bolt, 5/16" x 3/4"
Qty. 24 for PA-40 BH
Qty. 32 for PA-48 BH
(15)
Nylon Bearing, 3/4" I.D.
Qty. 6 for PA-40 BH
Qty. 8 for PA-48 BH
(28)
Lock Nut, 5/16"
Qty. 24 for PA-40 BH
Qty. 32 for PA-48 BH
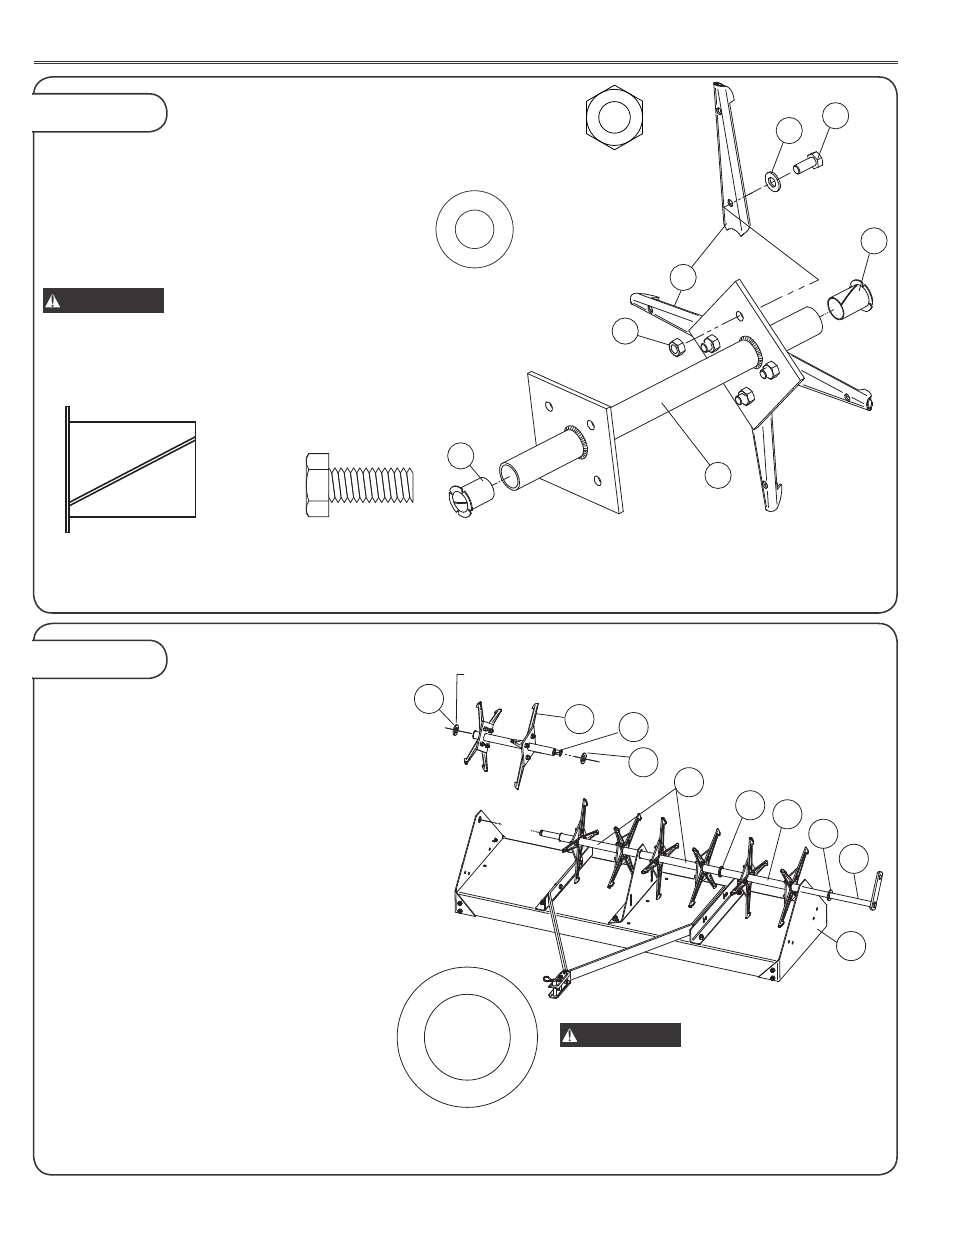
5a. Assemble Plugging Spoons (9) to each
welded plate (side opposite welds) of all the Tube
Assemblies (12 and 13) as shown. For PA-48H,
pre-assemble Hex Bolts (20) and Flat Washers
(24). NOTE: PA-40BH does not use Flat Washers.
Install the Bolt (and Washer Assemblies) through
Plugging Spoons and secure with Lock Nuts (28).
IMPORTANT
Rounded part of spoon fits
against the tube to lock in place.
5b. Insert a Nylon Bearing (15) into each end of
the tube assemblies.
6a. The End Tube Assemblies (12) have one
plate approximately 1-1/8" from the end of the
tube. The Center Tube Assemblies (13) have
each plate approximately 2-3/4" from the end of
the tube.
6b. Place a Machinery Bushing (26) over Axle
Assembly (10). Insert Axle Assembly through
Right Side Plate and install in the following order:
End Tube Assembly (12) with short hub end
•
next to side plate.
Machinery Bushing (26).
•
Center Tube Assembly (13).
•
For PA-48 BH only:
Center Plate (33) and then another Center
•
Tube Assembly (13).
For all models:
Machinery Bushing (26).
•
End Tube Assembly (12) with short hub end
•
next to side plate.
One or more Machinery Bushings (26) as
•
required to eliminate any side play in axle
assembly.
One or more Machinery Bushings as required to
eliminate any side play in axle assembly.
Figure 5
Figure 6
TUBE ASSEMBLY
TINE ASSEMBLY
ASSEMBLY
(24)
Flat Washer, 5/16"
Qty. 32 used on
PA-48 BH ONLY!
(26)
Machinery Bushing, 3/4"
Qty. 6
Make sure Nylon Bearings
(15) are inside Tube
Assemblies (Installed in Step 5b)
IMPORTANT