Installation, Facing detail, For qualified installers only) travis industries – Avalon Firestyles DVL Fireplace EF-2003 to 2007 User Manual
Page 12
1 2
Installation
(for qualified installers only)
Travis Industries
4041206
1 0 0 - 0 1 1 4 7
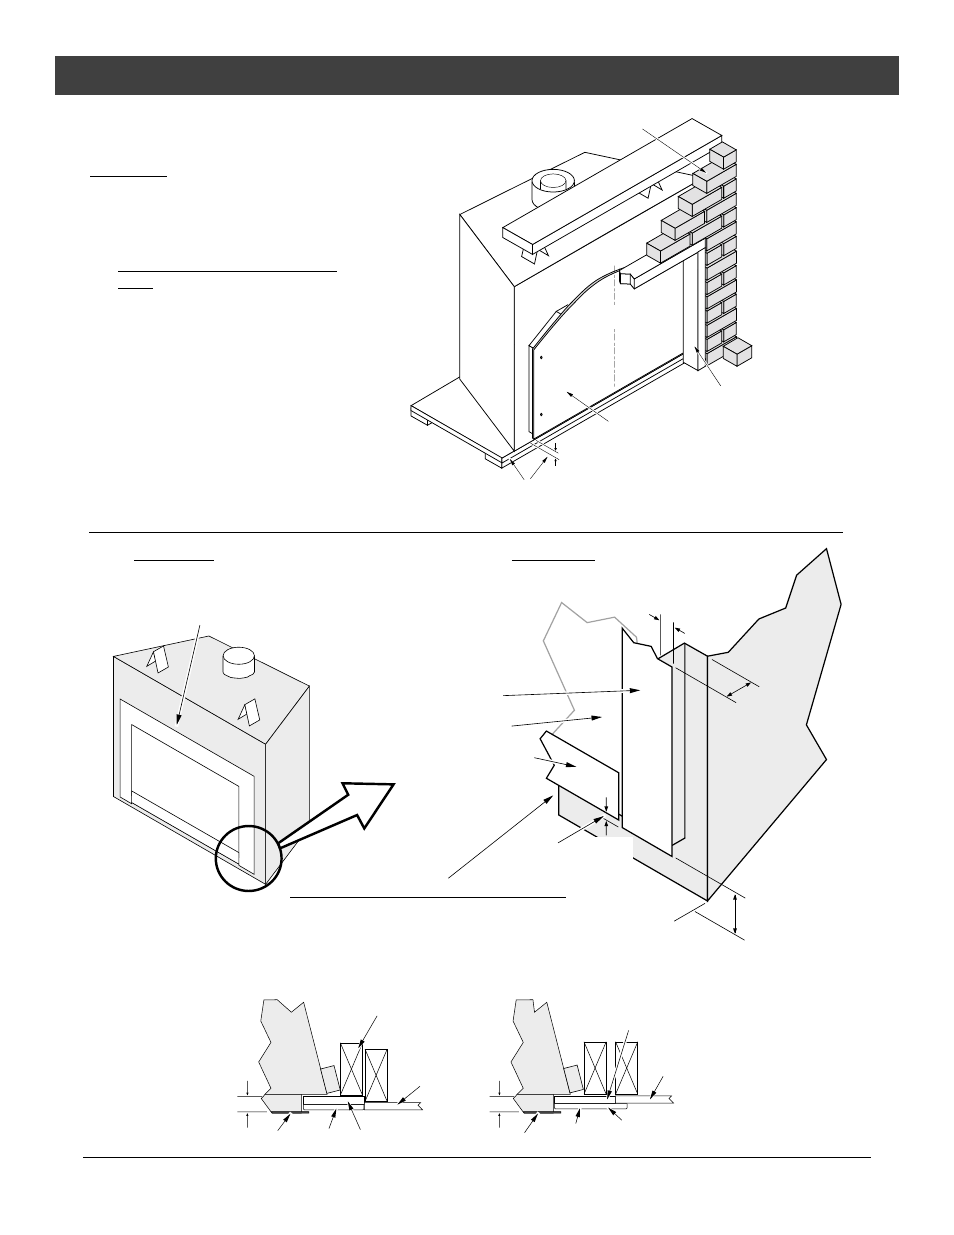
Facing Over 1" Thick
W A R N I N G
:
Faces that attach with latch-hooks
(Avalon Rosario, Avalon Cambridge,
Avalon Salish Bay, Avalon Rawhide,
Lopi Discovery, Lopi Heritage Bay, FPX
Architectural Faces (all styles),
require a 5/8” gap above the
f a c e
for face installation and removal.
•
If the facing material is over 1" thick
(e.g. brick, river rock), install the facing
around the perimeter of the face. You
may wish to make a facing support (see
the illustration to the right). If using an
arch face, you may wish to order the
optional set-up face:
34 Arch Set-Up Face is available from
Travis Industries (Part # 98500694)
•
Artisan faces vary in size. Use the face
being installed to create a template.
Rectangular Faces
Make a facing support using 2x4’s. It
should be 1/8” larger than the finished
face. NOTE: The bottom of the face is
1” above the base of the fireplace.
1”
Note: if using a brick hearth, the fireplace will need to be raised to accommodate the 1” gap betwen the
face and the base of the fireplace. For 2-1/2” thick brick this works out to approximately 1-1/2”.
The brick facing must meet the same requirements
listed in “Facing Requirements”
Center
Line
Arch Faces
Use the optional
Arch Set-Up Face
available from Travis
Industries.
Facing Detail
Access Door
1"
Face
1"
Glass
Air Space
Do not tuck facing under the faceplate on the bottom The
3/8"
(approx.) gap below the access door is required for the door to open. You
may tuck facing under the sides and top, but not on the bottom.
SIDE OVERLAP: To calculate the side overlap,
subtract 32-7/8" from the face (see "Face
Dimensions" on page 13) width and divide by 2.
TOP OVERLAP: To calculate the top overlap,
subtract 25-3/8 from the face height (see "Face
Dimensions" on page 13) - for arched faces, see
the "Dimensions" on page 6 for other details.
Approx.
3/8"
•
To achieve a facing that is flush with the drywall to the side of the fireplace, recess the framing directly
next to the fireplace. See the illustration below.
Fireplace
1"
1/2" Drywall
1/2" Concrete Board
3/8" Tile
This 2x4 is recessed 3/8"
to make a flush facing
Fireplace
1/2" Drywall
1/2" Concrete Board
3/8" Tile
The tile overlaps the drywall
for an overlap facing
Faceplate
1"
TOP
VIEW
Faceplate