Aervoe 30-Watt Solar Collector User Manual
Aervoe Equipment
Sierra Wave™ 30-Watt Solar Collector #9530
IMPORTANT SAFEGUARDS
Read all instructions before operating and keep for reference. Only use as directed.
•
To reduce the risk of electric shock, do not submerge the unit or its accessories in any
•
liquid
Do not operate in wet environments
•
Protect solar panels from scratching. Do not place other objects on top of panels to
•
avoid damage.
Do not use abrasive cleaning products to clean solar panels
•
Store in a clean dry place when not in use
•
When using the 7A Charge Controller, follow instructions carefully to avoid personal
•
injury and explosion or other damage to batteries, the solar panel, or Charge Controller
Not intended for use by children. Administer close supervision when children are nearby
•
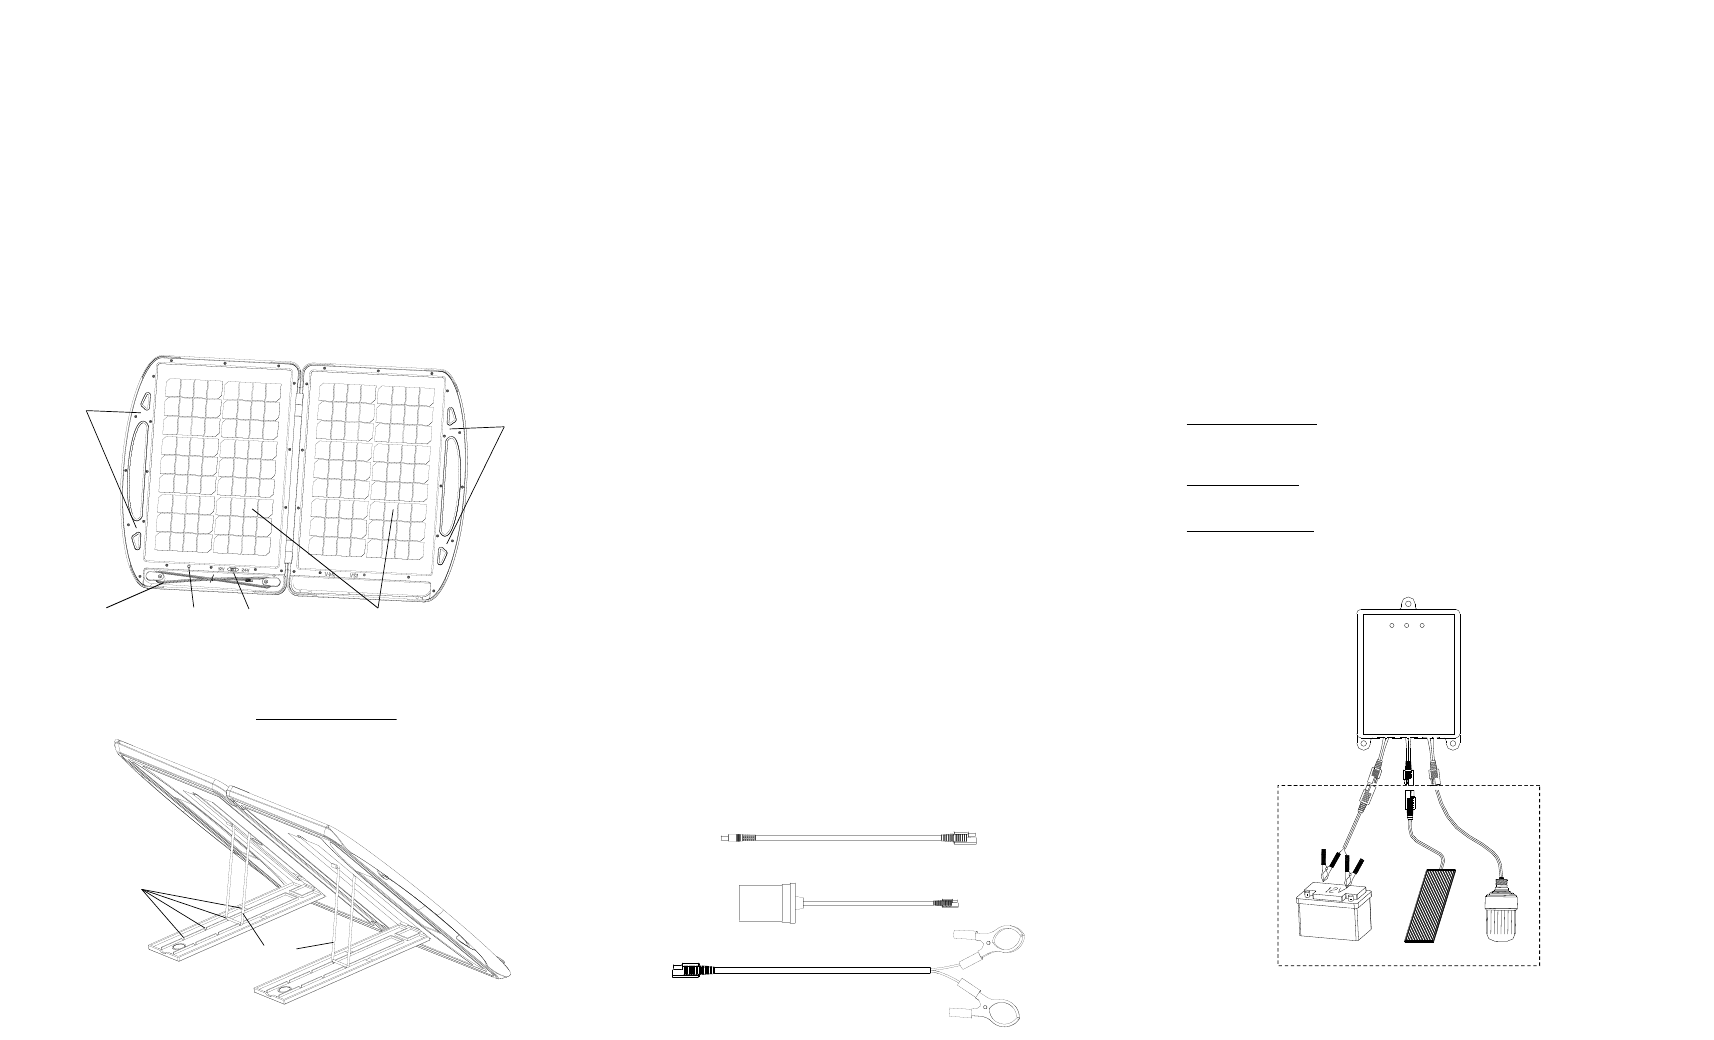
PARTS IDENTIFICATION
SOlAR COllECTION & ChARGING
This 30-Watt Solar Collector includes accessories to allow a direct solar charge to a variety of
rechargeable devices including tools, worklights, laptops, and other more sophisticated battery
centers such as the Max Burton® Power Center
100
#6994 and Sierra Wave™ Power Cell #7630.
In many cases you will need your specific device’s 12V DC charging adapter (vehicle charger).
Using the included 7A Charge Controller allows you to trickle charge vehicle batteries for cars,
trucks, RVs, boats, and motorcycles. The optional Chainable Cable #9501 connects up to three
30-Watt Solar Collectors to create 90 watts of power (sold separately).
Solar Collector Set-Up:
Unfold the solar collector by opening the hard case.
1.
Release the
2.
ADjUSTABle kICk STAND supports from the back and adjust the angle of
the support so that the SOlAR PANelS are facing the sun with maximum exposure.
Adjustment will be required throughout the day as the sun travels across the sky.
Move the
3.
ON/OFF SWITCh to the ON position. A blue leD POWeR INDICATOR will flash
to indicate when the solar panels are detecting solar energy. NOTe: it does not indicate
sunlight intensity.
Unwind the
4.
DC OUT CABle on the collector to the desired length to reach your charging
device.
Choose an accessory cable or adapter to match the specific device you wish to charge (see
5.
below).
Insure all connectors are secured tightly.
6.
Charging a Max Burton® Power Center
100
#6994 (sold separately):
Read all instructions included with the Power Center.
1.
Connect the included
2.
POWeR CeNTeR ADAPTeR CABle to the DC OUT CABle on the Solar
Collector.
Connect the other end to the DC IN #1 port located on the Power Center.
3.
Charging will start when the blue leD on the Solar Collector blinks.
4.
The battery meter on the Power Center will flash to indicate it is receiving a charge.
5.
Stored power in the Power Center may be used at the same time it is collecting solar energy
6.
or can be stored for use later when not connected to the Solar Collector.
Charging the Sierra Wave™ Power Cell #7630 or other small electronic devices (sold
separately):
Read all instructions included with the device you wish to charge.
1.
Connect the included
2.
12V DC FeMAle SOCkeT to the DC OUT CABle on the Solar
Collector.
Connect the other end to your device’s 12V DC charging adapter.
3.
Caution: This Solar
Collector has a high DC output range of 15-20 volts. Using your device’s specific 12V DC
charging adapter will prevent overcharging and battery damage.
Disconnect the Solar Collector when fully charged or not in use.
4.
NOTe: The 7A Charge Controller is not required if the device has built-in charge protection.
Check all devices before connecting for compatibility. If charge protection is not built-in, the
Charge Controller will be required to keep from damaging your device.
7A Charge Controller:
Using the included 7A Charge Controller is necessary when charging 12V batteries to protect
them from over charging, over discharging, and it provides load output control to your device.
Connect the included
1.
BATTeRy ClAMPS to the cable on the Charge Controller labeled as
BATTeRy.
Connect the
2.
BATTeRy ClAMPS to the 12V battery with the (-) negative black clamp to
the battery post marked (-). Then connect the (+) positive red clamp to the battery post
marked (+). WARNING: connecting the clamps to the battery incorrectly can cause
fire, explosion and battery damage.
Connect the cable on the Charge Controller labeled as SOlAR to the
3.
DC OUT CABle on
the Solar Collector.
The Charge Controller and cables should be placed off of the ground to avoid damage
4.
from walk-by traffic. Make sure all cables are securely connected.
If a device (load) is being operated, connect the included
5.
12V FeMAle SOCkeT to
the cable on the Charge Controller labeled as lOAD. NOTe: Verify that your device
is compatible with the Charge Controller’s specifications before connecting to avoid
damage.
Connect the other end to your device’s 12V DC charging adapter and then to your device.
6.
Charge Controller LED Indicators
high Voltage Protection: If the 12V battery reaches a pre-determined high voltage level,
the green high Voltage leD Indicator will illuminate. Solar charging to the battery will
automatically stop until the battery reaches a safe voltage.
Charging In Process: When the Solar Collector is connected, the yellow Charging leD
Indicator will illuminate as long as adequate solar energy is provided.
low Voltage Protection: If the 12V battery reaches a pre-determined low voltage level
the red low Voltage leD Indicator will illuminate. Operation of the load will automatically
stop until the battery reaches a safe voltage.
Adjustable Kick Stand Supports
Angle Adjustment
Notches
Metal
Supports
Magnetic Closure
DC Out
Cable
Solar
Cells
LED Charging
Indicator
Magnetic Closure
ON/OFF
Switch
Power Center Adapter Cable
12V DC Female Socket
Battery Clamps
Load
12V Battery
Solar Panel
Charge
Controller
Low
Voltage
Charging
High
Voltage
Load
Solar
Battery