Aervoe 80-Watt Solar Collector User Manual
Aervoe Equipment
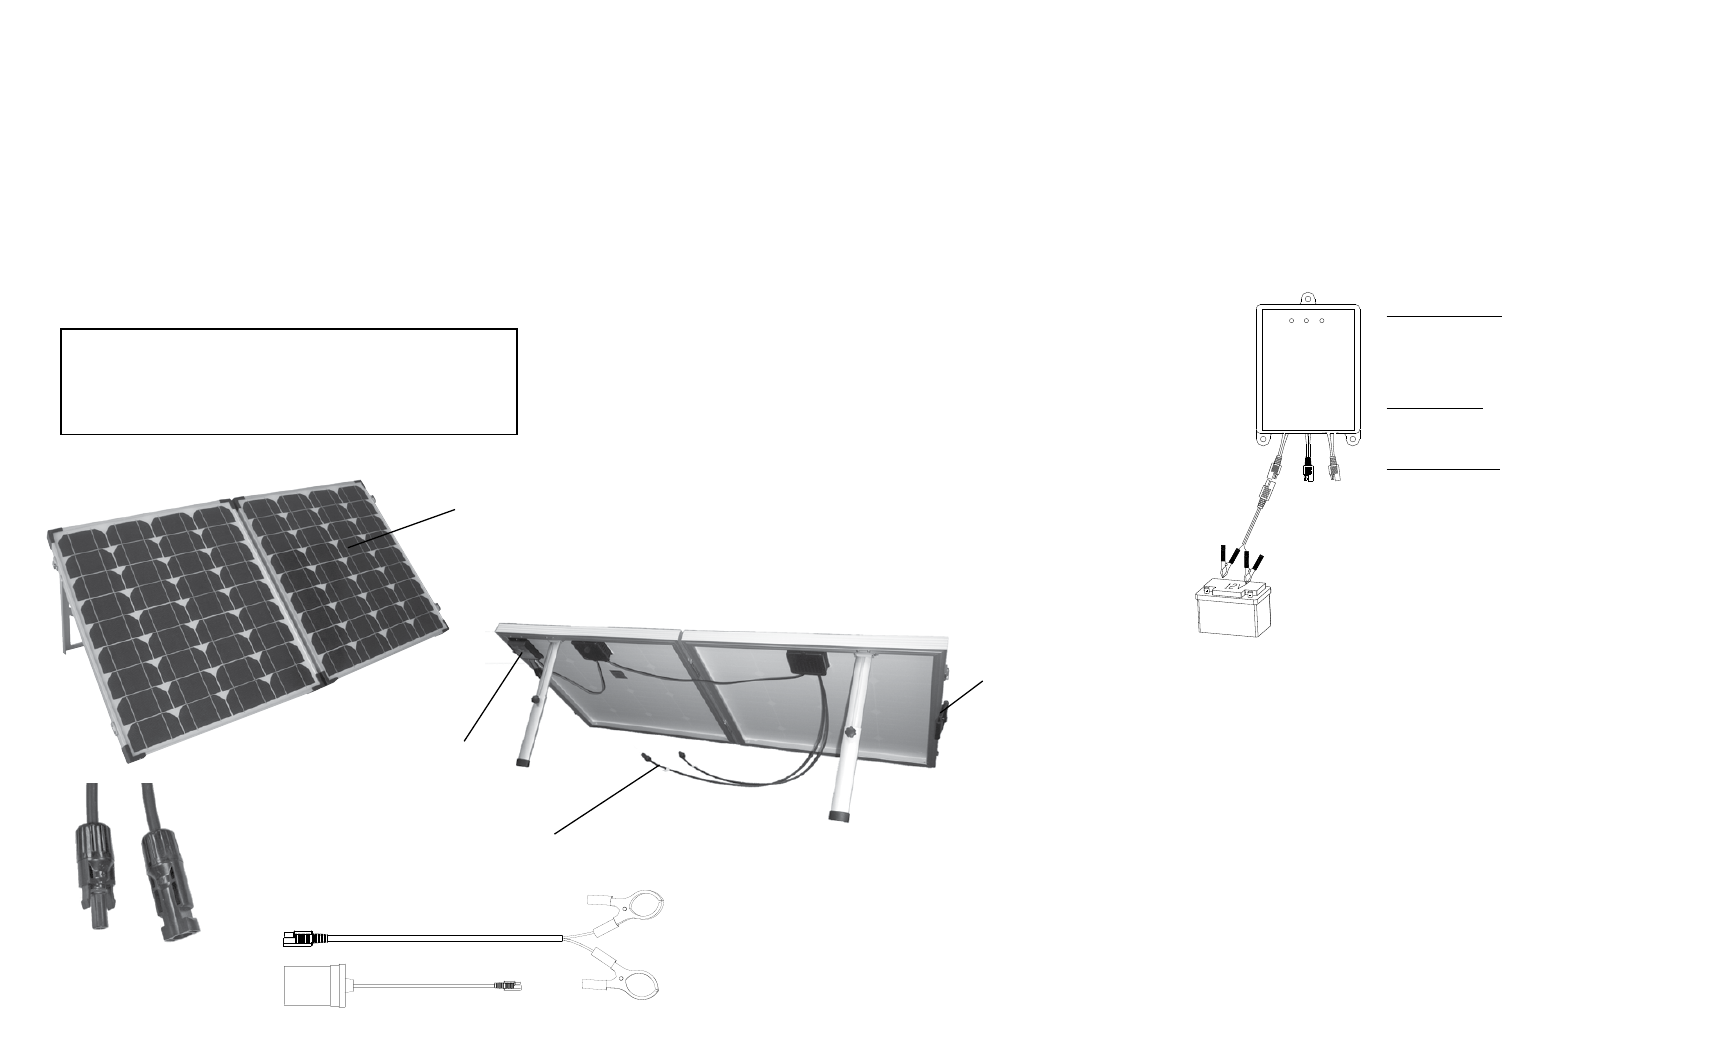
MC4 Power Cable
Charge
Controller
Handles
Sierra Wave® 80-Watt Solar Collector #9580
IMPORTANT SAFEGUARDS
•
Read all instructions before operating and keep for reference. Only use as directed
•
To reduce the risk of electric shock, do not submerge the unit or its accessories in any
liquid.
•
Unit is weather resistant but not waterproof. Bring indoors during heavy rain, snow or
wind. If fixed-mounted, cover it up during heavy rain, snow or wind.
•
To avoid shock do not connect to a power center in wet conditions.
•
Protect solar panels from scratching. Do not place other objects on top of panels to
avoid damage.
•
Do not use abrasive cleaning products to clean solar panels
•
Store in a clean dry place when not in use
•
When using the 7A Charge Controller, follow instructions carefully to avoid personal
injury and explosion or other damage to batteries, the solar panel, or Charge Controller
•
Not intended for use by children. Administer close supervision when children are nearby
PARTS IDENTIFICATION
SOLAR COLLECTION & CHARGING
This portable 80-Watt Solar Collector features high-efficiency monocrystalline solar cells and
includes MC4 cables to quickly connect to many Sierra Wave power centers. Also includes a
built-in 7A solar charge controller with over-charge protection, battery cables to charge 12V
batteries, and a barrel power adapter to charge other portable electronic devices.
Two Solar Collectors may be chained together in parallel for 160-watts of power using #9502
Chainable Connector.
Solar Collector Set-Up:
1.
Unfold the Solar Collector by opening the side latches.
2.
Adjust the height of the KICK STAND SUPPORTS on the back so that the SOLAR PANELS
are directly facing the sun with maximum exposure. Adjustment will be required throughout
the day as the sun travels across the sky. Obstructions from trees and buildings will affect
efficiency.
Charging a Power Center (sold separately):
We recommend the #9675 1000-Watt Energy Center, #9680 1500-Watt Energy Center or #9690
1500-Watt Incremental Energy Center as a storage device (Power Center) for collected power.
Read all instructions included with the Power Center or any other device you choose (based on
compatibility). When using a Sierra Wave Power Center, the Charge Controller is not required.
CAUTION: Do not make cable connections to the solar collector or power center when under
load.
1.
Connect the MC4 POWER CABLES on the Solar Collector to the SOLAR CHARGE CABLE
included with your power center, matching the MC4 female end of one to the MC4 male end
of the other.
2.
Connect the other end to the DC IN port located on the power center or other device.
3.
Follow your power center’s charging instructions. Disconnect when a full charge is achieved
or when not in use.
Charging a 12V DC Auxiliary Battery (sold separately):
1.
Place the battery on a stable surface close to the Solar Collector.
2.
Connect the SAE connector on the BATTERY CLAMPS to the SAE connector on the
CHARGE CONTROLLER port labeled BATTERY.
3.
Connect the red (+) and black (-) BATTERY CLAMPS to the corresponding red (+) and
black (-) battery terminals.
4.
Monitor the charging status using the CHARGE CONTROLLER LED INDICATORS. See
chart below.
5.
A LOAD output of no more than 7A/100 watts may be connected to the CHARGE
CONTROLLER to directly operate from the 12V battery. Function is controlled by the
CHARGE CONTROLLER to ensure battery safety. Check your devices rated wattage
before using this function.
Barrel Power Adapter with SAE Connector
Battery Clamps with SAE Connector
DANGER
The Charge Controller must be used when charging 12V sealed lead acid and AGM
vehicle batteries. Failure to do so may cause a battery fire, explosion and personal
injury. Extreme caution must be taken to make certain all connections are secure
between the charge controller, solar collector, and load connected; and that the
battery cables are attached to the correct polarity terminals.
12V Battery
7A
Charge
Controller
Low
Voltage
Charging
High
Voltage
Load
Solar
Battery
Charge Controller LED Indicators
High Voltage Protection: If the 12V battery reaches a pre-
determined high voltage level of 14V-14.5V DC, the green
High Voltage LED Indicator will illuminate. Solar charging
to the battery will automatically stop until the battery
reaches a safe operating voltage.
Charging In Process: When the Solar Collector is connected,
the yellow Charging LED Indicator will illuminate as long as
adequate solar energy is provided.
Low Voltage Protection: If the 12V battery reaches a pre-
determined low voltage level of 11V ±0.3V the red Low
Voltage LED Indicator will illuminate. Operation of the
load will automatically stop until the battery reaches a safe
operating voltage.
Solar Collector
Charging Electronic Devices
Directly charge Sierra Wave power banks or electronic devices like tablets, smartphones,
cameras, GPS equipment, and tools. Your device’s 12V own charger is required for this
function. IMPORTANT: Charging laptops is not supported with this method because they
require 19-21V and higher wattage. Use the a Sierra Wave Solar Link 240, 1000 or Energy
Center 1500 to charge these items.
1.
Read all instructions included with the device you wish to charge to confirm
compatibility. Power requirements must not exceed Solar Collector rated output.
2.
Place your device on a stable surface next to the Solar Collector.
3.
Connect the included BARREL POWER ADAPTER to the CHARGE CONTROLLER port
labeled BATTERY on the Solar Collector.
4.
Connect your device’s 12V Vehicle Charger into the BARREL POWER ADAPTER and
the other end into your device.
5.
The LEDs on the CHARGE CONTROLLER and your 12V Vehicle Charger should be
illuminated.
6.
If your device will not charge, check that all connections are secure and there is
sufficient sunlight. Contact Aervoe for additional assistance if needed.
7.
Disconnect the Solar Collector when fully charged or not in use. Do not leave
unsupervised.
NOTE: User is responsible for confirming compatibility. Aervoe Industries, Inc. is not
responsible for damage to user’s device. Read and understand all operating instructions and
specifications prior to use.
Male MC4
Tip
Female MC4
Tip