Part names and functions – Denon DN-C680 User Manual
Page 8
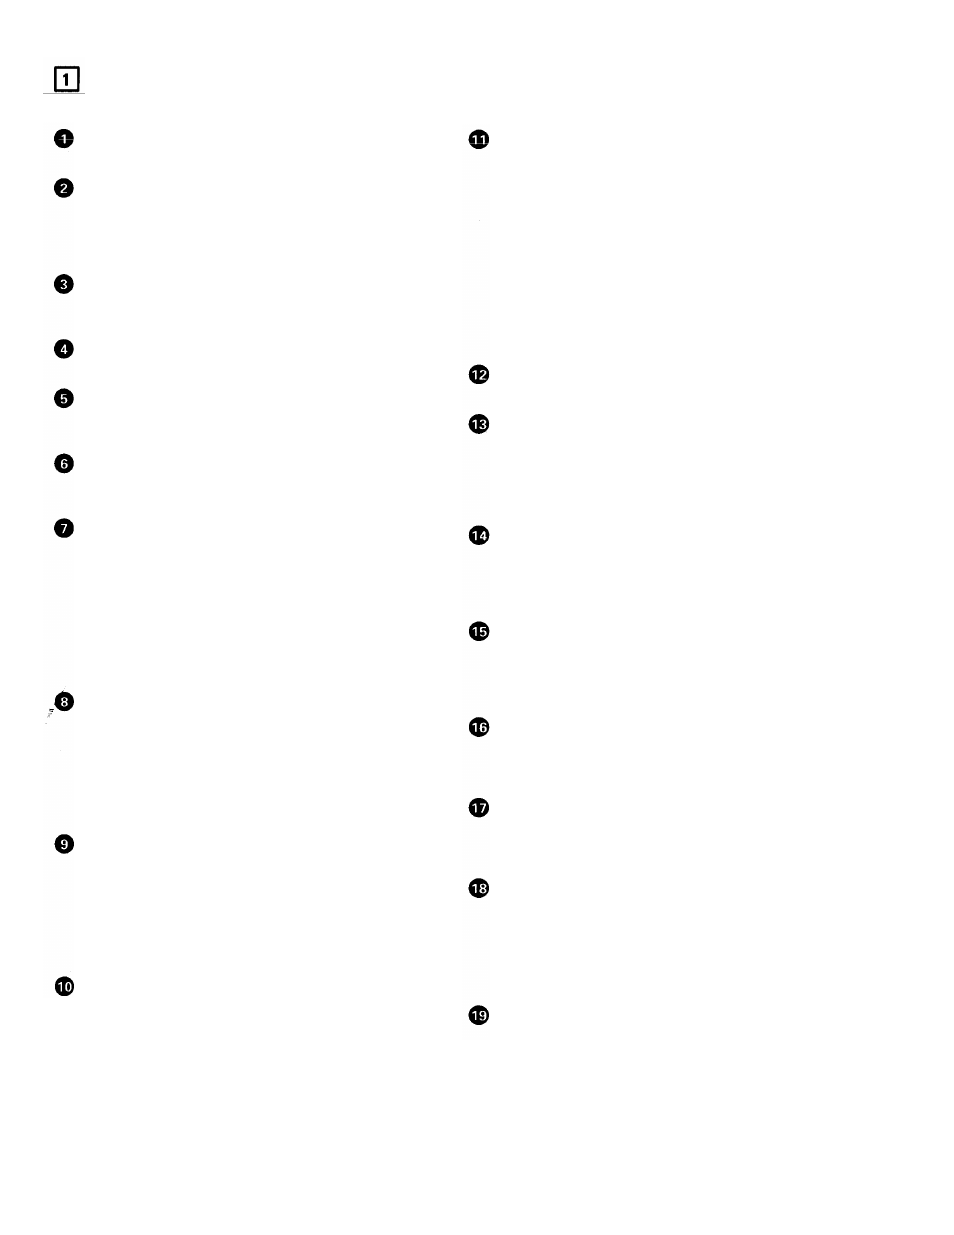
PART NAMES AND FUNCTIONS
(1) Front Panel
POWER button
•
This turns the set on and off.
Disc holder
•
Place discs in this holder.
Press the OPEN/CLOSE button to open and close the disc holder.
Load discs firmly inside the slot.
OPEN/ CLOSE button
•
Press this button to open and close the disc holder. The
disc holder will not open during playback.
LEVEL control
•
Use this to adjust the volume of the headphones.
PHONES jack
•
Connect headphones with an impedance of 30 to 40 62/ohms.
STOP button
•
Press this button to turn all the servo functions off and stop. Press
this button during playback to set the stop mode.
STANBDY / CUE button
•
When this button is pressed during the play or pause mode, the
pickup returns to the position at which playback started and the
standby mode is set. (Back Cue)
•
When pressed during playback when the next track has been
programmed, the programmed track is searched for and the
standby mode is set.
•
The button lights when the standby mode is set.
•
When the button is pressed while pressing the PLAY MODE button,
the preset mode is set.
PLAY / PAUSE button
•
Press this button in the standby, pause or manual search mode to
begin playback.
•
Press the button in the stop mode to search for the first track and
begin playback.
•
The button lights during the play mode.
•
When the button is pressed during playback, the pause mode is set.
The button flashes while the pause mode is set.
PROG. PLAY ON/ OFF button
•
When this button is pressed while the PROGRAM IN button is lit,
the program play mode is set.
•
The button will not function during the A-B play mode.
•
The button lights during the program play standby and play modes.
•
When the button is pressed during the program play standby or
play mode, the program play mode is cleared.
PROGRAM IN button
•
Press this button to set the program input mode.
•
The button will not function during the play mode.
•
The button flashes when in the program input mode.
•
The button lights when a program is set.
Select knob
•
Turn this' knob to select the next track (or index number) to be
played.
•
Use the INDEX button to choose whether to select tracks or index
numbers.
•
Turn the knob clockwise by one click to move one track (or one
index number) forward, counterclockwise by one click to move one
track (or one index number) backward.
•
When the knob turned while pressing it in, one click corresponds to
10 tracks (or 10 index numbers).
•
In the preset mode, use this knob to set and enter preset settings.
•
When setting programs, use this knob to select, enter and check
the program.
PLAY MODE button
•
Press this button to switch the play mode.
PITCH button
•
Press this button to switch to the play speed set with the + and
-buttons.
•
The button lights when the pitch play mode is set.
•
Press the button again to cancel the pitch play mode and return to
the normal speed.
+ button
•
Press this button once to increase the pitch by 0.1 %.
•
Hold the button in to increase the pitch continuously.
•
Press the button in the program editing mode to set the program
insert mode.
- button
•
Press this button once to decrease the pitch by 0.1%
.
•
Hold the button in to decrease the pitch continuously.
•
Press the button in the program editing mode to clear the program.
END MON button
•
Press this button in the standby mode to monitor the end of the
track. (End Monitor)
•
The button lights when the end monitor mode is set.
REPEAT button
•
Press this button to set the repeat mode.
•
The button lights when the repeat mode is set.
•
Press the button again to cancel the repeat mode.
A button
•
Press this button when no A point is set to set the A point.
•
The button lights when the A point is set.
•
When pressed while the A point is set, the A point is searched for
and the standby mode is set.
•
When the button is pressed during manual search while the A point
is set, the A point changes.
B button
•
Press this button when no B point is set to set the B point.
•
The button lights when the B point is set.
•
When pressed while the B point is set, the B point is searched for
and the standby mode is set.
•
When the button is pressed during manual search while the B point
is set, the B point changes.
9