Tview D760BD User Manual
Page 6
07
08
BASIC OPERATION
1. Power on /off
Press the “ ” button on panel or remote control, enter into power on
condition, pressing this button again to turn off the unit.
2. PLAY/PAUSE
On normal play disc mode, press this “ ” button to pause. Press this button
again to continue playing.
3. STOP
On normal display mode, press to stop playing, press “PLAY” button to resume
playing.
4. DISC IN /OUT
When flip down the front panel, press to eject / load the disc.
5. Adjust panel angle
Press “ ” “ ” button on remote control, can adjust the panel angle.
6. MUTE control
Press “ ” button on remote control to turn off the sound. Press it again will
resume the previous volume level.
Note: there are some functions no work when mute
7. Function mode switch
Press “ MODE” button on panel or remote control, then can switch the DVD,
AUX, RADIO, BLUE, SD/USB mode. But lf the unit without disc/SD inside,
can't enter to DVD/SD mode.
8. “ ” “ ”
Under DVD mode, press it for previous/next items choose; Under FM mode,
press it for channel increase/decrease.
9. SEL audio function
Audio adjust button. Press it to choose “VOL” “TRE” “BAS” “L/R” “F/R”, then
press “VOL-” “VOL+” to adjust that you need.
10. press the CLOSE key on the remote, the monitor could auto-extend or return,
and the music display could not be influenced by the telescopic
11. Press OSD when playing DVD, the screen will display current playing mode
and disc information.
12. “GOTO” chooses play button, Press it, the play information will show on
screen, use cursor button on the remote control to choose disc title, chapter or
time and then press “enter” button to play.
13. Press AUDIO to select the audio language when the main unit is in play mode
for DVD disc. For VCD and CD discs, press AUDIO to change the sound
channel.
14. Press Sub-T to select different subtitles inherented in DVD disc.
15. Press ANGLE to select the play angle when the main unit is in play mode for
DVD disc, there is no function for other disc. It will be no working if the disc not
have this function.
16. Press ZOOM key for times, the picture will change in order of 2X, 3X, 4X,
1/2X, 1/3X and1/4X of normal size. (Note: When playing MP3/USB/SD, this
button is invalid.)
17. Press SLOW on the remote control to slow playing. Change the playing
speed to 1/2, 1/3, 1/4, 1/5, 1/6 and 1/7 through pressing SLOW button. Press
SLOW button to skip frame when the unit is in pause mode. (The sound is mute
when the main unit is in fast or slow playing except CD and MP3 disc. Press
PLAY to resume normal playing)
18. The main unit may auto play the list according to the order of title, chapter or
setlist; Press ST/PROG, the menu will shown on the screen.
NOTE:
(1).The program list will auto cancel when the main unit is power off or eject the disc to
replay.
(2).There is no program function for some discs.
(3).The unit can not play the list if you select the title or chapter that does not exist in the
disc.
Hint: T is for Title, C is for Chapter of DVD disc. DVD disc
is divided into several parts called Title. Then title is
divided into chapter;
Normally one movie only corresponding to one title. CD
disc is divided into several setlists. For KARAOKE disc
one music corresponding to one title.
Use the / / / and number button, to input the corresponding title, chapter, same as
the picture showing:
Use / / / move cursors to “play”, press “enter” button, the
unit starts playing according to program list. Press “Play/Pause”
button or choose “Exit” button, press “enter” to exit.
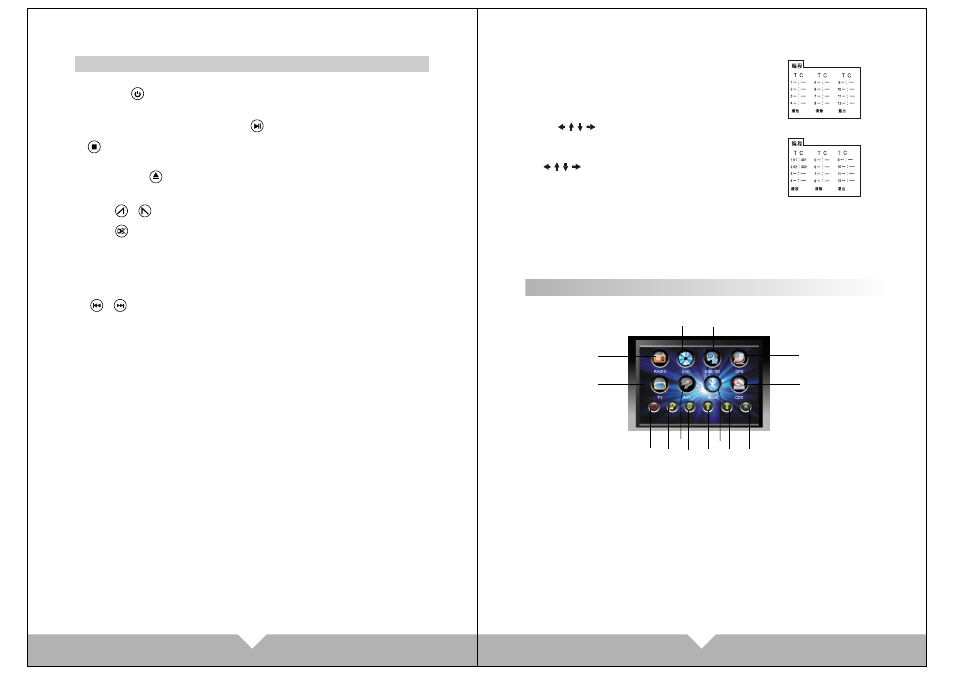
TOUCH SCREEN MENU AND OPERATION
Press “MODE” button on panel or remote control to choose function display
pictures: see below picture
1
5
6
14
13
12
11
10
9
8
7
2
4
3
1.RADIO: FM/AM radio mode
2.TV function mode (optional function)
3.DVD mode (have disk can be entering)
4.USB/SD:USB signal input mode
(connect the USB / SD can be to enter)
5.GPS: navigation mode (optional function)
6.CDC: CDC mode (optional function)
7.POWER
8.Enter to common menu setting
9.AUX: Video mode input
10.Enter to MENU setting
11.Panel angle upward
12.BLUE: BLUE TOOTH function
13.Panel angle down
14.Disc eject
Note: This product “ GPS” and “TV” functions are optional, and this unit does not
come with these functions.