Configuration and operation (cont.), Lcd models – Computronic Controls Sentinel 300P User Manual
Page 10
Sentinel 300P installation, operation & maintenance
ci0039 p10/12 issue 9 2015-09-04
LED indication
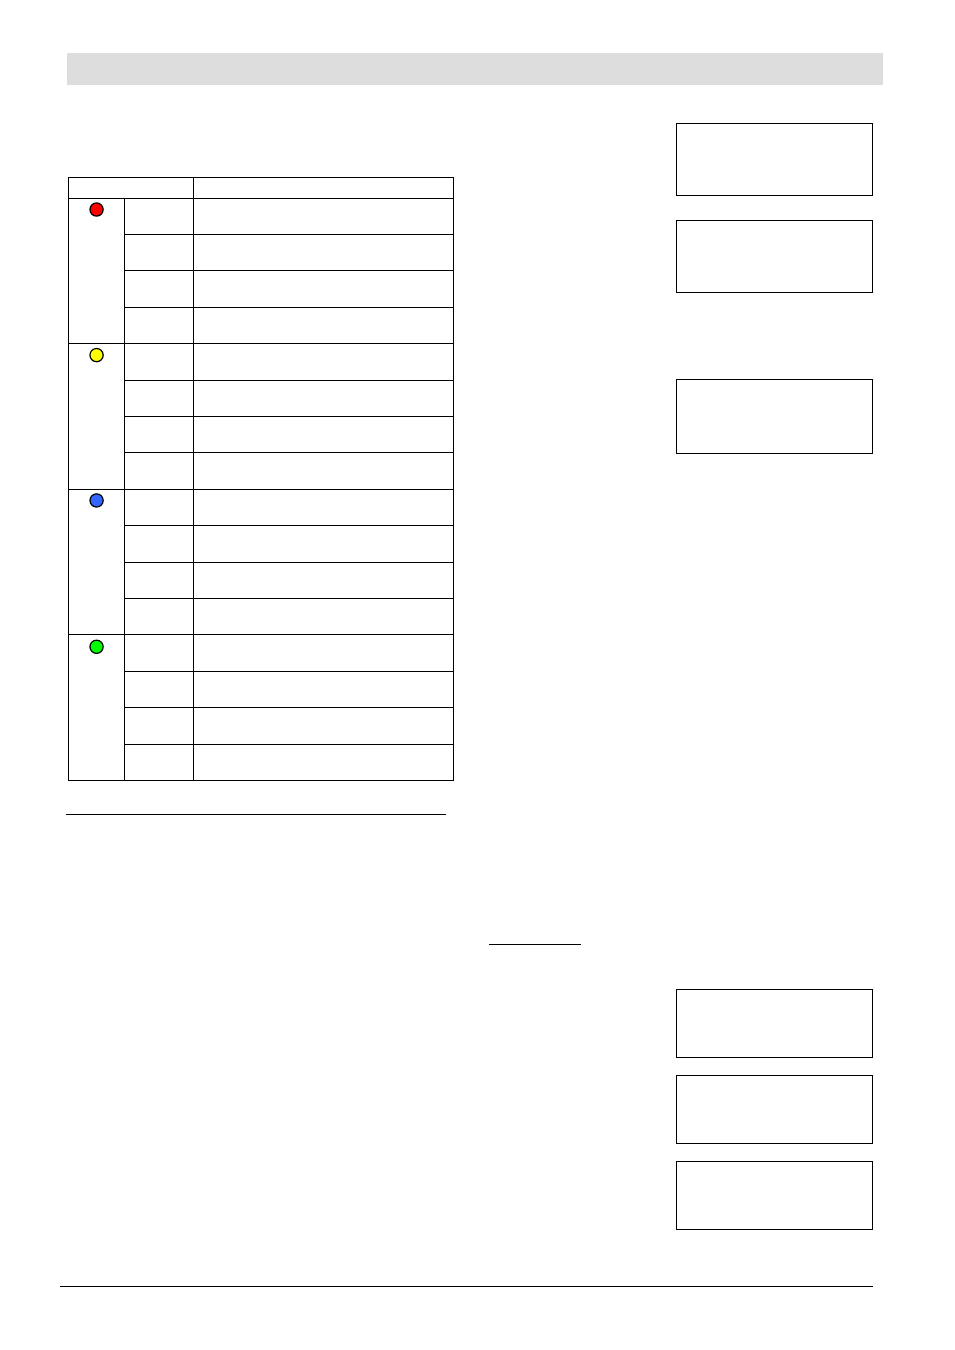
In normal operation, the four circuit board LEDs indicate
operating status: fault conditions, charge mode,
temperature compensation and AC supply:
LED operation
Status
Red
on
Fault condition (except AC supply &
battery connection errors).
flashing,
slow
AC supply not available
(DC connected).
flashing,
fast
Battery connection error.
off
No fault conditions.
Yellow
on
In Float mode.
flashing,
slow
In AutoBoost mode.
flashing,
fast
In AutoBoost extension mode / boost
decay.
off
Output off / output to nominal.
Blue
on
Temperature compensation active,
sensor connected.
flashing,
slow
Temperature compensation auto
disabled due to external fault.
flashing,
fast
Temperature compensation at absolute
limit, i.e. <
–10ºC or >+50ºC.
off
Temperature compensation disabled.
Green
on
AC supply available, charge output on.
flashing,
slow
AC supply available, charge output off.
flashing,
fast
Boost decay or battery missing
(if red LED is also on).
off
AC supply not available.
LCD Models
Enclosed models ESNTL300PCL and ESNTL300PCLM
include a backlit graphic LCD, three push-button controls
(Up, Down, Enter) and three additional indicating LEDs:
Green: CAN network status (CAN-enabled models only).
Lights continuously in normal CAN operation.
Yellow: charging mode, operation as yellow circuit board
LED.
Red: fault conditions, operation as red circuit board LED.
In normal charging mode, the LCD displays Sentinel and
battery status, e.g. operating mode, charge voltages and
currents, date/time, faults, etc.
In configuration menu modes, the LCD and push-buttons
can be used by the operator to view/edit operating
parameters and options (date/time, charge profiles, etc).
Normal charging: float and AutoBoost modes
At power-up, Sentinel
displays an initial message
that includes the unit
firmware version, followed
*******************
* SENTINEL 300P *
* V 3.0 *
*******************
by...
The default operating
screen, showing date, time,
battery volts, charge
current and charge mode.
20/05/10 10:23
VDC: 13.2 ADC: 8.5
FLOAT CHARGE
When Sentinel is in AutoBoost mode, the 4
th
line changes
to show the current boost stage, displaying (in sequence)
‘ramping to boost’, ‘boost extension’ and ‘boost decay’.
Fault messages
When a fault condition
occurs, an appropriate
message is shown on the
display 3
rd
line.
20/05/10 10:23
VDC: 13.2 ADC: 8.5
CHARGE FAIL
FLOAT CHARGE
Fault messages automatically clear from the display when
the fault condition clears. In the event of multiple faults,
the 3
rd
line displays the highest priority message, ranked
in the following order (highest priority first):
AC mains failure
DC connection error
Sensed connection error
Battery missing (detected during battery check routine)
Incorrect battery type (when configured with a 12V
charge profile, but the connected battery voltage is
above 16.1 V).
No
battery detected (when configured with an ‘auto’
charge profile, but the connected battery, or lack of
connection, is below 1.0V).
High battery voltage
Charge fail
Low battery voltage
Volt sense level fault
Configuration mode
The LCD and control keys can be used to view or change
configuration settings. The Sentinel 300P has three
configuration menus
, named ‘Settings’, ‘System’ and
‘CAN’. While the operator is viewing or editing these menu
settings, Sentinel continues normal charge operation, but
current charging status or fault information is not displayed
on the LCD.
Settings menu
This sequence of screens allows viewing (but not editing)
of several operating and device parameters.
To access the Settings
menu, press and hold the
Up and Down keys. The first
screen displayed is:
SETTINGS
FLOAT: XX.XVDC
BOOST: XX.XVDC
BOOST EXT: XXX MINS
Press Up or Down keys to
view more settings:
SETTINGS
LOW ALARM: XX.XVDC
HIGH ALARM: XX.XVDC
ALARM DELAY: XXX SEC
Press Up or Down keys to
view more settings:
SETTINGS
MODEL: XXXXXXXXX
SERIAL NO: XXXXXX FIRMWARE:
XXXXXXX
Press Up and Down to review the parameters again, or
press Enter to exit the Settings menu.
Configuration and Operation (cont.)