Casella CEL Campbell Stokes Sunshine recorder User Manual
Page 2
Side 4
CAMPBELL STOKES SUNSHINE RECORDER
User Instructions
Side 2
CAMPBELL STOKES SUNSHINE RECORDER
User Instructions
Side 3
2.
PRINCIPLE OF OPERATION
A glass sphere is used to
focus the Sun's rays to an
intense spot in order to burn
a trace on to a heat sensitive
recording card. As the Sun
moves across the sky, the
spot moves across the card
burning a trace, when the
Sun is obscured the trace is
interrupted.
The sphere is made from
colourless optical glass and is
clamped in a metal arc. Also
attached to the arc is a metal
bowl of spherical section,
which is grooved on the
inside to hold the recording
cards. It is positioned at the
correct focal length from the
sphere to ensure burning of
the trace.
Different instruments are available depending
upon the latitude of the recording station.
0 - 45
o
North or South - Tropical
45 - 65
o
North or South - Temperate
The only difference between the versions is
the shape of the bowl.
The arc is mounted on a grooved slide, which
enables the bowl to be set to the latitude of
the recording station.
3.
RECORDING CARDS
The cards have been treated to char rather
than burn and to reduce the amount they
swell if they get wet.
When the Sun's altitude changes with the
seasons the Sun's image travels up and down
the bowl, so that three different types of sun
card are required.
As the position of each card changes within
the bowl, three pairs of overlapping grooves
have been cut on the inside of the bowl. The
grooves overlap so that the burn does not run
close to the edge of the recording card before
the next seasonal card.
Figure 2 shows the position of each of the
seasonal cards within the bowl.
LATITUDE
SLIDE CLAMP
BOWL
FIXED SPHERE
CLAMP
LEVELLING
FOOT
SUB-BASE
MAIN BASE
SPHERE
CLAMP
Figure 1: General arrangement of the sunshine recorder
4.
INSTALLATION
4.1 Access to Sun Rays
The Sun's rays must have unobstructed
access to the instrument in all seasons and at
all times of the day. Due to the low intensity
of the Sun's rays at sunrise and sunset, the
only exceptions are obstacles whose height
does not exceed 3
o
above the horizon.
Because of the need for unobstructed
sunlight, the roof of a building is often a
convenient site. However, if the building is
too high, it is possible for the roof to obscure
the Sun's rays after Sunrise and before
Sunset, thus preventing the measurement of
a full days sunshine.
4.2 Mounting
The instrument should be mounted on to a
rigid warp free surface at a convenient height
to read and change sun cards, e.g. on a brick
pillar, with a wooden top.
Point the instrument in a southerly (northerly)
direction, within ±10
o
and secure the main
base to the mounting surface usually wood
(25 cm square).
Winter
Summer
Equinoctial
Figure 2: Position of sun cards in the bowl
5.
ADJUSTMENT
5.1 Levelling
This is achieved by adjusting the bottom nuts
(below the sub-base of the instrument) and
using a spirit level.
1. Slacken the nuts above and below the sub
base. See Figure 3.
2. Level using the bottom nuts.
3. First level in an East / West direction.
To help levelling, set the latitude to 0
o
for
Tropical or 52
o
for Temperate installations,
then lay the spirit level across the bowl.
4. Then level in a North / South direction,
placing the spirit
level on the flat
machined part of
the sub-base.
5. When you have
levelled the
instrument,
tighten the top nuts
finger tight.
If the instrument is
not level in an East /
West direction the
trace will burn at an
angle across the
card.
5.2 North South Orientation
Using the mid-point (noon line) on the bowl,
align the instrument to face due South in the
Northern Hemisphere and due North in the
Southern.
1. Adjust the instrument by rotating the
sub-base.
If using a compass remember to take
magnetic variation into consideration. See
Figure 4.
2. When aligned, tighten up the top nuts.
You can also use time to set the instrument.
For example at 12 p.m. (G.M.T), 0
o
longitude,
the Sun's image will fall
on the bowl's noon line
when pointing due
South.
For other longitudes
local noon times need
to be calculated.
5.3 Setting
the Latitude
The bowl must be set to
the correct latitude for
the station.
1. Undo the nut beneath the arc support, using
the tommy bar provided.
2. Set the latitude by aligning the engraved
latitude marks with the arrowhead.
3. Tighten the nut while making sure that the
arc does not slip. See Figure 5.
5.4 Fitting the Sphere
The sphere is clamped into the arc using two
knurled head screws.
One of these screws is locked into position at
the factory, so when the sphere is clamped in
place it is already correctly aligned.
TOP NUT
BOTTOM NUT
SUB-BASE
MAIN BASE
Figure 3: The Sub-base
6.
DAILY ADJUSTMENT
Where possible, the cards should be changed
after sunset so that each card has a record of
one day's sunshine. If this is not possible
care must be taken with the dates, to keep
each day's sunshine correct.
When inserting a new card make sure that the
noon line on the card lines up with the noon
mark on the bowl.
On the back of each card, date ranges are
given for when they are to be used in both the
Northern and Southern hemispheres as well
as spaces for date etc. At certain latitudes it
is necessary to trim the cards to the specified
dotted line. This ensures that the Sun's rays
are not obscured by the edge of the card at
Sunrise and Sunset.
Difficulty may be experienced in removing the
recording card from the bowl when wet. Do
not try to force the card as it may tear. With a
sharp blade cut as close to the grooves as
possible, parallel to the length of the card.
The remaining card in the groove can be
removed with a pointed stick or other soft
material.
The glass sphere should be kept clean using a
chamois leather or other non-scratching
material. It is also important to keep the
grooves clean and to remove any snow or
frost immediately.
When changing the cards, note the position
and angle of the burn, if it has not run parallel
to the edge of the card, the instrument should
be adjusted. Occasionally while the Sun is
shining, check to see that the burn is being
produced at the correct time and adjust if
necessary.
The instrument can be upset only by
someone moving it and not during normal use.
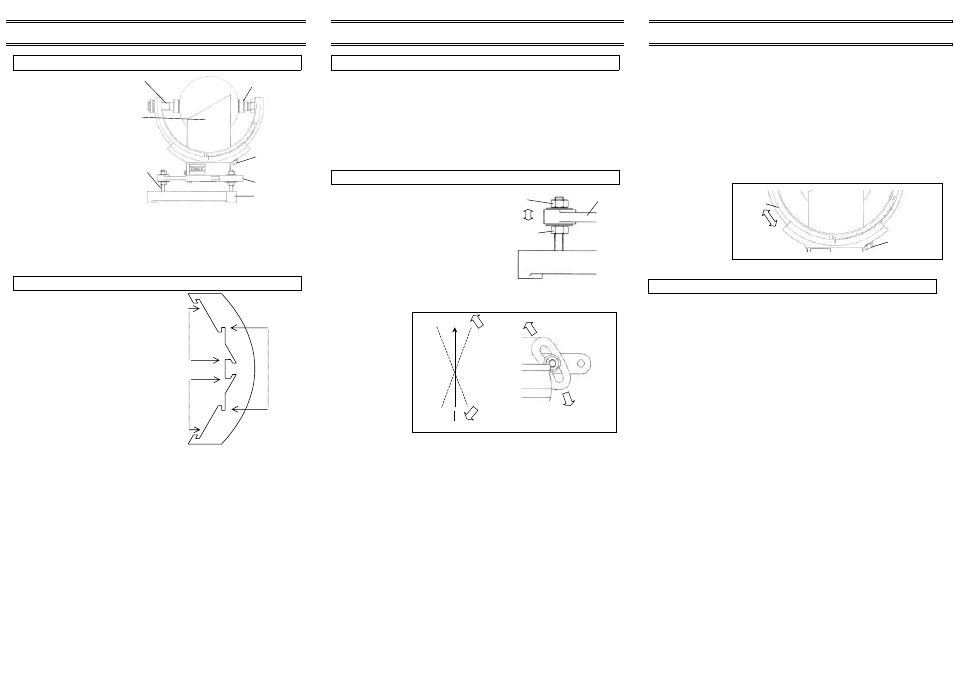
ARC
ARC CLAMPING
NUT
Figure 5: Position of the arc clamping nut
N/S
NOON LINE
Figure 4: Rotation of the sub-base for North / South orientation