Box contents, Connection diagram / installation, Rear panel overview – Alto Professional TS110A User Manual
Page 2
2
BOX CONTENTS
•
TRUESONIC speaker
•
Power cable
•
Quickstart Guide
•
Safety Instructions & Warranty Information Booklet
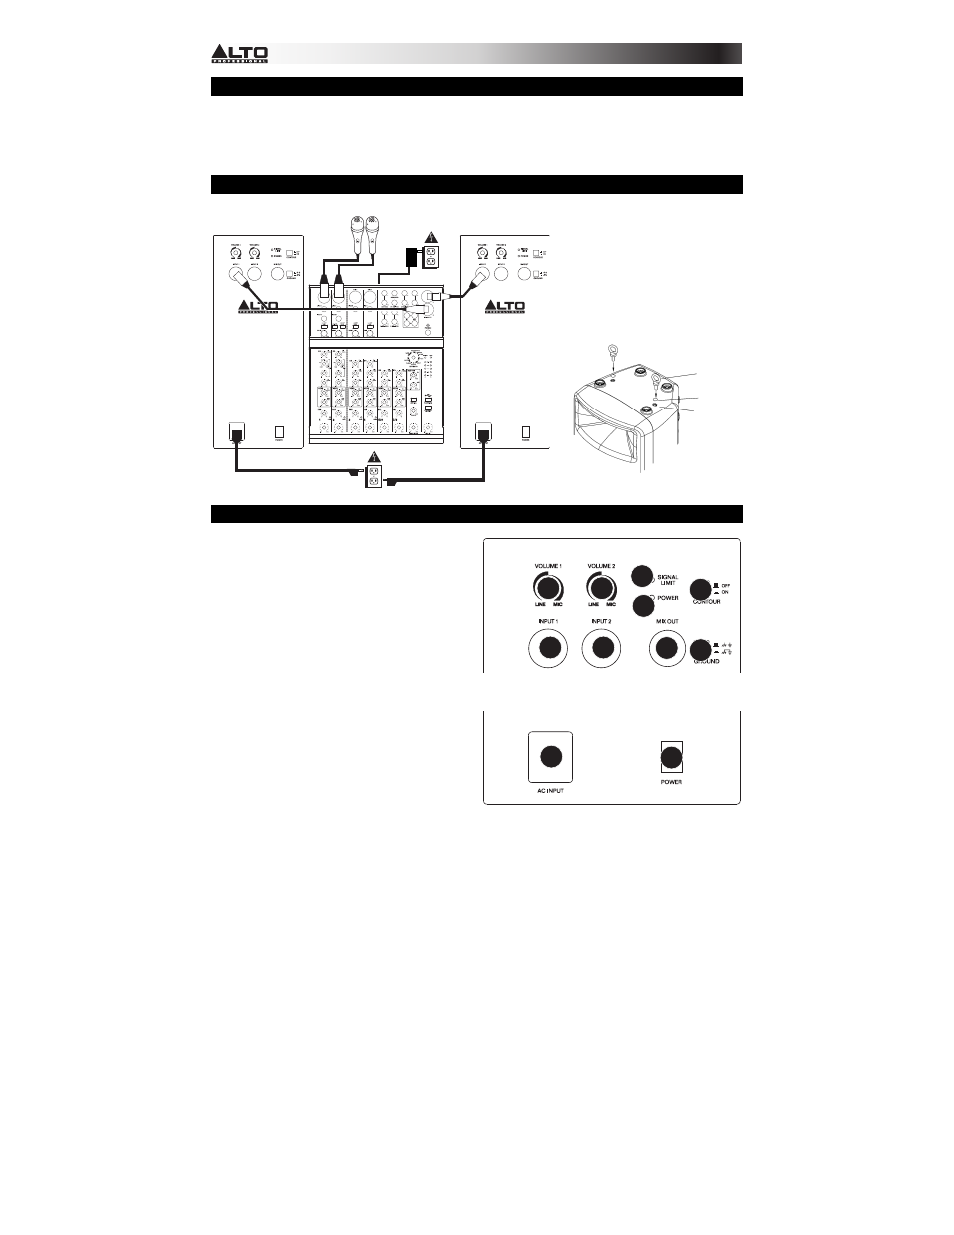
CONNECTION DIAGRAM / INSTALLATION
REAR PANEL OVERVIEW
1.
POWER INPUT – Connect the included power
cable to this input and connect the other end of
the cable to a power source. Make sure the
speaker's POWER SWITCH is set to "off"
when plugging and unplugging the cable.
2.
POWER SWITCH – Turns the speaker on/off.
Make sure the VOLUME knob is set to "zero"
before turning it on.
3.
POWER LED – Illuminates when the speaker
is on.
4.
VOLUME – Turn this knob to adjust the
speaker's volume.
5.
INPUT – Use a standard 1/4" TRS or XLR
cable (not included) to connect your sound
source to this input.
6.
MIX OUT – Use a standard XLR cable (not
included) to connect this jack to the input of
another speaker (i.e., another TRUESONIC
speaker).
7.
SIGNAL LIMIT LED – Illuminates when the
audio signal being sent to the speaker is
"clipping" or distorting. If this light illuminates
frequently or steadily, reduce the volume of your sound source.
8.
CONTOUR – Engage (depress) this switch to equalize the mix for optimal music playback. Disengage
(raise) the switch during live performance for a flatter response.
9.
GROUND SWITCH – Press this switch to reduce hum or noise.
*Note: Microphones, mixer,
and cables are not included.
Mixer*
Power
Power
Microphones*
Speaker
Speaker
Eyebolt
Dust cover
Suspension
point
Example:
INSTALLATION:
This speaker should be installed on a
stand on the floor, according to its
maximum weight, or suspended from its
suspension points (M10 x 1.5PH, 30mm
length) (see example image). We do
NOT recommend suspending multiple
speakers in a vertical array.
1
2
3
4
4
5
5
6
7
9
8