Installation, Continued – Desa CCL3018PR User Manual
Page 15
111161-01A
15
15
For more information, visit www.desatech.com
For more information, visit www.desatech.com
INSTALLATION
Installing Logs (Models CCL3018PR, CCL3018NR, CCL3924PR,
CCL3924NR, CCL3930PR, AND CCL3930NR) (Cont.)
AUT
O
OF
F
ON
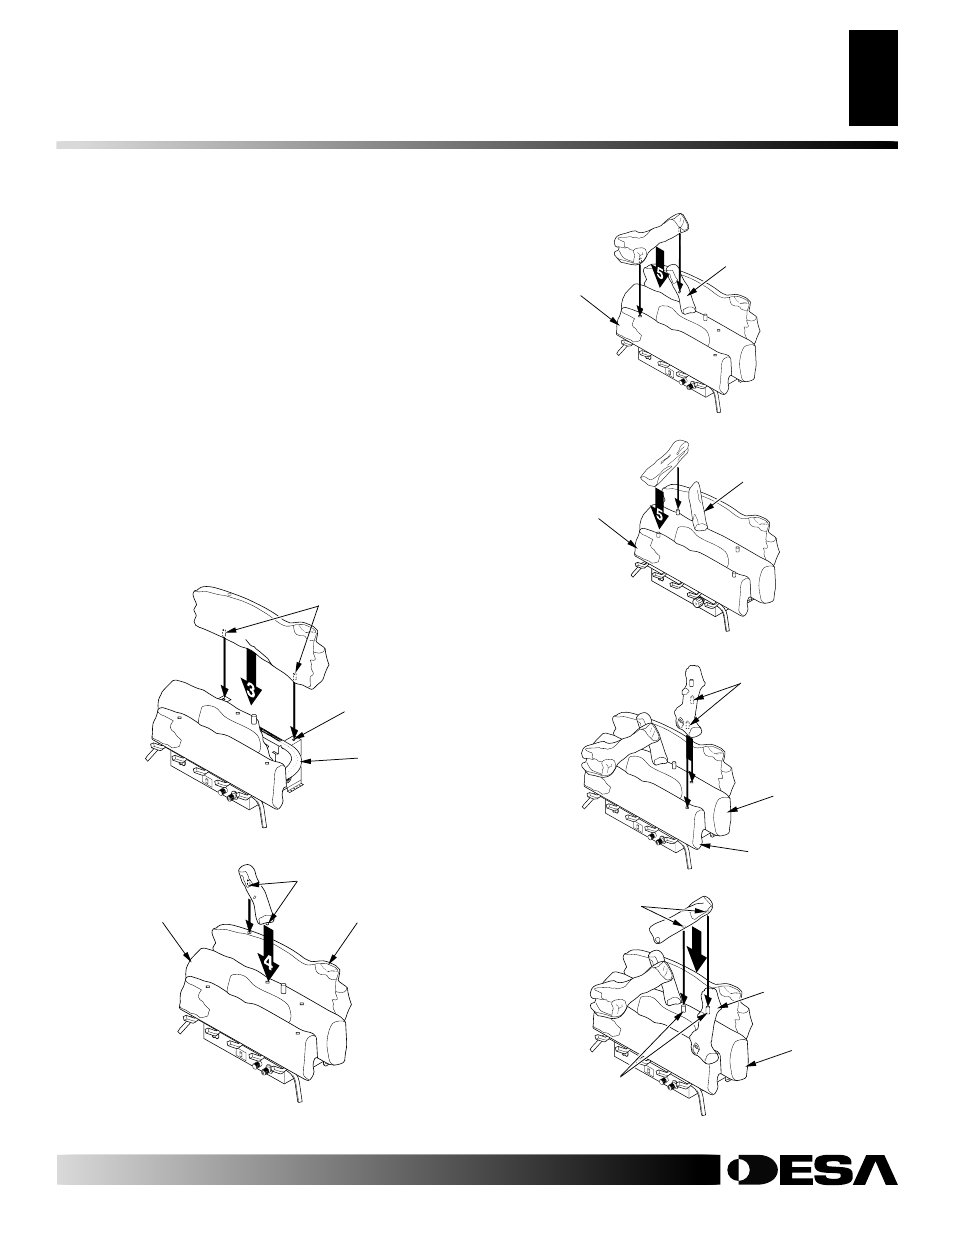
3.
Locate pegs on the bottom of back log (#3). Slide these pegs into
the holes in the grate base behind the burner (see Figure 26).
4.
Locate pegs on the bottom of crossover log (#4). Slide these
pegs into the holes located in middle log (#2) and back log
(#3). See Figure 27 for placement.
5.
Locate pegs on the bottom of crossover log (#5). Slide these
pegs into the holes located in crossover log (#4) and front log
(#1). See Figure 28.
For CCL3018PR/NR Only:
Locate holes on the bottom of cross-
over log (#5). Slide the holes over the left pegs on middle log
(#2) and front log (#1). See Figure 29.
6.
Locate pegs on the bottom of crossover log (#6). Slide these
pegs into the holes located in middle log (#2) and front log
(#1). See Figure 30.
7.
For CCL3930PR/NR only
, locate holes on the bottom of cross-
over log (#7). Slide onto the pegs located in crossover log (#6)
and middle log (#2). See Figure 31.
8.
Add lava rock around base of heater if desired. Do not place
any lava rock on logs or burner.
AUT
O
OF
F
ON
Figure 26 - Installing Rear Log (#3) (CCL3930PR/NR Shown)
Figure 27 - Installing Crossover Log (#4) (CCL3930PR/NR Shown)
Hole in
Grate
Base
Pegs
Burner
Log #2
Log #3
Pegs
INSTALLATION
Continued
Figure 28 - Installing Crossover Log (#5) (CCL3930PR/NR Shown)
AUT
O
OF
F
ON
7
Figure 31 - Installing Crossover Log (#7) to Models
CCL3930PR/PRA and CCL3930NR/NRA Only
Middle
Log (#2)
Crossover
Log (#6)
Holes
Pegs
Figure 30 - Installing Crossover Log (#6) (CCL3930PR/NR Shown)
AUT
O
OF
F
ON
Crossover Log (#4)
Front Log (#1)
Figure 29 - Installing Crossover Log (#5) (CCL3018PR/PRA and
CCL3018NR/NRA Only)
Crossover
Log (#4)
Front Log (#1)
AUT
O
OF
F
ON
6
Pegs
Log #2
Front Log (#1)