Hdx-ssd quick start guide english, Introduction, 1 install and connect – Naim Audio HDX User Manual
Page 2: 2 switch on and set up
HDX-SSD Quick Start Guide
English
Introduction
The HDX-SSD is a network hard disk music player. It incorporates no built-in storage but requires
external network storage (a NAS drive) to be connected and configured before it can be used.
Configuring network storage is described in Section 2 of this guide.
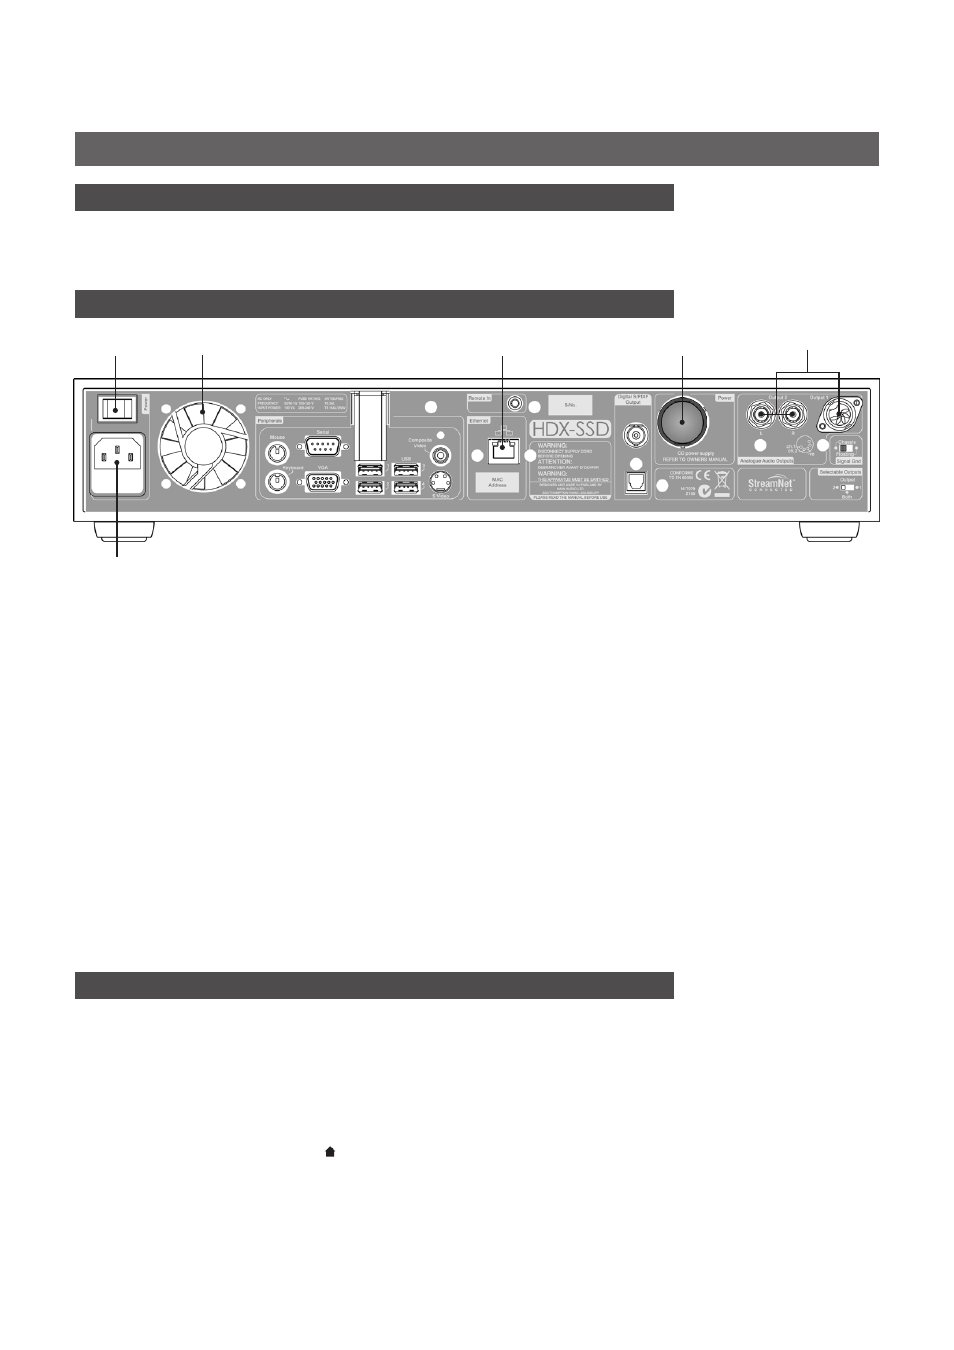
1 Install and Connect
• Install your HDX-SSD on an equipment stand or rack intended for the purpose. Ensure that the
fan aperture is not obstructed.
• Identify the
Audio Output, Network
,
Power Supply Link Plug
and
Mains Input
sockets.
• Connect one or both of the
Audio Output
sockets - DIN (output 1) or Phono (output 2) -
to an audio system.
Set the rear panel
Selectable Outputs
switch to reflect the choice of
audio output sockets. Unless connecting to a system that includes another earthed source
component (a Naim CD player or AV processor for example), switch the rear panel
Signal
Ground
to
Chassis
. The
Signal Ground
switch should be set to
Floating
if mains “hum” is heard
through the speakers or if the audio system includes another earthed source item
.
• Use a standard RJ45 ethernet cable to connect the
Network
socket to a network router with a
working internet connection and a connected Network Attached Storage (NAS) drive.
• If the HDX-SSD is to be used with an XPS or CD555PS power supply, remove the rear panel
link
plug
and connect the power supply using the appropriate Burndy cable. Switch on the XPS or
CD555PS before switching on the HDX-SSD. The link plug must be fitted if the HDX-SSD internal
power supply only is used.
THE SXPS BURNDY CABLE ONLY MUST BE USED TO CONNECT THE XPS
OR CD555PS POWER SUPPLIES.
• Connect the HDX-SSD
Mains Input
using the supplied mains cable.
2 Switch On and Set Up
• Ensure that the network router, NAS drive and peripheral audio equipment is connected,
switched on and working. Switch on the HDX-SSD using the rear panel
Power Switch
.
• After a delay of approximately one minute the user interface
Home
menu will appear on the
front panel display. The HDX-SSD display is a touch screen.
Touch
items to select them.
• The HDX-SSD display language can be changed. Select
System Setup
on the front panel
Home
Menu, followed by
System Settings
,
Language,
and the desired option. Return to the
Home menu by selecting the
Home
( ) symbol.
• In order to rip CDs the NAS drive must be enabled and given
Music Store
status. Select
System
Setup
on the
Home
menu followed by
Network Shares
and
Manage Shares
. A list of attached
network drives will be displayed. Select and
Enable
the desired drive.
Full installation and operational information can be found in the HDX-SSD Reference Manual
included on the CD packed with the product, or at www.naimaudio.com
mains input
power
switch
Phono and DIN
audio outputs
network
socket
power supply
upgrade socket
(link plug fitted)
fan
aperture
Note:
Ensure that the unit
has adequate ventilation.
The ambient temperature
in the vicinity of the unit
should not exceed 35°C.
Note:
Wired network
connection is strongly
recommended for the
most consistent and
secure HDX-SSD operation.
Ethernet-over-mains
hardware may be used
and provides a simple and
convenient method of
home network connection.
However, the presence of
network data on the mains
supply may compromise
overall system sound
quality.
Note:
The HDX-SSD is
configured when originally
shipped not to require
any network setup but
to connect to a network
automatically. However,
if your HDX-SSD has been
previously used, its network
configuration may have
been altered, leaving
it unable to connect
automatically. Refer to
the HDX-SSD Reference
Manual or contact your
retailer or installer if this
appears to be the case.