2 installation and connection, 1 ndx rear panel, 2 ndx connected to optional 555ps power supply – Naim Audio NDX User Manual
Page 4: Installation and connection
2
Installation and Connection
2 Installation and Connection
Your NDX/5XS should be installed on an equipment stand intended for the purpose. Ensure
it is well ventilated, and do not stand it directly on top of another item of equipment. It
should be installed in its final location before connecting cables or switching on. The
NDX/5XS has no standby mode and is intended to be left switched on.
Connecting the NDX/5XS to mains power and to a variety of audio peripherals and
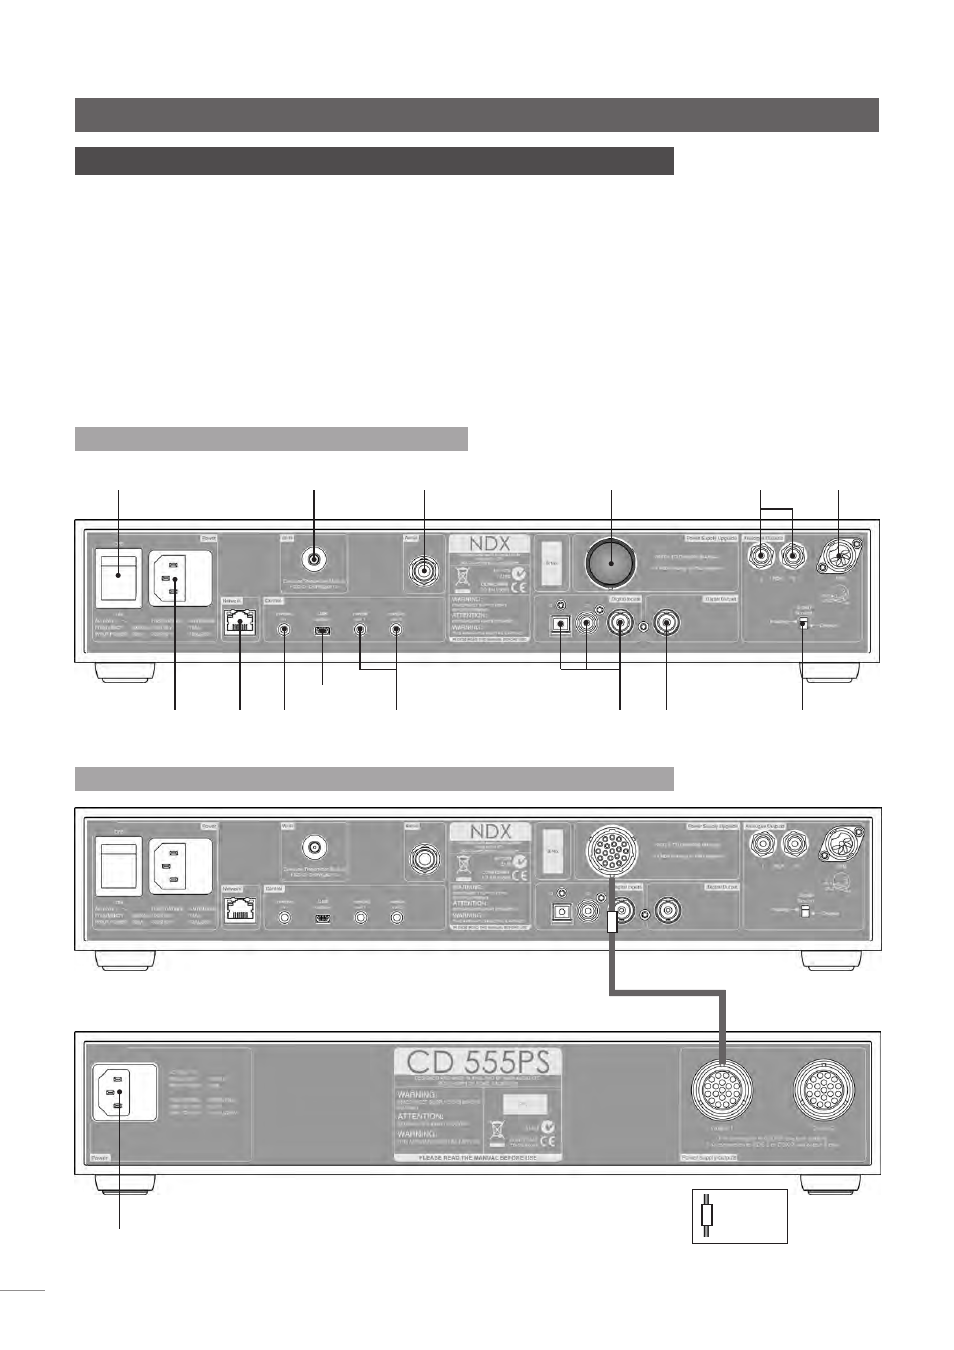
sources is described in the following paragraphs. Diagrams 2.1 and 2.3 respectively
illustrates the NDX and ND5 XS rear panel connection sockets.
Both the NDX and ND5 XS can be upgraded through the use of an Naim 555PS, XPS or
XP5 XS power supply. Connection of external power supplies is illustrated in Diagrams 2.2
and 2.4 and described in Section 2.6.
2.1 NDX Rear Panel
mains input
and fuse
power switch
network
socket
DAB/FM aerial
socket (if option
fitted)
signal ground
switch
digital
output
wireless network
(Wi-Fi) antenna
socket
power supply
upgrade socket
(link plug fitted)
USB update
interface
remote
in
remote
out 1 & 2
digital inputs
3, 2 & 1
analogue
output
(phono)
analogue
output
(DIN)
2.2 NDX Connected To Optional 555PS Power Supply
mains input
and fuse
SXPS Burndy
Cable
Cable
direction
marker
THE NDX MAINS CABLE SHOULD BE REMOVED AND
ITS POWER SWITCH TURNED OFF WHEN AN EXTERNAL
POWER SUPPLY IS USED.
THE SXPS BURNDY CABLE ONLY MUST BE USED TO
CONNECT THE EXTERNAL POWER SUPPLY.
Important:
XPS power
supplies with serial
numbers below 188015
are not compatible with
the NDX or ND5 XS and
should not be used.
Contact your local retailer
or distributor for more
information.