Assembly instructions, Directions for use – Weston Cuber/Tenderizer Grinder Attachment User Manual
Page 5
-5-
-8-
ASSEMBLY INSTRUCTIONS
BE SURE TO FOLLOW ALL SAFETY WARNINGS
AND PRECAUTIONS THAT ARE CONTAINED
IN YOUR GRINDER INSTRUCTION MANUAL
BEFORE USING THE CUBER/TENDERIZER
ATTACHMENT
WITH
THE
ELECTRIC
GRINDER! NEVER LEAVE THE MACHINE
UNATTENDED!
PRIOR TO FIRST USE: Disassemble the Cuber/
Tenderizer and hand wash each part in warm, soapy
water. Rinse with clear water. Dry thoroughly before
re-assembling. WARNING! This will expose the
Cutting Blades. ALWAYS wear cut-resistant gloves
when handling the Blade assembly.
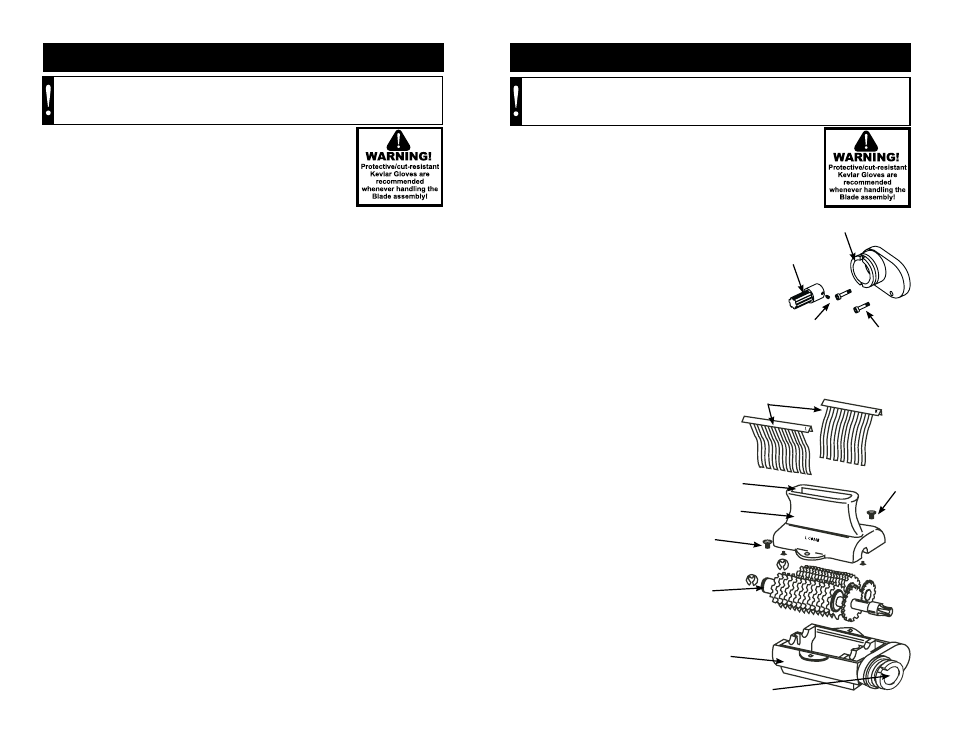
1. If the
Shaft Adapter is not already attached to the
Cuber/Tenderizer attachment, loosen the Set Screw
on the
Shaft Adapter using the supplied Allen Wrench.
Slide the
Shaft Adapter onto the Driving Blade Rack
Shaft and tighten the Set Screw. DO NOT over tighten.
Figure 1
2. To install the
Chute onto the Top
Housing, remove the Top Housing from
the
Lower Housing. Secure the Chute to
the
Top Housing using the two Screws and
Lock Washers. DO NOT over tighten.
3. Insert the
Driving Blade Rack into the
Lower Housing, guiding the Drive Shaft
into the bearing journals. NOTE: When
installing the
Blade Rack Assembly, you
must position the drive shaft with the
Shaft
Adapter through the hole in the Electric
Grinder Adapter before seating into the
bearing journals. Figure 2
4. Install the
Driven Blade Rack
into the
Lower Housing making
sure the teeth on the
Driving Blade
Rack are properly meshed together
with the teeth on the
Driven Blade
Rack.
5. Position the
Top Housing onto
the
Lower Housing and line up the
screw holes.
6. Secure the
Top Housing to the
Lower Housing using the Housing
Thumbscrews. DO NOT over
tighten.
Shaft Adapter
Figure 1
Electric Grinder Adapter
Adapter Mountig
Bolts
Shaft
Adapter
Set Screw
Combs
Top Housing
Lower Housing
Thumbscrew
Thumbscrew
Blade
Assembly
Driving Blade
Driven Blade
Chute
Electric Grinder
Adapter
Figure 2
WARNING!
Before cleaning, assembling or disassembling the Cuber/
Tenderizer Attachment make sure the PLUG of the GRINDER IS REMOVED
FROM THE OUTLET/POWER SOURCE! ALWAYS unplug the grinder when
not in use.
DIRECTIONS FOR USE
BE SURE TO FOLLOW ALL SAFETY WARNINGS
AND PRECAUTIONS THAT ARE CONTAINED IN
YOUR GRINDER INSTRUCTION MANUAL BEFORE
USING THE CUBER/TENDERIZER ATTACHMENT
WITH THE ELECTRIC GRINDER! NEVER LEAVE
MACHINE UNATTENDED!
Make sure the
Cuber/Tenderizer is fully assembled and
correctly attached to the electric grinder.
Remove all bones or hard items in the meat before tenderizing or cubing. Damage
to the unit may occur if bones or hard objects are pushed through.
Do not cube or tenderize meat that is more than 1” (2.5 cm) thick. Thicker meat
may get lodged in
Blades, which may cause damage to the product.
Use
Tongs to insert the meat to be tenderized or cubed into the mouth of the
Chute until the meat comes in contact with the Blades. The meat will be pulled
through the unit by the
Blade movement.
If a piece of meat is too short to reach the
Blades, use the provided Tongs to
guide the meat to the
Blades.
CAUTION! DO NOT press or push the meat into the Chute with your fingers or
any other object. Doing so may cause personal injury and/or damage to the unit. DO
NOT push the
Tongs or other utensils into the Blades.
It may be necessary to pass the meat through the
Cuber/Tenderizer several
times to obtain the desired results. You may also pass the meat through at different
angles if a different result is desired.
When finished tenderizing or cubing the meat, turn off the electric grinder and
unplug it from the power source.
Clean the unit before and after each use.
•
•
•
•
•
•
•
•
•
WARNING!
Before cleaning, assembling or disassembling the Cuber/
Tenderizer Attachment make sure the PLUG of the GRINDER IS REMOVED
FROM THE OUTLET/POWER SOURCE! ALWAYS unplug the grinder when
not in use.