Assembly instructions for manual operation, Using the meat mixer as a grinder attachment, Using the manual meat mixer – Weston 44 lb Meat Mixer User Manual
Page 5
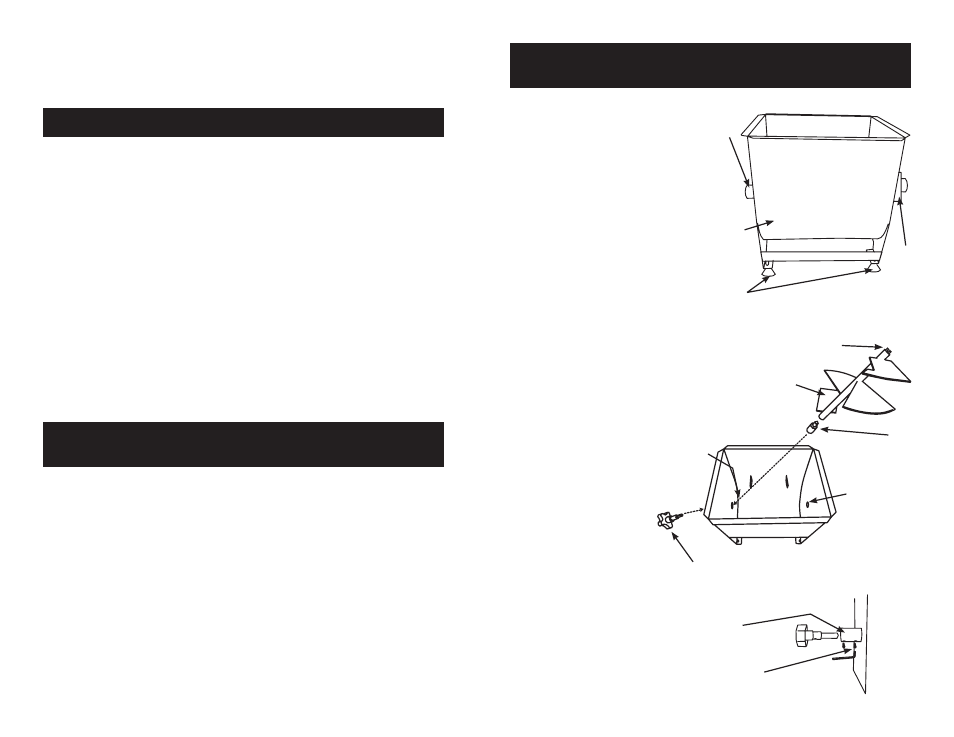
ASSEMBLY INSTRUCTIONS
FOR MANUAL OPERATION
1. Place the
Mixing Tub on a stable, level
surface with the
Pivot Knob on your left
and the
Gear Housing Cover on your right
(figure 1).
2. Adjust the
Feet so the Meat Mixer is
stable and level. Raise the
Locking Nuts
until they contact the bottom of the
Meat
Mixer. Tighten the Locking Nuts against
the bottom to secure the
Feet in position.
3. Insert the hollow end of the
Brass Pivot
Pin, notched side down, into the Pivot
Housing from inside the Mixing Tub
(figure 2).
4. Using the
Wrench, tighten the Set
Screw nearest the Mixing Tub on the
underside of the
Pivot Knob Post until
it stops. Loosen the
Set Screw ¼ turn to
allow the
Brass Pivot Pin to slide back and
forth (figure 3). Make sure the
Set Screw
fits in the notch in the
Brass Pivot Pin.
5. Insert the threaded end of the
Pivot
Knob into the Pivot Knob Post from
outside the
Mixing Tub (figure 2).
6. Screw the
Pivot Knob
into the
Brass Pivot Pin until
tight.
7. Install the notched end of
the
Mixing Shaft onto the Pin
on the
Mixing Shaft Pinion
inside the
Mixing Tub. It
is best to have the
Paddle
nearest the notched end of
the
Mixing Shaft pointing
downward. You may have to
align the
Pin with the notch
to install the
Mixing Shaft in
this position. If so, install the
Handle onto the Drive Shaft.
Rotate the
Handle until the Pin
aligns with the notch. Remove
the
Handle.
8. While holding the
Mixing Shaft in place,
pull the
Pivot Knob out until it stops. Align
the
Mixing Shaft with the Brass Pivot Pin.
Slowly release the
Pivot Knob to allow the
-5-
figure 1
Mixing
Tub
Pivot
Knob
Post
Gear
Housing
Cover
figure 2
Pivot
Pin
Pivot
Housing
Mixing
Shaft
Pivot
Knob
Notched End of
Mixing Shaft
Inside View of
Mixing Tub
Rubber
Feet
figure 3
Pivot
Knob
Post
Set
Screws
1. Place the
Meat Mixer and attached grinder on a stable, level work surface.
2. Place ground meat into the
Mixing Tub.
3. Place the
Clear Lid onto the Mixing Tub. DO NOT operate the Meat Mixer
without the
Clear Lid in place. Serious injury may result!
4. Attach the grinder to the power source. Turn “on” the grinder.
5. Add seasonings, cure and water as necessary through the slot in the
Clear Lid at
this time.
6. Mix until the meat feels sticky to the touch. Do not over-mix the meat. To check
the consistency of the meat, first turn “off” the grinder and disconnect it from the
power source. Remove the
Clear Lid. Keep clear of the Mixing Shaft and Paddles
while checking the meat. Replace the
Clear Lid before continuing.
7. When mixing is complete, turn “off” the grinder and disconnect it from the power
source. Disconnect the grinder from the
Meat Mixer.
USING THE MEAT MIXER
AS A GRINDER ATTACHMENT
1. Place the
Meat Mixer on a stable, level work surface. Allow ample room for the
Handle to rotate.
2. Place ground meat into the
Mixing Tub. Add seasonings, cure and water as
necessary at this time.
3. Place the
Clear Lid onto the Mixing Tub. DO NOT operate the Meat Mixer
without the
Clear Lid in place. Serious injury may result!
4. Turn the
Handle clockwise to mix.
5. Mix until the meat feels sticky to the touch. Do not over-mix the meat. Remove
the
Clear Lid to test the consistency of the meat. DO NOT turn the Handle and
KEEP CLEAR of the
Mixing Shaft Paddles during this step. Replace the Clear Lid
before you continue mixing.
6. When mixing is complete, remove the
Clear Lid and Mixing Shaft before removing
the meat.
7. Refrigerate meat as soon as possible after mixing. DO NOT let meat sit out for
an extended period of time. Follow the basic rules in the “Food Safety” section of this
manual.
USING THE MANUAL MEAT MIXER
Now that the
Meat Mixer is fully assembled and ready to use, it is time to blend your
favorite sausage or jerky meat mixture.
Be sure to read and fully understand the “General Safety Rules” at the beginning of
this manual before you start.
-8-
Mixing Shaft
Pinion