Questions – TracRac IM TracTonnuea User Manual
Page 2
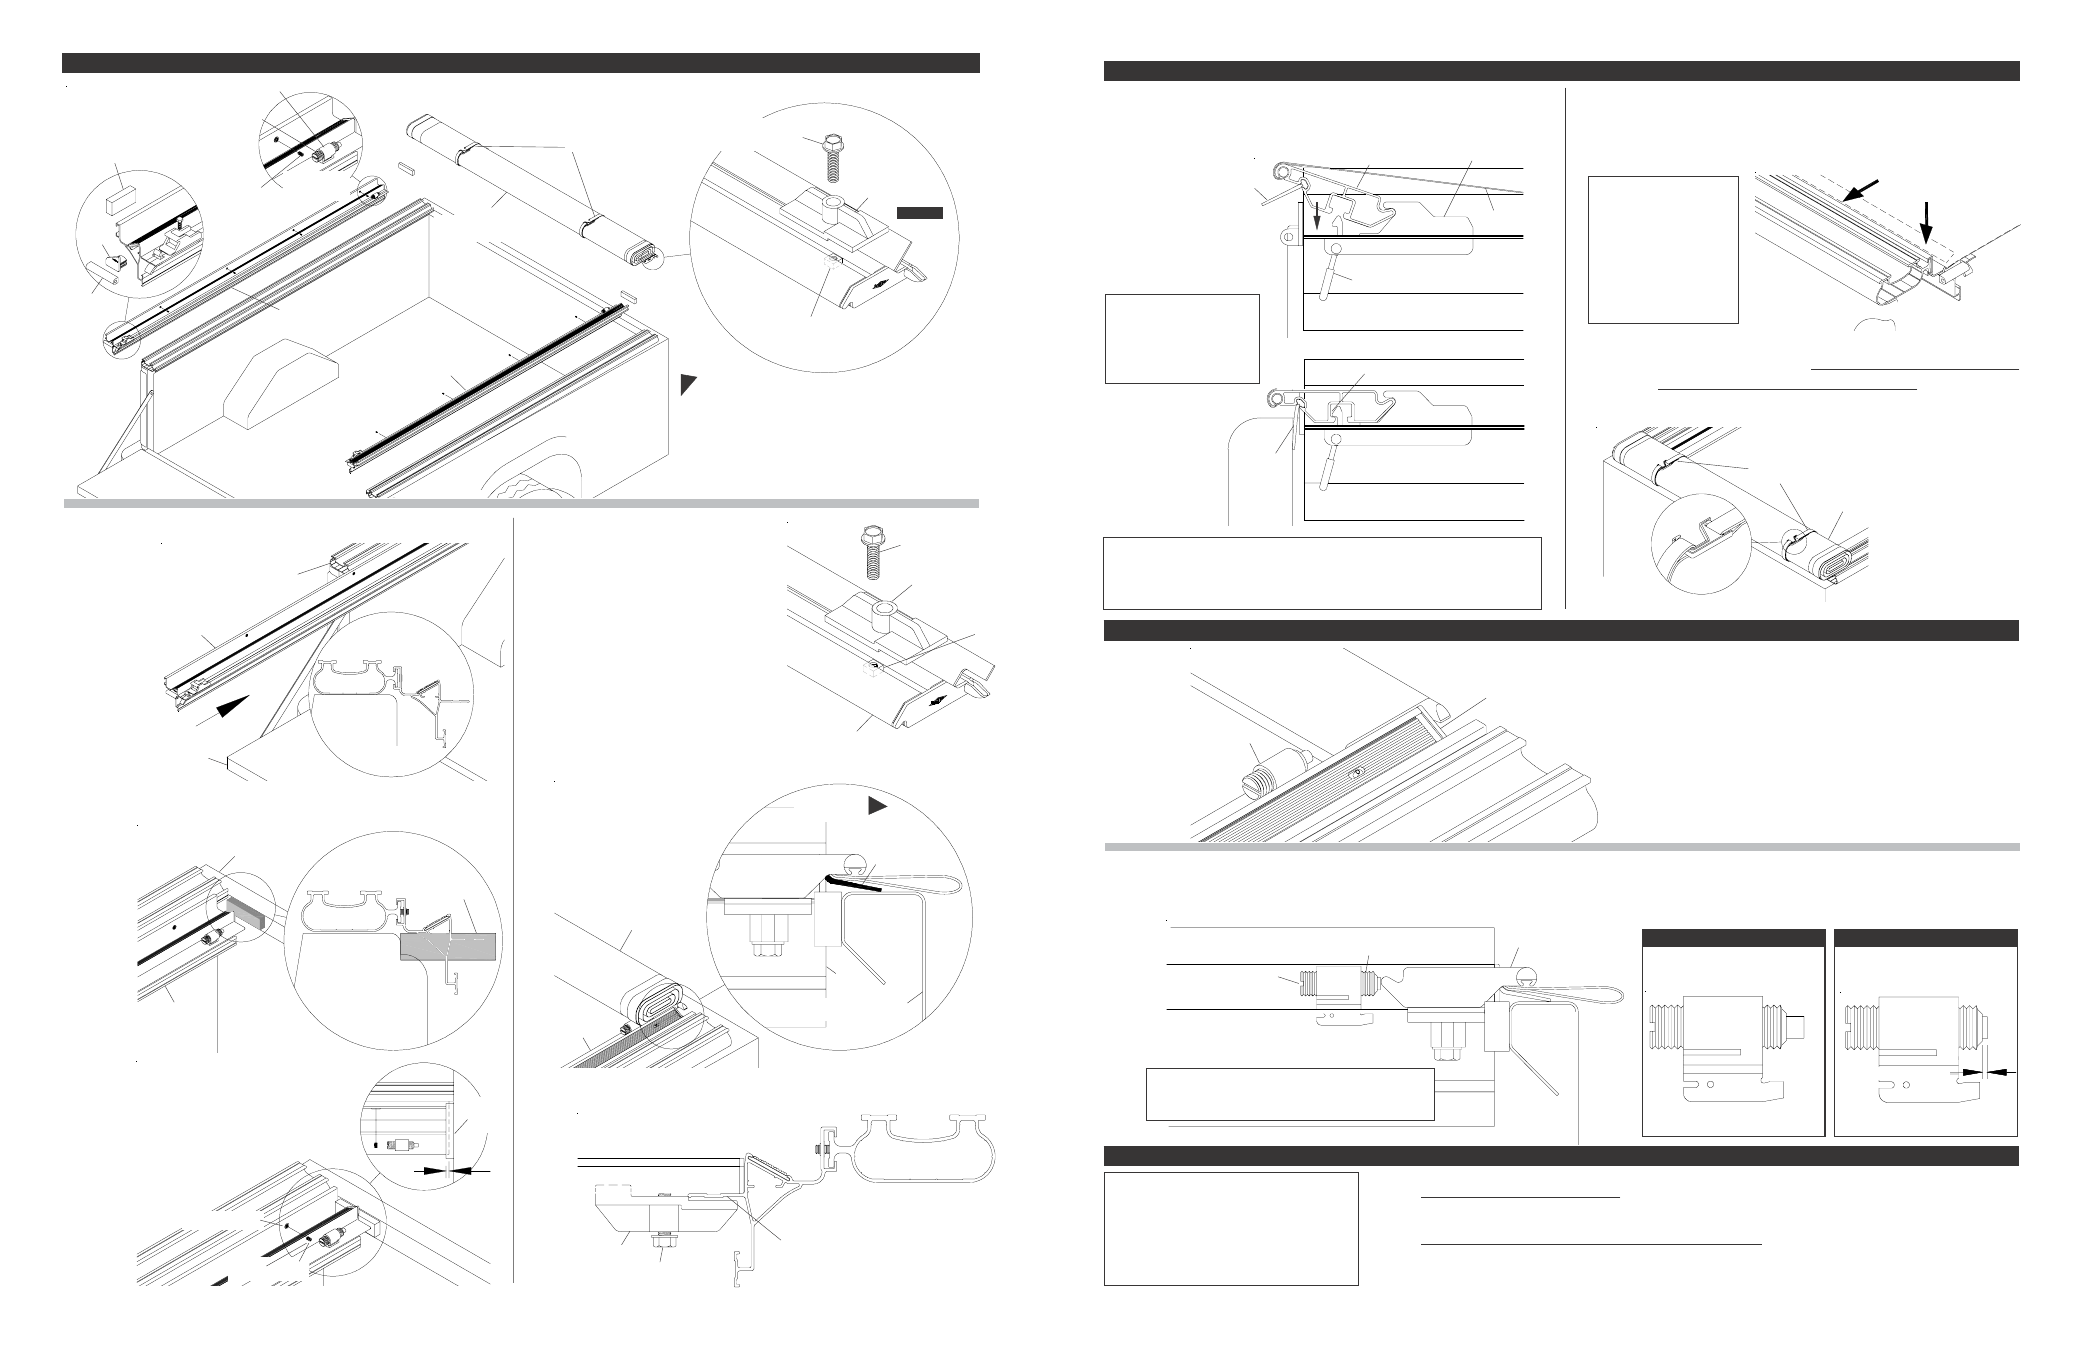
STEP 9:
To release cover, pull back on toggle. Roll cover
toward cab to open. For best results, leave cover
fastened to side rails while opening.
STEP 11: Set tension during warmest part of day. With cover closed, release VELCRO
®
brand loop from both side rails near
cab. Check compression of both spring plungers against the front header per diagram. Roll cover open and make
adjustments. Close cover and recheck adjustment. Repeat until satisfactory tension has been achieved.
header
cover
toggle
header seal
header stop
adjust HERE
HERE
HERE
HERE
HERE with
flat screwdriver
cover secured open
safety
straps
side rail
front header
spring plunger
EVER-TITE™
AUTOMATIC
TENSION
CONTROL
•
Spring plunger compensates for material expan-
sion and contraction caused by temperature
changes.
•
Check cover tension after installation, seasonally,
and after extreme temperature changes.
•
For best performance, adjust tension regularly
to protect your cover against wind wear.
lock toggle into header
header
seal
inside
tailgate
spring plunger
front header
HEADER WILL NOT LATCH:
Make sure the header seal is not caught between side rail and header.
FABRIC COVER IS TOO TIGHT OR TOO LOOSE: See Step 11 to adjust tension.
* VELCRO® is a registered trademark of the Velcro companies.
STEP 7:
Unroll cover toward tailgate and rest bows on side
rails. Rotate header into header stops and press
down to lock toggle into header.
COVER TOO LOOSE
ROTATE CLOCKWISE
CORRECT TENSION
DURING WARMEST
PART OF DAY
STEP 10: Secure cover open by
hooking safety straps to
front loops.
STEP 8:
Secure Shur-Bond™ fasteners on one side rail,
by pressing along full length of rail. Pull cover
tight across pickup bed, and secure Shur-Bond™
fasteners on opposite side rail.
no less than 1/16”
cover
side
rail
side
rail
header
seal on top
of rail
passenger’s
side rail
header
guide
bracket
spring
plunger
safety
straps
FRONT OF
TRUCK BOX
STEP 1:
Open tailgate and slide the side rails onto the inside
track of the TracRac rails.
STEP 6:
Slide header guides into side rail flanges on each
side of header. Tighten cap screws securely.
STEP 5:
Set cover assembly behind cab with header seal
on top of rail.
STEP 4:
Install header guides
into front header with
3/8” x 1 1/2” cap
screws and 3/8”
square nuts as shown.
N u t s h a v e b e e n
pre-installed into
slot in header guide.
Finger tighten.
square nut, 3/8”
cover assembly
side rail flange
cap screw
header guide
cap screw,
3/8” x 1 1/2”
header guide
front header
square
nut, 3/8”
driver’s
side rail
TENSION
CONTROL
cover
assembly
rubber
seal
cap screw,
3/8” x 1 1/2”
NOTE: Adjust tension in small increments.
Slight adjustments will gain significant results.
NOTE: In cold weather conditions or with some accessories, it may be
preferable to close the cover before closing the tailgate. Header seal
may be placed across top of tailgate if preferred.
TROUBLE SHOOTING
Questions?
Call our friendly customer service staff
at TracRac Toll Free:
1-800-501-1587
NOTE: If tailgate has a
key lock, cover is se-
cured until tailgate is
unlocked and opened.
NOTE: Secure Shur-
Bond™ VELCRO
®
brand fasteners along
entire length of both
side rails before driv-
ing vehicle, to prevent
wind lift.
end
plug
COVER TENSION ADJUSTMENT
LATCHING & UNLATCHING COVER
STEP 2:
Locate cab seal between side rails and front of pickup
box. Peel backing and adhere cab seal to box.
STEP 3:
Press side rails
into cab seal,
compressing seal
1/4”. Install set
screws into clinch
nuts on side rails
and tighten.
inside box rail
FRONT OF
TRUCK BOX
SIDE RAIL & COVER INSTALLATION
set
screw
bottom
bottom
bottom
bottom
bottom
v i e w
v i e w
v i e w
v i e w
v i e w
tractonneau
side rail
open tailgate
tracrac rail
end view
end view
end view
end view
end view
cab seal
front of
pickup box
side rail
set screw
clinch nut
cab
seal
1/4”
pull cover over rails
press edges
top gap seal