RTA Products RTA-3309 User Manual
Page 8
RTA-3309
P.8
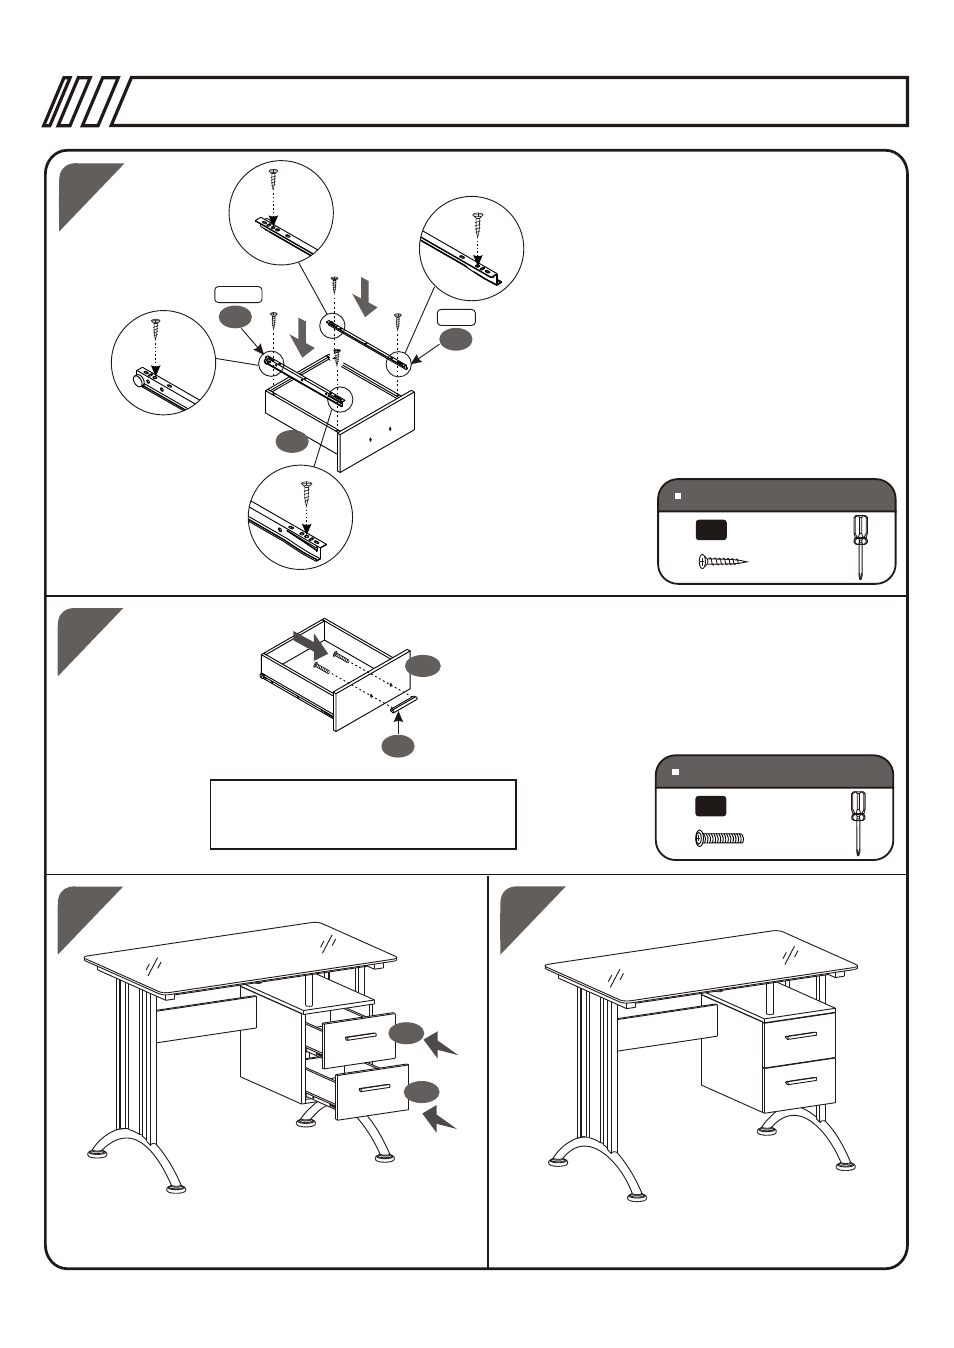
SCREWS
SCREWS
C
4PCS
3X15 MM
SCREWS
SCREWS
4X20 MM
J
2PCS
Right
Left
18
Repeat steps 12 to 16
to install the other drawer
18
18
15
17
18
6
7
7
17
16
With the drawer upside down, align and
match the selected holes of the moving
part of the Sliders (7) with the pre-drilled
holes of the Drawer Left & Right
Panels (16&17) as illustrated and then
use Screws (C) to fix them.
Use Screws (J) to fix the Handle (6) to
the Drawer Front Panel (18).
Make sure to tighten all screws
and then install all drawers in their
places. The top drawer might need
to be inserted at an angle.
Enjoy your unit!
See also other documents in the category RTA Products Computer hardware:
- RTA-00397B (5 pages)
- RTA-1565 (11 pages)
- RTA-2018 (13 pages)
- RTA-2202 (22 pages)
- RTA-2706 (15 pages)
- RTA-3325 (15 pages)
- RTA-3331 (9 pages)
- RTA-3343 (8 pages)
- RTA-3784 (14 pages)
- RTA-8104 (5 pages)
- RTA-8336 (8 pages)
- RTA-8338 (9 pages)
- RTA-B001N (14 pages)
- RTA-B002 (14 pages)
- RTA-B003 (4 pages)
- RTA-B005 (15 pages)
- RTA-Q203 (7 pages)
- RTA-Q207 (15 pages)
- RTA-S06 (18 pages)
- RTA-S10 (11 pages)
- RTA-B006 (11 pages)
- RTA-6336 (7 pages)
- RTA-8107 (10 pages)
- RTA-220AB (12 pages)
- RTA-S06C (11 pages)
- RTA-S07 (17 pages)
- RTA-S08 (10 pages)
- RTA-S11 (9 pages)
- RTA-S13 (9 pages)
- RTA-8830 (13 pages)
- RTA-8850 (11 pages)
- RTA-8896 (10 pages)
- RTA-8897 (10 pages)
- RTA-9910 (9 pages)
- RTA-9920 (9 pages)
- RTA-1462 (14 pages)
- RTA-7732 (6 pages)
- RTA-7733 (6 pages)
- RTA-7734 (6 pages)
- RTA-7735 (6 pages)
- RTA-8807 (15 pages)
- RTA-8811 (13 pages)
- RTA-4804L (29 pages)
- RTA-4805L (30 pages)