Step 3, Step 2 – ParkZone PKZ4700 User Manual
Page 5
9
10
Step 3
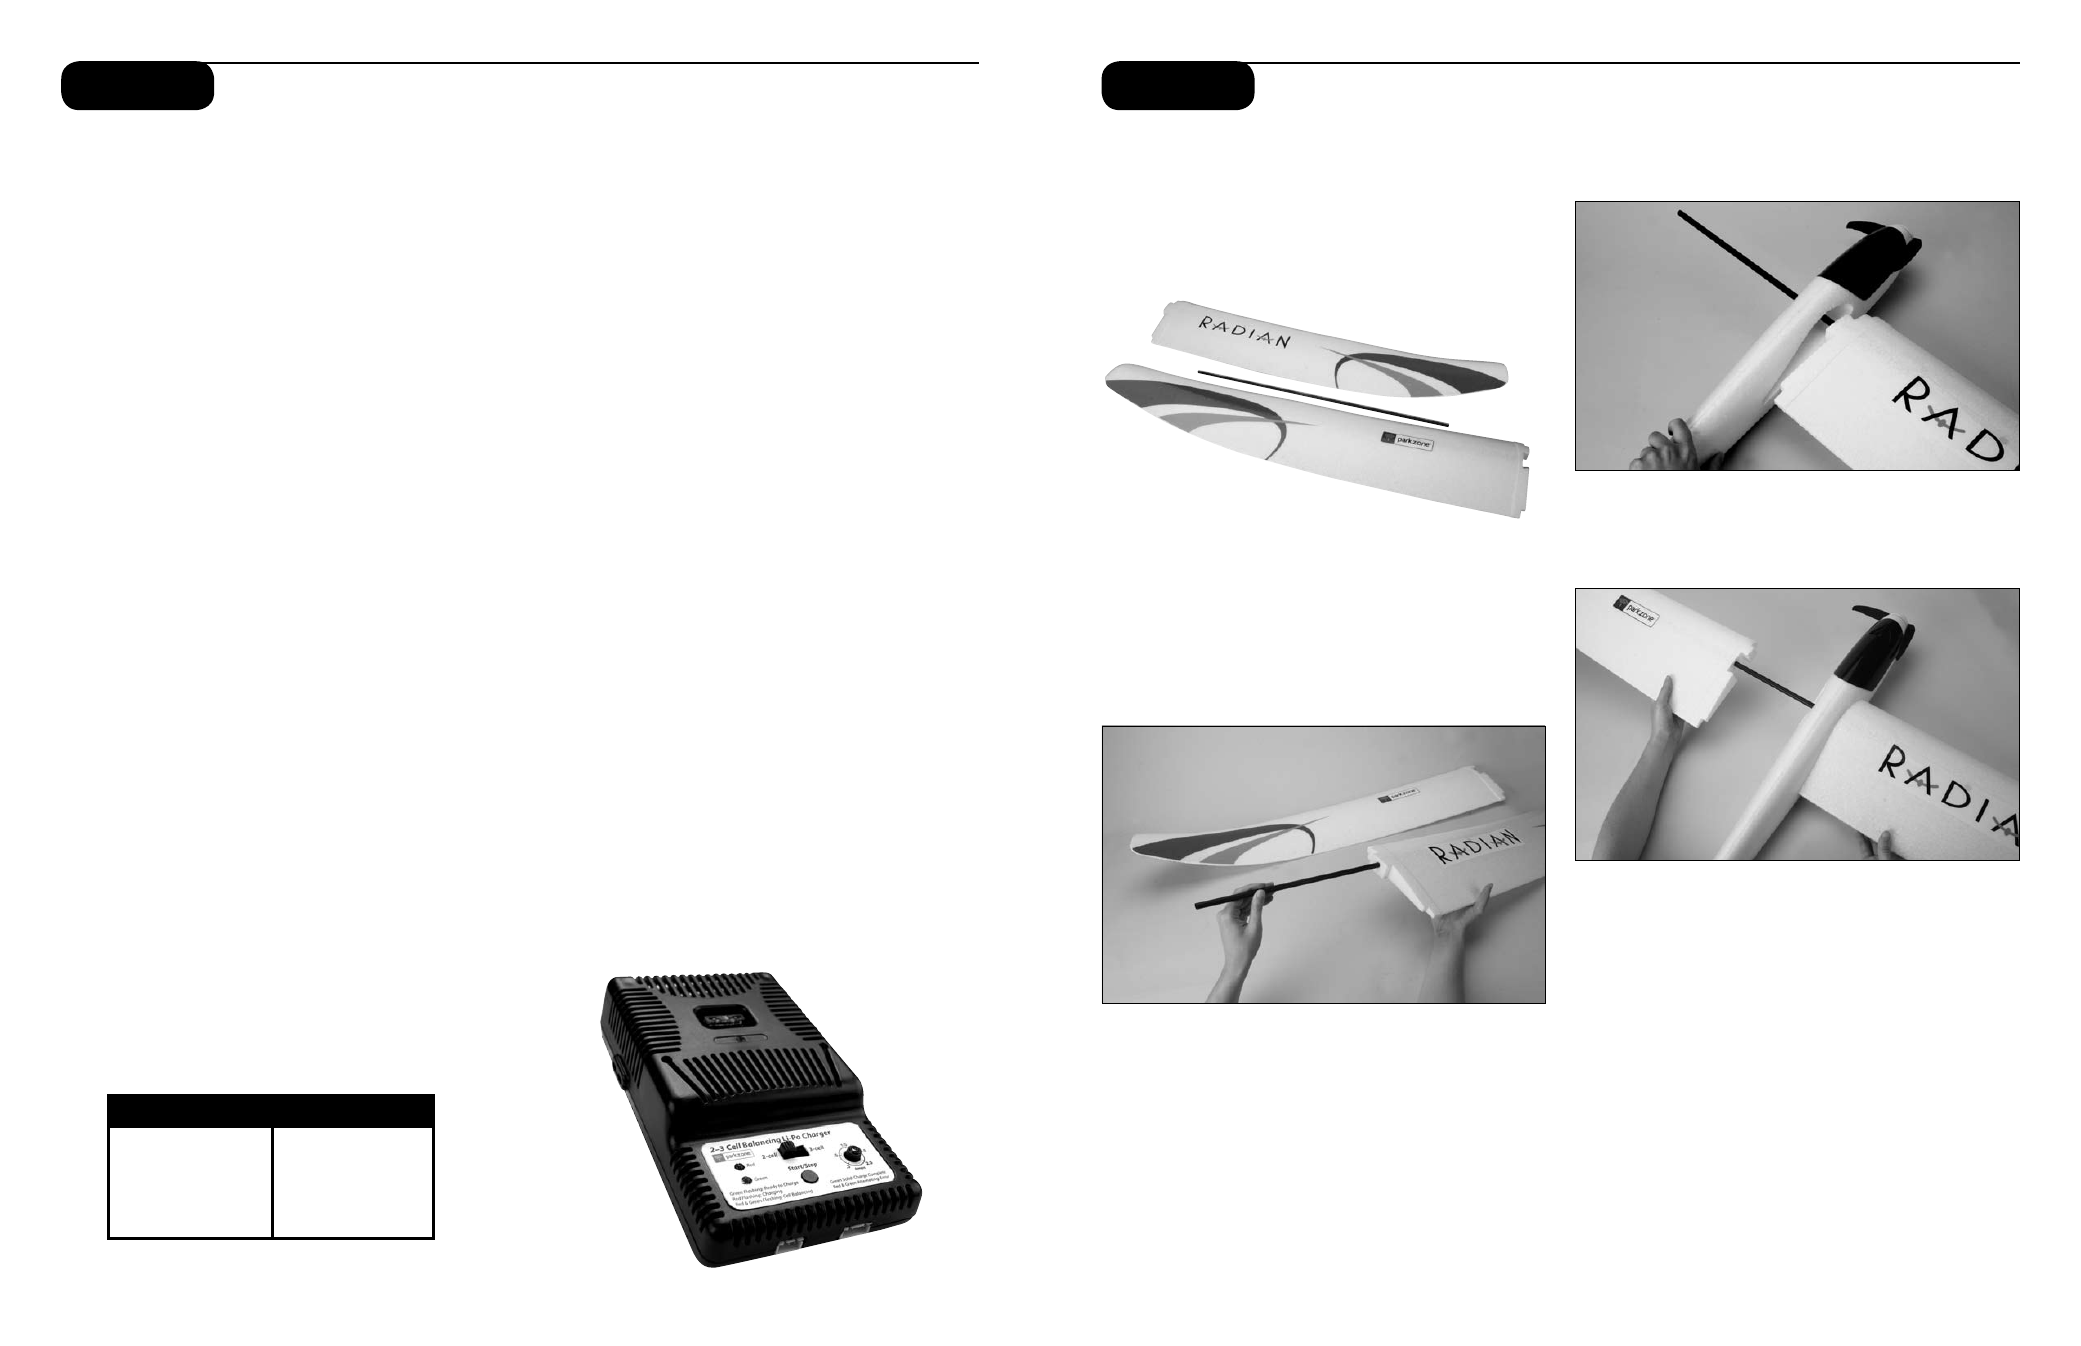
Attaching the Wing
In order to attach the wing of your Radian, please follow
these simple instructions:
1. Locate the wing spar, as well as the left and right
wing panels.
2. Slide the wing spar into the socket located in either
the left or right wing panel. Confirm the wing spar
is fully seated in the socket.
Note: Use caution when inserting the wing spar into
the sockets of the left and right wing panels. Pushing
too hard will damage the wing panels.
3. Slide the wing spar and panel through the opening
in the fuselage. Slide the wing panel into the
fuselage, making sure it is fully seated.
4. Slide the opposite wing panel onto the wing spar.
Press the remaining wing panel into the fuselage
until it is fully seated. The wing panels are keyed
to “lock” when the wing is installed.
Step 2
Charging the Flight Battery
The Radian comes with a 12V 2-3 cell DC balancing
charger and 3S 11.1V 1300mAh Li-Po battery. You
must charge the included Li-Po battery pack with a Li-Po
specific charger only (such as the included charger).
Never leave the battery and charger unattended during
the charge process. Failure to follow the instructions
properly could result in a fire. When charging, make
certain the battery is on a heat-resistant surface.
DC Li-Po Balancing Charger Features
• Charges 2- and 3-cell Lithium Polymer
battery packs
• Automatically detects incorrect cell count selection
• Simple single push-button operation
• LED charge status indicator
• LED cell balance indicator
• Audible beeper indicates power and charge status
• 12V accessory outlet input cord
Specifications
• Input power: 12V DC, 2A
• Charges 2- to 3-cell Li-Po packs with minimum
capacity of 300mA
• Variable charge rates from 300mAh to 2 amps
3S 11.1V 1300mAh Li-Po Battery Pack
The ParkZone 3S Li-Po battery pack features a
balancing lead that allows you to more safely charge
your battery pack when used with the included
ParkZone Li-Po balancing charger.
To Complete the Charging Process
1. Attach the input cord of the charger to the
appropriate power supply (12V accessory outlet),
or use the HBZ6513 (optional) and attach to 12V
AC power supply. Once your charger has been
correctly powered up, there will be an approximate
3-second delay and then you will hear an audible
“beep” and the green (ready) LED will flash.
2. Refer to the chart below to select the appropriate
charge rates:
Note: When charging the included 1300mAh battery,
set the charge rate dial to 1.3A or lower. Selecting
a charge rate higher than 1x battery capacity may
cause a fire.
3. Select the proper number of cells that you will be
charging, either 2 or 3 cells. In the case of the
1300mAh battery included with the Radian, you will
select 3 cells.
4. Locate the safety charge lead on the battery pack.
The charge lead of a 3-cell Li-Po battery will plug
into the larger 4-pin port on the bottom right of
the charger. A 2-cell pack will need to plug into the
3-pin port on the bottom left of the charger. Once
the battery is properly plugged into the correct
port, it will beep 3 times if it is a 3-cell, and twice if
it is a 2-cell pack. Once this is done, you are ready
to proceed to charge the battery pack.
5. Push the start button to begin the charging
process. Once this is done, the charger will make
an audible beep that matches the cell count, and
then the red (charge) LED will begin to flash. Do
not adjust the current once the charger has begun
to charge.
Note: At times, the green LED may also flash during
the charging process, indicating that the charger is
balancing one or more of the cells at the same time
it is charging the battery pack. When this is occurring,
the red and green LEDs will both be flashing. It will
not always be necessary for the cells to be balanced.
6. When the battery pack is fully charged, you will
hear an audible beep for about 3 seconds, and the
green LED will be solid. Always unplug the battery
from the charger immediately upon completion.
Failure to do so could cause a fire.
300—400mAh
300mAh
500—1000mAh
500mAh
1000—1500mAh
1A
1500—2000mAh
1.5A
2000mAh +
2.0A
BATTERY CAPACITY
MAX. CHARGE RATE