Morpho b.pdf, Care & field repair, Warranty repair – NEMO Equipment MORPHO A User Manual
Page 2: Features, Warnings
CARE & FIELD REPAIR
Avoid rough ground, especially rocks and pavement.
Make sure the tent is clean and dry before packing.
Store the tent unpacked to allow air circulation.
Occasionally inspect the tent for wear and tear.
Don’t store the tent exposed to UV light.
Do not store Nemoid™ Foot Pump compressed.
Tips for Extending the Life of Your Tent
Repairing Bladders:
Exchanging Bladders
Any twists in the bladder will result in kinks in the
airbeam when you re-inflate. This will require repeating
this entire process, so it is best to take your time and be
sure the bladder is fed into the tent with the valve
oriented in the right direction, without any twists.
Connect deflator to completely deflate the punctured airbeam.
NEMO AirSupported™ tents are designed to withstand all the
usual rigors of adventure. We worked hard to select materials
with the right balance of being lightweight and durable. If you
take reasonable care of your tent, you should never have a
problem. But, accidents do happen! If you have a puncture, the
next few steps will show you how to swap in a new bladder
and repair the damaged one to keep as a spare. Please read all
the steps first before beginning.
Never open access pockets when airbeam is inflated.
Repairing Bladder Punctures:
Make sure the area is dry and clean
Cover the hole with a generous piece of the self-adhesive patch
(TEAR-AID™) included in your repair kit.
Repairing small holes in a NEMO bladder is simple. If necessary, inflate
the bladder underwater to locate the puncture.
If the damage is larger than 1/8” in length or diameter, the repair may
not be reliable. Replacement bladders are available from your NEMO
retailer or from www.nemoequipment.com.
Open bladder access pockets. If the puncture is reachable, skip to
Repairing Bladder Punctures for TEAR-AID™ instructions.
Tie the new bladder to the end of the old bladder. It is important
as you pull the new bladder through that it does not twist. To
minimize twists, it may help to lay out the new bladder flat on the
ground with the valve oriented the right direction. Make sure to
use a long bladder when fixing the long airbeam.
Once the valve is pushed back through its Hypalon® hole
and the access pockets have been closed, re-inflate.
Pull the new bladder through and untie the old bladder.
To swap in a new bladder, push the valve back through its
Hypalon® hole. A small amount of force may be needed. Be careful
not to tear the airbeam.
1
2
4
5
3
6
7
1
2
7
If you have any problems with a NEMO product, please contact Rainy
Pass Repair, Inc., the industry leader in outdoor product care for repair or
replacement. If you have any questions regarding warranty and repair,
or if you need to send a product in for service, please call Rainy Pass. It is
not necessary to clean the item before sending, but it will be
appreciated if you remove any excessive soiling. Rainy Pass will be
happy to give you advice about safely cleaning your product. Please
provide the following when you send a NEMO product to Rainy Pass:
A note with your name, phone number, address, e-mail and
problem description. A repair form can be downloaded at:
www.nemoequipment.com/pdf/NEMO_repairform.pdf
Please remove all of your personal items and mark all damaged
areas on the product with masking tape.
Pack the product in a sturdy cardboard box with plenty of room. If
possible, use the original box to reduce waste.
If you live in the Seattle area, you can call Rainy Pass locally at (206)
523-8135 and visit their shop during the following hours: M,T,W,F
9am-6pm and Th 9am-7pm.
Ship to:
Rainy Pass Repair, Inc.
5307 Roosevelt Way, NE
Seattle, WA 98105
To contact Rainy Pass:
Phone: 1 (888) 747-7867
Email: [email protected]
www.rainypass.com
WARRANTY
REPAIR
NEMO guarantees every product we sell. We put a great effort into
choosing the best materials and providing you with the highest level of
workmanship. If one of our products does not meet your expectations
during its useful life, we promise to repair it, replace it, exchange it, or
give you a refund at our discretion. NEMO does not warranty products
against normal wear and tear, unauthorized modifications or alterations,
improper use, improper maintenance, misuse or neglect or if the
product is used for a purpose for which it is not intended. Except as
expressly set forth in these terms and conditions, NEMO is not liable for
any direct, indirect or consequential damages arising out of or resulting
from the use of a NEMO product. The warranties set forth in these terms
and conditions are in lieu of all other warranties, express or implied,
including without limitation, implied warranties of merchantability or
fitness for a particular purpose.
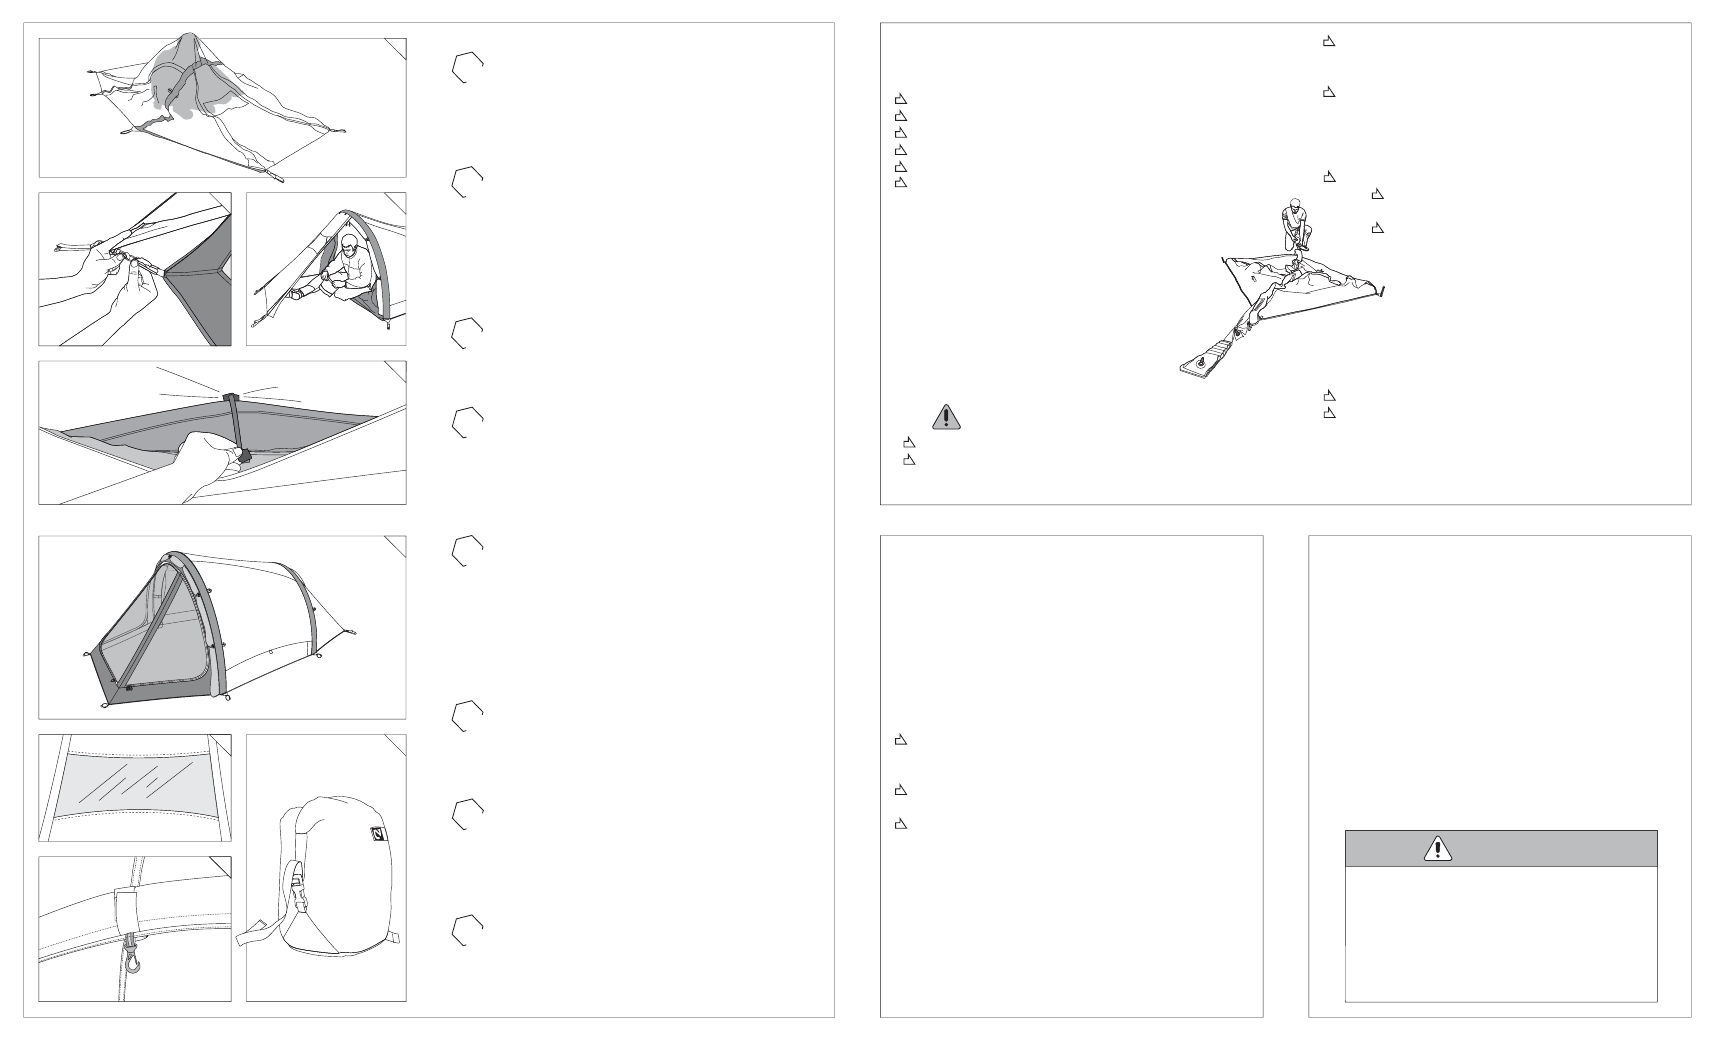
In poor weather, Morpho AR™ can be inflated entirely from the inside.
After staking out the corners, get inside and take your time pumping up
the airbeams while staying dry. Remember to close all zippers to stay
completely dry.
1
The ExoFly™ is a unique morphing vestibule that gives you the option
of a full vestibule to stash wet and muddy gear or expands to provide
maximum sleeping room. Unclip the inner tent near the front stakes,
and retract to create as much space as you need. You can clip and unclip
from inside the tent by opening the front mesh zipper. WARNING: do
not cook in or near your tent. This can lead to burns or suffocation.
2
With doors that can be fastened back, the front vestibule creates great
open-air protection in the rain and allows a dry entry.
3
The dual side vents on Morpho AR™ offer additional side to side
ventilation. Attach the Velcro at end of the strut to Velcro on the side of
the tent to deploy the vents from inside the tent. These vents will add
extra ventilation in a rainstorm while still protecting the inside of the
tent.
4
FEATURES
On sunny days, roll back all of the doors of ExoFly™ to expose as much
mesh ventilation as possible. To tie doors back, put the cord locks
through their respective reflective webbing loop and pull the cord lock
tight. For privacy or shade, you can choose which doors to tie back or
leave open. The vent at the rear of the tent completes the ventilation
system that ensures a maximum cross breeze.
5
You can peek out the front window of Morpho AR™ to get the weather
report, or on clear nights, enjoy star gazing from inside the tent.
6
Use the hook hanging from the center of the airbeam to clip your head
lamp for a convenient overhead light, or run a line between the two
hooks to create an indoor clothes line.
7
1
3
2
4
5
6
Keep tent away from open flames or smoldering camp fires
Maintain adequate ventilation inside tent
Avoid campsites with danger of falling rocks or tree limbs, lightning
strikes, flash floods, avalanches or other hazards
In extreme weather make sure all stakes and guy-outs are secure
Do not store food inside of tent
Store tent in a dark, dry area away from UV light
WARNINGS
Your Morpho AR™ stuff sack also works very well as a dry bag for other
gear when your tent is not inside. The bag is waterproof and the side
reinforcement allows you to really pack things in tight.
8
8