Motor maintenance, Wheel and shaft maintenance, Wheel rotation – MK Plastics AXTC Centrifugal Inline Fan IO&M User Manual
Page 4: Drive alignment
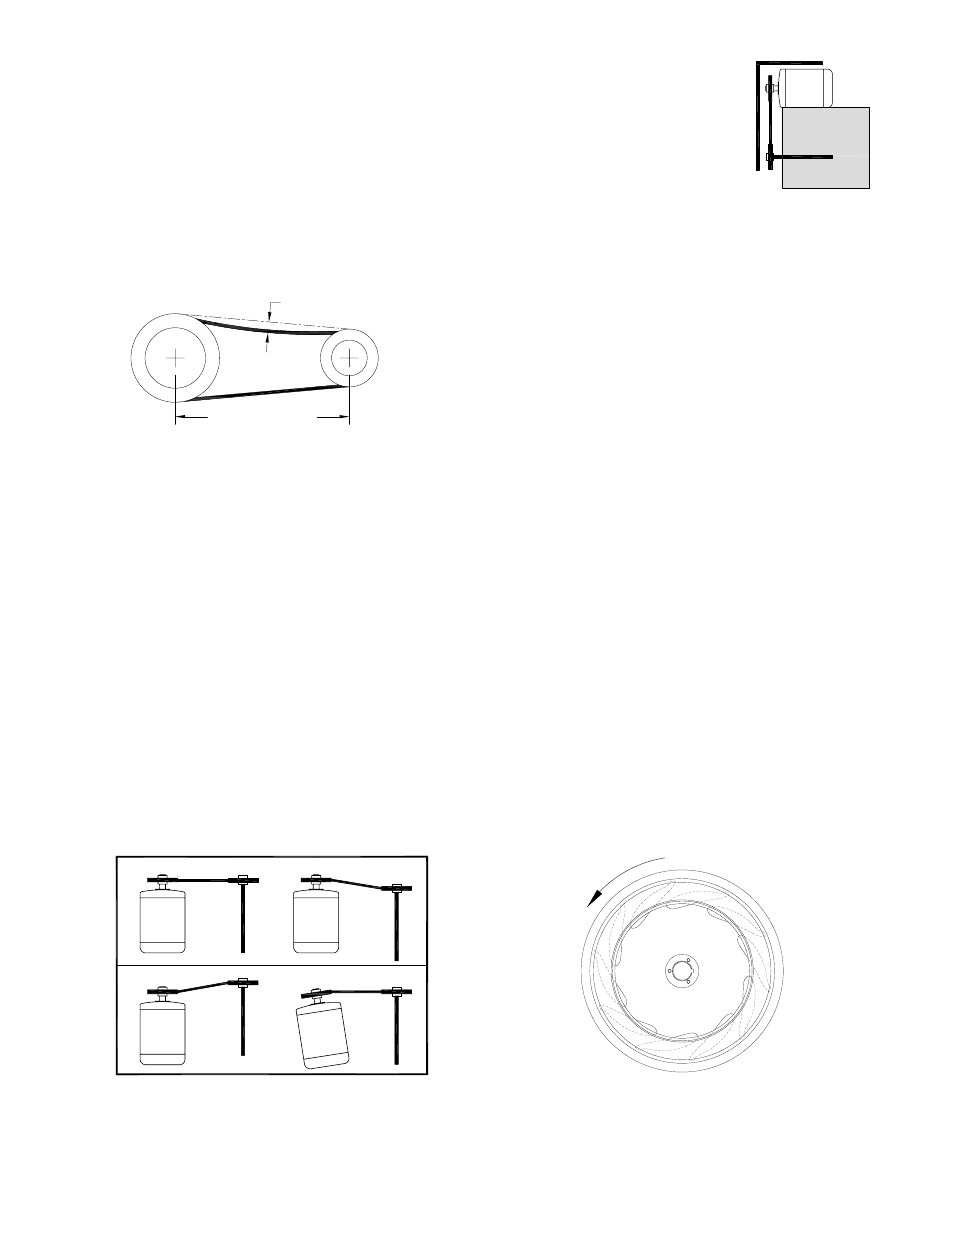
A recommended method of inspecting
the pulley alignment is shown in Figure
12. With the shorter leg of a carpenter’s
square or other straight edge lying
along the case of the motor, adjust
the position of the motor pulley (or the
motor) until the longer leg of the square
is parallel to the belt.
Motor Maintenance
The three basic rules of motor
maintenance are:
1. Keep the motor clean.
2. Keep the motor dry.
3. Keep the motor properly lubricated.
Blow dust off periodically (with low pressure air) to prevent
motor from overheating.
Some smaller motors are lubricated for life. Lubrication
requirements are normally attached to the motor. Use the
motor manufacturer’s recommendations for relubrication. If
this information is not available, the following schedule may
be used. Motors less than 10 HP running about eight hours a
day in a clean environment should be lubricated once every
five years; motors 15 to 40 HP, every three years. For motors
in dusty or dirty environments or running 24 hours a day:
divide the service interval by 4. Do not over lubricate.
Wheel and Shaft Maintenance
Periodically inspect the shaft and wheel for dirt buildup,
corrosion, and signs of excess stress or fatigue. Clean the
components. If the wheel is removed for any reason, make
sure that it is securely attached to the shaft before restarting
the fan.
Wheel Rotation
Test the fan to ensure the rotation of the wheel is the same
as indicated by the arrow marked Rotation. One of the most
frequently encountered problems with centrifugal fans is
motors which are wired to run in the wrong direction. This is
especially true with 3-phase installations where the motor will
run in either direction, depending on how it has been wired.
To reverse rotation of a 3-phase motor, interchange any two
of the three electrical leads. Single phase motors can be
reversed by changing internal connections as described on
the motor label or wiring diagram. Figure 13. shows the wheel
rotation as viewed from the fan inlet.
M.K. Plastics Corp. Montréal, Québec www.mkplastics.com
Page. 4
Check sheaves for wear. Excessive slippage of belts on
sheaves can cause wear and vibration. Replace worn
sheaves with new ones. Carefully align sheaves to avoid
premature sheave failure.
Belt tension is determined by the sound the belts make
when the fan is first started. Belts will produce a loud squeal
which dissipates after the fan is operating at full capacity. If
the belt tension is too tight or too loose, lost efficiency and
possible damage can occur. The proper tension for operating
a V-belt is the lowest tension at which the belts will not slip
at peak load conditions. For initial tensioning, the proper belt
deflection half-way between pulley centers is 1/60” for each
inch of belt span.
Refer to the following procedure for belt tensioning -
1. Loosen motor plate adjustment bolts and move motor
plate in order that the belts can easily slip into the
grooves on the pulleys. Never pry, roll, or force the belts
over the rim of the pulley.
2. Adjust the motor plate until proper tension is reached.
For proper tension, a deflection of approximately 1/60”
per inch of center distance should be obtained by firmly
pressing the belt. Refer to Figure 10.
3. Lock the motor plate adjustment nuts in place.
4. Ensure pulleys are properly aligned.
When replacing belts, replace the entire set. After initial
replacement and tensioning, recheck belt tension after a few
days. New belts require a break-in period. Never use belt
dressing on any belts.
Drive Alignment
Pulley alignment is adjusted by loosening the motor pulley
setscrew and by moving the motor pulley on the motor shaft.
Fig. 11 illustrates correct and incorrect pulley alignment.
Deflection [inch]
Belt Span [inch]
Figure 10. - Belt Tension
Correct
Incorrect
Incorrect
Incorrect
Figure 11. - Pulley Alignment
Correct
Incorrect
Incorrect
Incorrect
Figure 12.
Figure 13. - Wheel Rotation