Final installation steps, Operation, Start up – MK Plastics AXPR IO&M User Manual
Page 4
4
Final Installation Steps
1. Inspect fasteners and setscrews, particularly fan mounting fasteners, and tighten according to the
recommended torque shown in the table Recommended Torque for Setscrews/Bolts.
2. Inspect for correct voltage with voltmeter. Make sure the supply voltage is correct.
3. Ensure all accessories are installed.
4. The propeller should rotate freely and not rub on the inside of the fan inlet cone. Turn the propeller by hand
to check for binding.
5. Test the fan by ‘bumping’ the starter to be sure the propeller rotation is the same as indicated by the arrow
affixed to the unit, marked Rotation.
Do not allow the fan to run in the wrong direction. This will overheat the motor and cause serious
damage. For 3-phase motors, if the fan is running in the wrong direction, check the control switch.
It is possible to interchange two leads at this location so that the fan is operating in the correct
direction.
Operation
Pre-Start Checks
1. Lock out all the primary and secondary power sources.
2. Ensure fasteners and setscrews, particularly those used for mounting the fan, are tightened.
3. Inspect motor wiring.
4. Ensure fan, screens and shutter are clean and free of debris. Any loose items or debris could be drawn into
the fan, or be dislodged by the fan discharge.
5. Inspect propeller-to-inlet clearance.
6. Restore power to the fan.
Start Up
Turn the fan on. In variable speed units, set the fan to its lowest speed and inspect for the following:
1. Direction of rotation.
2. Excessive
vibration.
3. Unusual fan noise.
4. Excessive and unusual motor noise.
5. Improper motor amperage or voltage.
If a problem is discovered, immediately shut the fan off. Lock out all electrical power and check for the cause
of the trouble. See Troubleshooting.
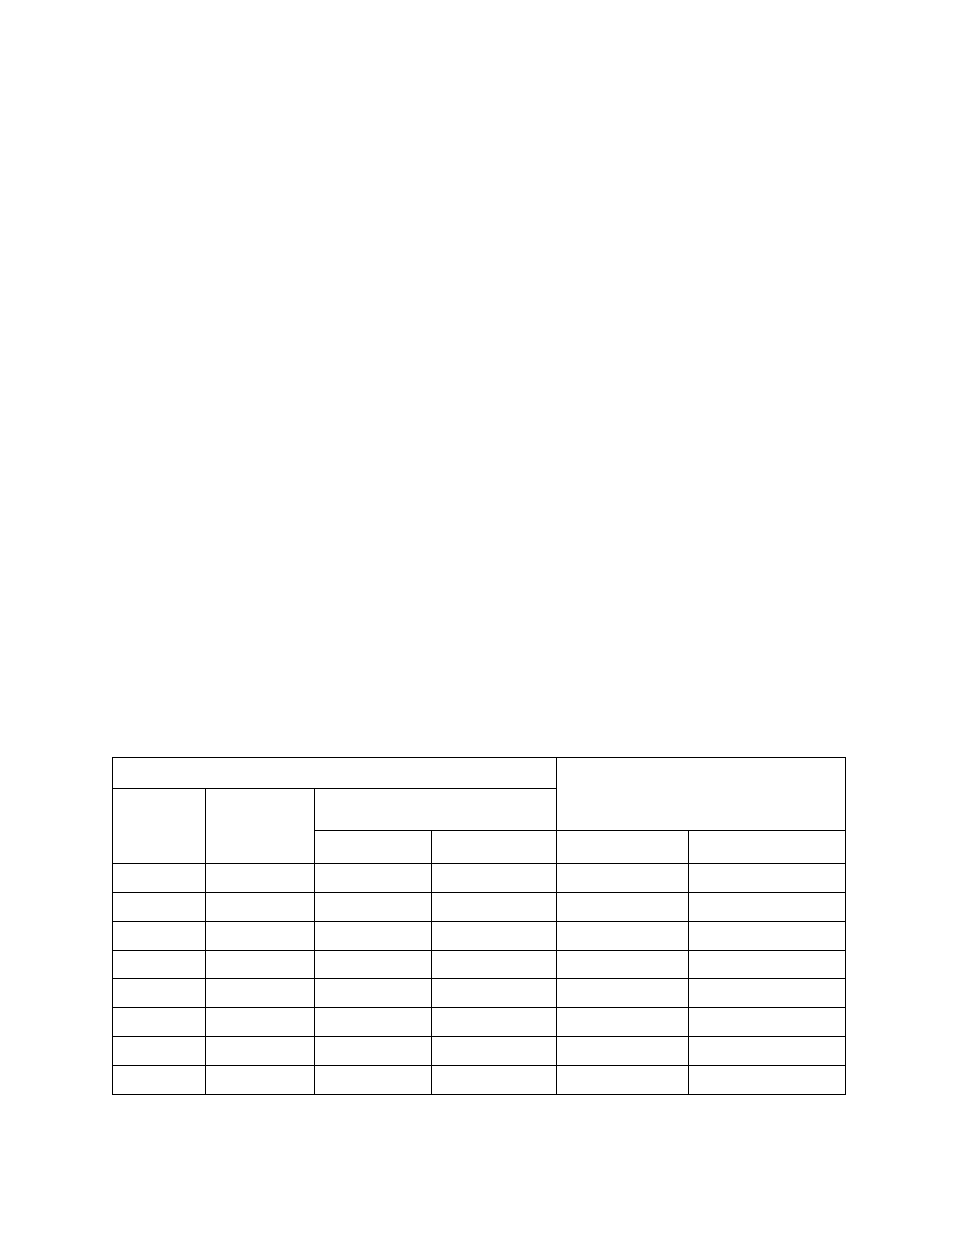
Setscrews should be rechecked after a few minutes, eight hours and two weeks of operation (see the following table
for correct tightening torques).
Recommended Torque for Setscrews/Bolts (IN/LB.)
Setscrews
Recommended Torque
Inch-Lbs
Hold Down Bolts
Size
Key Hex
Across
Flats
Min. Max. Size
Wrench Torque
(inch-Lbs)
No. 10
3/32”
28
33
3/8”-16
240
1/4” 1/8”
66
80
1/2”-13
600
5/16” 5/32”
126
156
5/8”-11
1200
3/8” 3/16” 228
275
3/4”-10
2100
7/16” 7/32”
348
384
7/8”-9
2040
1/2” 1/4” 504
600
1”-8
3000
5/8” 5/16” 1104
1200
1-1/8”-7
4200
3/4” 3/8” 1440 1800 1-1/4”-7
6000