Thro – HITEC Aggressor CRX User Manual
Page 7
E) ABS (Anti-Lock Braking)
- After entering the programming mode press the "FUNC" button to scroll to the ABS menu.
- Press the "DATA" + or - buttons to turn the ABS feature on or off.
- Once the ABS is selected to "on" press the "SEL" button to scroll down to the "point" setting;
this sets the position where the ABS engages in the brake travel.
- To set this you will need to push the brake lever to the desired position and press the
"DATA" + & - buttons at the same time. If done correctly the percentage on the screen will show the
new position. If it is not at the desired position repeat the last step.
- Press the "SEL" button to scroll down to set the "delay". This is the time it takes for the ABS to engage.
- Press the "DATA" button to adjust the setting. The lower the number, the shorter the delay.
- Press the "SEL" button to scroll down to set the "depth". This is the amount of travel the
servo will move during the pulsing.
- Press the "DATA" button to adjust the setting. The lower the number, the tighter the pulsing movement.
- Press the "SEL" button to scroll down to set the "speed". This is the rate at which the
servo pulses back and forth.
- Press the "DATA" button to adjust the setting. The lower the number, the faster the pulsing.
- Note: Typically the ABS function is only used in nitro or gas powered vehicles.
To fine tune the braking of an electric vehicle use the ATL switch.
- Tip: After extensive testing the Hitec racing team has found these ABS settings
work in almost all applications:
- Point: 50% -75%
- Delay: 0-2
- Depth: 3-5
- Speed: 2-5
- Press the "FUNC" button to scroll to the next menu.
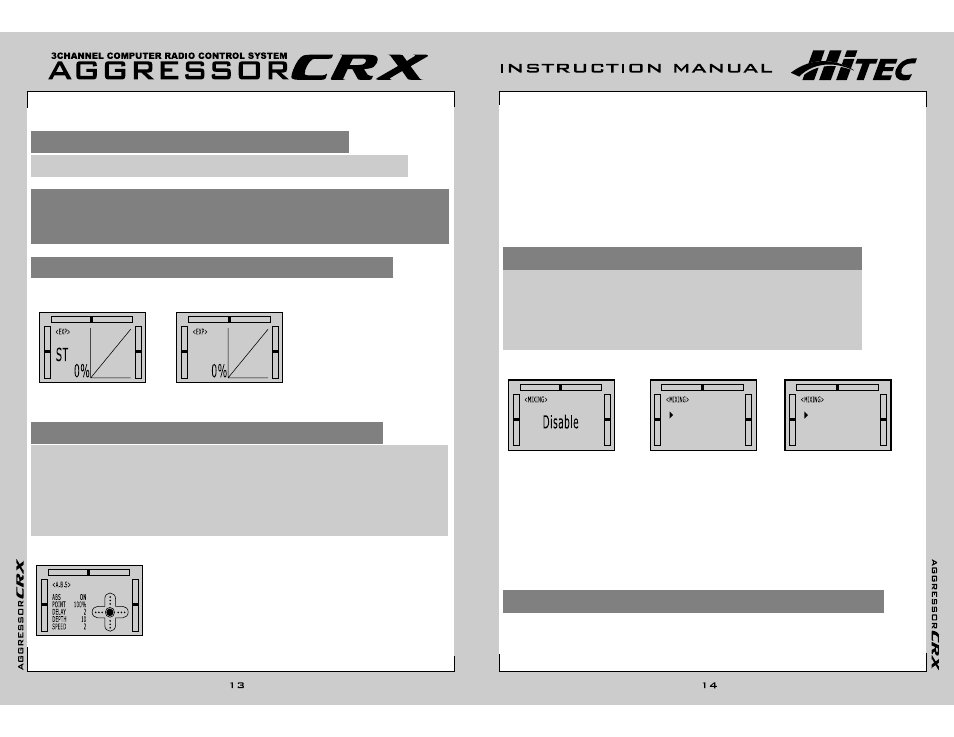
F) Mixing
- After entering the programming mode press the "FUNC" button to scroll to the mixing menu.
- To use this feature, select "Linear" control for the 3rd channel. If "Shift" is selected it will not work.
- Press the "DATA" + & - buttons at the same time to activate or disable the mixing function.
- Press the "DATA" + or - buttons to select "ST" (Steering) or "THRO" (Throttle) as the master.
- Press the "SEL" button to scroll down to the "Rate1" setting and use the DATA +/- buttons to adjust.
If "ST" was selected then this screen allows you to set the amount of mixing to the AUX servo for
a left turn. To set the amount of mixing for the right turn (Rate2) turn the steering wheel to the right.
- If "THRO" was selected then "Rate1" is throttle and "Rate2" is braking. You will have to push the
brake trigger forward to set "Rate2" and use the DATA +/- buttons to adjust.
- Press the "SEL" button to scroll down to the "neutral" setting. This allows you to reset the
center position of the AUX servo if needed. To reset this position, move the controls so that the
AUX servo is in the new desired neutral position and push the "DATA" + & - buttons at the same time.
- Note: The trim does not link to the AUX servo so you will need to use the "neutral" feature to
fine tune the servo as needed to match the master.
- Press the "SEL" button to get to the throttle EPA screen, adjust it with the "DATA" + or - buttons the
same way as the steering. To adjust the high throttle setting, pull and hold the trigger back.
To adjust the brake EPA push and hold the trigger forward.
- Note: The ATL switch on the handle under the D/R dial will make the same
adjustment as the brake EPA.
- Tip: The ATL can be adjusted while driving, for fine tuning the braking power of the vehicle.
The current setting will be displayed on the primary screen.
- Press the "SEL" button to adjust the auxiliary 3rd channel EPA with the "DATA" + or - buttons.
- Note: If "SHIFT" was selected for this model, you will need to push the shift button to
set each side of the travel.
- Note: If "LINEAR" was selected for this model, you will need to move the AUX digital trim tab
on the right side of the steering column to the "side" you wish to set.
Leaving the trim centered will adjust both sides at once.
- Press the "SEL" button to loop back to the main EPA menu.
- Note: The main EPA menu will now show all the new settings.
- Note: Push the "DATA" + & - buttons at the same time to reset to factory default(100%).
- Press the "FUNC" button to scroll to the next menu.
D) Exponential
- After entering the programming mode press the "FUNC" button to scroll to the exponential menu.
- To set the exponential press the "SEL" button to select steering or throttle.
Next, press the "DATA" + button for positive expo or the - button for negative expo.
- Note: The graph depicts the travel curve for one side of the servo travel.
- Note: Push the "DATA" + & - buttons at the same time to reset to factory default(0%).
- Tip: Negative steering exponential will make the vehicle less sensitive to small inputs and
positive expo will make the vehicle more sensitive. Typically you will only use negative expo for
steering but you should experiment with this setting to see what suits your driving style the best.
A good place to start is around -30%.
- Tip: For the throttle, use negative expo to broaden the power band and positive expo to increase the
"punch". Typically you will use negative expo with a modified electric, nitro vehicles,
in situations where the traction is low. Use positive expo with a stock electric motor vehicles or
when the traction is high.
THRO
ST
Rate1
Rate2
Neutral
AUX
100%
52%
0
THRO
Rate1
Rate2
Neutral
AUX
0%
16%
8
_