Hanna Instruments HI 9147 User Manual
Page 2
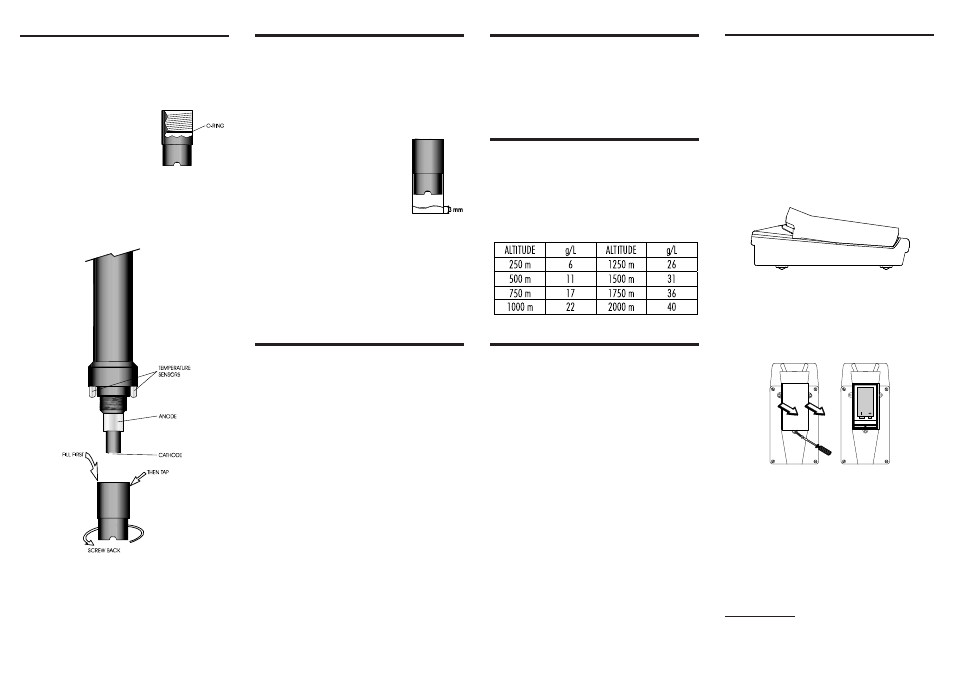
PROBE PREPARATION
All Hanna D.O. probes are shipped dry. To hydrate the probe and
prepare it for use proceed as follows:
1. Remove the black & red plastic cap. This cap is used for
shipping purposes only and can be thrown away.
2. Insert the supplied O-ring in
the membrane (see figure).
3. Rinse the supplied membrane (HI 76409A) with electrolyte
while shaking it gently. Refill with clean electrolyte.
Gently tap the membrane over a surface to ensure that
no air bubbles remain trapped. To avoid damaging the
membrane, do not touch it with your fingers.
4. Whit the sensor facing down screw the cap clockwise to
the end of the threads. Some electrolyte will overflow.
CALIBRATION
Calibration is a very simple 1-point procedure, performed in air.
Ensure the probe is ready for measurements, i.e. the membrane is
filled with electrolyte (see “Probe Preparation” section for details).
Switch the meter on, select the % mode and turn the % trimmer
to display 100%.
If the environmental relative humidity is lower
than 30%, pour some deionized water (approx.
3 mm) in the white cap supplied with the
membrane. Insert the probe in the cap and
calibrate.
Keep the probe in vertical position to avoid any
contact of the membrane with the water.
Note: For best accuracy, calibration should be performed on the
measurement site, and the probe should be at the same
temperature as the air.
Note: After replacing the membrane or the electrolyte solution,
wait a few minutes for the reading to stabilize.
TAKING MEASUREMENTS
Ensure the meter has been calibrated. Ensure the temperature
sensors are immersed in the sample to be tested.
The D.O. reading can be displayed in % air saturation or in
ppm (mg/L); press the corresponding key to enter the desired
mode. The instrument also measures the temperature: press the
“°C” button to display the temperature value of the tested
solution.
For accurate dissolved oxygen measurements a water movement
of at least 5-7 cm/sec is required. In this way a constant
replenishment of the oxygen-depleted membrane surface is
ensured.
During field measurements, this condition may be achieved by
manually agitating the probe into the solution being measured.
Accurate readings are not possible in still water.
During laboratory operations, the use of a magnetic stirrer is
recommended.
Note: For some particular applications, such as fish farming,
the membrane can be sterilized with stabilized iodine
(20 to 50 ppm), typically used for this purpose.
Note: For use in harsh environments, it is recommended to
protect the membrane with the optional HI 76409-0
sleeve. The response time will slightly slow down.
BATTERY RECHARGE & REPLACEMENT
The instrument features a battery level control system: the “V” tag
on the LCD lights up to advise the user that only a few hours of
working life are left.
The instrument is also provided with BEPS (Battery Error
Preventing System), which turns the meter off if the battery
level is too low to ensure reliable readings.
The 9V battery provided with the instrument can be recharged
using the optional HI 710040 battery recharger.
Plug the recharger and the green LED will turn on, then put the
meter on the recharger and the LED will turn to orange, to
indicate that the battery is charging.
It will take approx. 14 hours to completely charge the battery.
The supplied 9V Ni-MH rechargeable battery can last for
approximately 5 years. When the battery needs to be replaced,
remove the cover on the rear of the meter and replace the
rundown battery with a new one, while paying attention to the
correct polarity.
Replacement should take place in a non-hazardous area using
a 9V Ni-MH rechargeable battery.
Note: The meter can also be powered with a normal 9V
alkaline battery. Never use the HI 710040 recharger
with non-rechargeable battery.
Note: Dispose of the Ni-MH battery according to local
regulations.
SALINITY COMPENSATION
Oxygen measurements (mg/L range only) can be compensated for
salinity factor and the correction value can be set by the user.
Enter the mg/L mode by pressing the corresponding key.
Keep the SAL button pressed while turning the SAL trimmer to
display the desired salinity value (within the 0 to 51 g/L range).
ALTITUDE COMPENSATION
When salinity compensation is not required (i.e. not salty water),
the SAL trimmer can be used to set the altitude correction value.
Enter the mg/L mode by pressing the corresponding key.
Keep the SAL button pressed while turning the SAL trimmer to
display the salinity value corresponding to the desired altitude.
See below table for reference:
Recommendations for Users
Before using this product, make sure that it is entirely suitable for the environment in which it is used. Operation
of this instrument in residential area could cause unacceptable interference to radio and TV equipment, requiring
the operator to take all necessary steps to correct interference.
Any variation introduced by the user to the supplied equipment may degrade the instruments' EMC
performance. To avoid electrical shock, do not use this instrument when voltages at the measurement
surface exceed 24 Vac or 60 Vdc. To avoid damage or burns, do not perform any measurement in
microwave ovens.
PROBE & MEMBRANE MAINTENANCE
For a top performance probe, it is recommended to replace the
membrane every 2 months and the electrolyte once a month.
Proceed as follows:
• Unscrew the membrane by turning it counterclockwise.
• Rinse the supplied spare membrane (HI 76409A) with
some electrolyte solution while shaking it gently. Refill
with clean electrolyte.
• Gently tap the membrane over a surface to ensure that no
air bubbles remain trapped.
• Whit the sensor facing down screw the cap clockwise to
the end of the threads. Some electrolyte will overflow.
If any deposit scales the sensors, gently brush the sensor surface
with the supplied scouring pad, while paying attention to not
damage the plastic body.