Hanna Instruments HI 991401-01 User Manual
Page 2
Preliminary operations
Connect the pH electrode to the meter.
Connect the 12 Vdc adapter to the meter and to the mains;
the display will lit.
Press and hold the MODE button for 2-3 seconds. All the used
segments on the LCD will be visible for a few seconds.
To change the temperature unit
To change the temperature unit (from °C to °F), from
measurement mode, press and hold the MODE button until
“TEMP” and the current temperature unit are displayed on
the lower LCD (E.g. TEMP °C).
Use the SET/HOLD button to change the temperature unit,
and then press MODE button twice to return to normal
measurement mode.
To freeze the display
Press and hold the SET/HOLD button for 2-3 seconds, until
“HOLD” appears on the secondary display.
Press either button to return to normal mode.
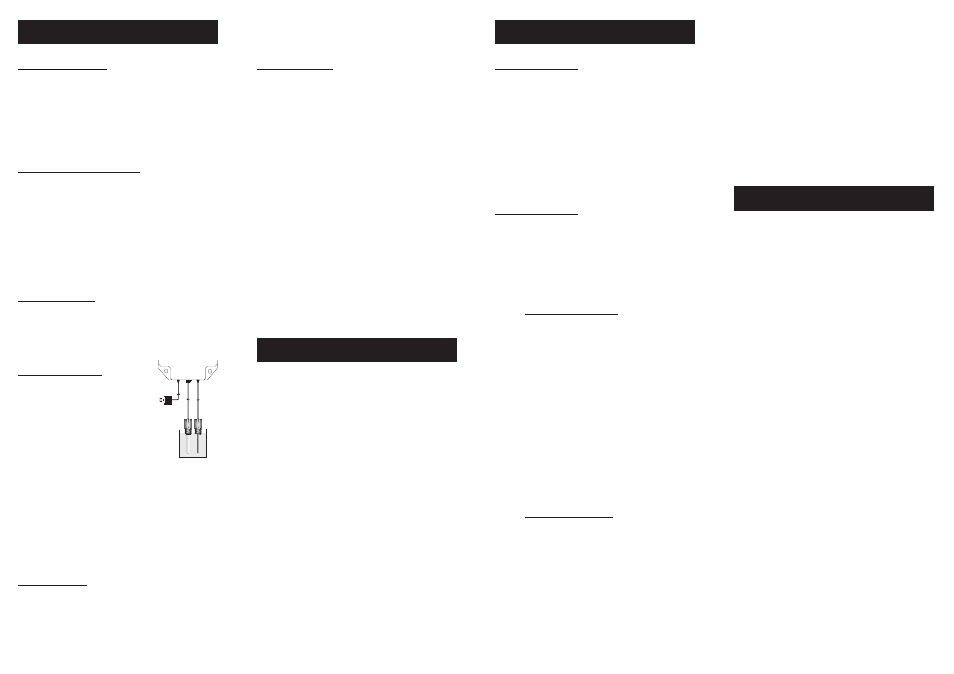
Taking measurements
Immerse the electrode and the tem-
perature probe in the solution to be
tested. For better accuracy, the elec-
trode should not touch or stand close to
the walls or bottom of the sample
vessel.
The pH value automatically compen-
sated for temperature is shown on the primary LCD, while the
secondary LCD displays the temperature of the sample.
Measurements should be taken when the stability symbol
on the top left of the LCD disappears.
IMPORTANT NOTE
Measurements have to be taken with both pH elec-
trode and temperature probe (also working as
matching pin) immersed in the same vessel.
OPERATIONAL GUIDE
Calibration buffer set
• From measurement mode, press and hold the MODE
button until “TEMP” and the current temperature unit are
displayed on the lower LCD (E.g. TEMP °C).
• Press the MODE button again to show the current buffer set:
“pH 7.01 BUFF” for standard set (pH 4.01/7.01/10.01) or
“pH 6.86 BUFF” for NIST set (pH 4.01/6.86/9.18).
• Press the SET/HOLD button to change the buffer value.
• Press the MODE button to return to the normal mode.
Calibration procedure
From measurement mode, press and hold the MODE button
until “CAL” is displayed on the lower LCD. Release the button.
The LCD will display “pH 7.01 USE” (or “pH 6.86 USE” if you
have selected the NIST buffer set). The CAL tag blinks on the
display.
• For a single-point pH calibration, immerse the electrode
and the temperature probe in any buffer from the selected
buffer set (eg. pH 7.01 or pH 4.01 or pH 10.01). The
meter will recognize the buffer value automatically.
If using pH 4.01 or pH 10.01, the meter will display “OK”
for 1 second and then return to measurement mode.
If using pH 7.01, after recognition of the buffer the meter
will ask for pH 4.01 as second calibration point. Press the
MODE button to return to measurement mode or, if
desired, proceed with the 2 point calibration as explained
below.
Note: For better accuracy it is always recommended to carry
out a two-point calibration.
• For a two-point pH calibration, place the electrode and
the temperature probe in pH 7.01 buffer (or pH 6.86 if
you have selected the NIST buffer set). The meter will
recognize the buffer value and then display “pH 4.01
USE”.
Rinse the electrode thoroughly and immerse it in the
second buffer value (pH 4.01 or 10.01, or, if using NIST,
pH pH 4.01 or 9.18). When the second buffer is also
recognized, the LCD will display “OK” for 1 second and the
meter will return to the normal mode.
pH ELECTRODE MAINTENANCE
• When not in use, rinse the electrode with water and store
it with a few drops of HI 70300 storage solution in the
protective cap.
NEVER DISTILLED OR DEIONIZED WATER FOR STORAGE
PURPOSES.
• If the electrode has been left dry, soak in storage or pH 7
solution for at least one hour to reactivate it.
• To prolong the life of the pH electrode, it is recommended
to clean it monthly by immersing it in the HI 7061
cleaning solution for half an hour. Afterwards, rinse it
thoroughly with tap water and recalibrate the meter.
ACCESSORIES
HI 1293D
Spare pH electrode with differential input,
pipe thread 1/2’’ NPT and DIN connector
HI 1294 (*)
Temperature probe, pipe thread 1/2’’
NPT (also working as matching pin for the
pH electrode)
HI 70004P
pH 4.01 solution, 20 mL sachet (25 pcs)
HI 70006P
pH 6.86 solution, 20 mL sachet (25 pcs)
HI 70007P
pH 7.01 solution, 20 mL sachet (25 pcs)
HI 70009P
pH 9.18 solution, 20 mL sachet (25 pcs)
HI 70010P
pH 10.01 solution, 20 mL sachet (25 pcs)
HI 7004M
pH 4.01 solution, 230 mL bottle
HI 7006M
pH 6.86 solution, 230 mL bottle
HI 7007M
pH 7.01 solution, 230 mL bottle
HI 7009M
pH 9.18 solution, 230 mL bottle
HI 7010M
pH 10.01 solution, 230 mL bottle
HI 7061M
Electrode cleaning solution, 230 mL bottle
HI 70300M
Electrode storage solution, 230 mL bottle
HI 710005
12 Vdc power adapter, US plug
HI 710006
12 Vdc power adapter, European plug
HI 710012
12 Vdc power adapter, Australian plug
HI 710013
12 Vdc power adapter, South Africa plug
HI 710014
12 Vdc power adapter, UK plug
(*) To be replaced by authorized technical personnel only
To turn the meter off
Press the MODE button while in normal measurement mode.
“OFF” will appear on the lower part of the display. Release
the button. The display still lit, until the power supply is
connected.
Notes:
• Before taking any measurement make sure the meter has
been calibrated.
• To clear a previous calibration, press the MODE button
after entering the calibration mode. The lower LCD will
display “ESC” for 1 second and the meter will return to
normal measurement mode. The “CAL” symbol on the LCD
will disappear. The meter will be reset to the default
calibration.
• If measurements are taken in different samples successively,
rinse the electrode thoroughly with water, and then with
some of the sample to be measured.
pH CALIBRATION
Note: For storing calibration data in the non-volatile memory,
turn the meter OFF and then ON again through the
MODE button.
The “CAL” symbol on the LCD means that the meter is
calibrated.