English, Assembly – EarthQuake MC43E User Manual
Page 9
Operator's Manual
MC43 2-Cycle Cultivator
Check for parts online at
www.getearthquake.com or call 800-345-6007 M-F 8-5
9
ENGLISH
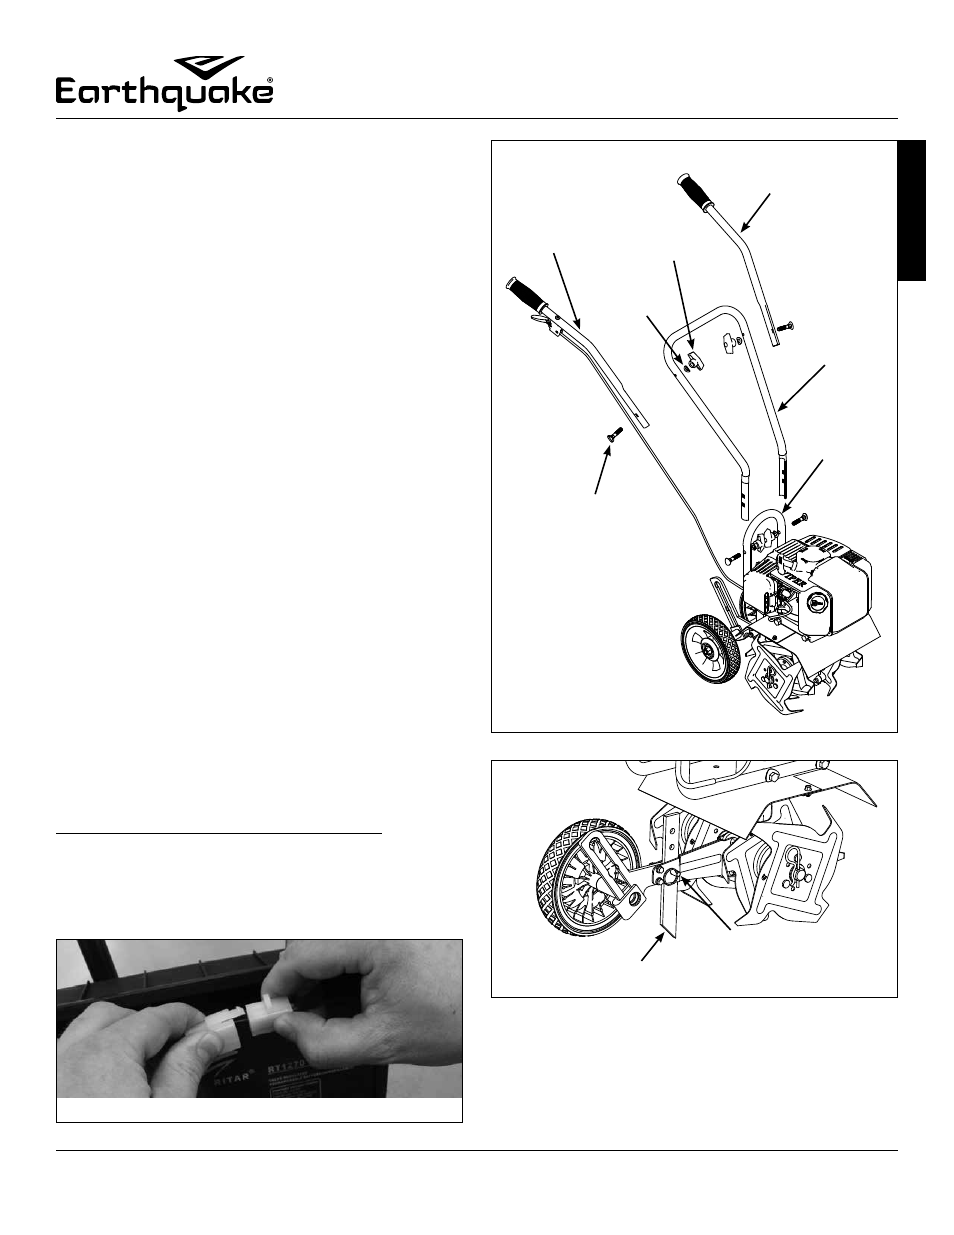
FIGURE 2
drag stake
detent pin
FIGURE 1
handle clamp
bolt
lower
handlebar
upper right
handlebar
upper left
handlebar
middle
handlebar
curved
washer
T-handle
nut
FIGURE 3
ASSEMBLY
UNPACK CULTIVATOR
1. Carefully lift the cultivator out of the box, remove any packing
material and cut any ties holding the handlebar pieces to the
cultivator assembly.
2. Find parts packet. Parts packet contains:
4 - T-Handle Nuts (4640)
4 - Curved Washers (4641)
4 - Handle Clamp Bolts (4642)
ASSEMBLY
1. Stand the cultivator assembly upright with tines and wheels
on a level surface. Wheels should be set in the lowest position.
DO NOT place the cultivator on a high surface where it can
fall and cause property damage or personal injury.
2. Using two T-handle nuts, two handle clamp bolts, and two
curved washers, attach the middle handlebar to the lower
handlebar that is already connected to the cultivator assembly
(SEE FIGURE 1). The middle handlebar can be installed in one
of two positions, one high and one low. DO NOT overtighten
the T-handle nuts.
NOTE: FIGURE 1 applies to both the MC43 and the MC43E,
the MC43 is shown.
3. Attach the upper right and left handlebars to the middle
handlebar using the two remaining T-handle nuts, handle
clamp bolts, and curved washers (SEE FIGURE 1). DO NOT
overtighten the T-handle nuts.
4. The drag stake is shipped with point facing upwards. Before
using, remove detent pin and turn the drag stake around
so the point is directed in the downward position facing to-
wards the tines. Re-insert detent pin. SEE FIGURE 2
For the Electric Start Cultivator Model MC43E, remove the
battery box cover and plug the white plastic connector from the
battery into the mating white plastic connector in the battery
box. SEE FIGURE 3. Make sure the ignition key is removed from
the ignition before connecting the wiring for the battery.