Caution, Unpacking and assembly, No engine oil – EarthQuake 7040 User Manual
Page 7: Important
Operator's Manual
SRT Model 7040
Check for parts online at
www.getearthquake.com or call 800-345-6007 M-F 8-5 CST
7
unPACkinG And ASSEmBLY
Your rototiller comes fully assembled except for a few parts.
The following instructions will help you unpack your tiller and
assemble and adjust your tiller’s depth regulator lever, cable
tension and handlebar height. You will need - 9/16” wrenches.
unPACk tiLLER
1. Open top of carton and remove handlebar assembly.
. Find parts packet. Parts packet contains:
4- 3/8-16 x 3/4” hex head bolts
4- 3/8-16 locknuts
1- 5/16-18 x 3/4” hex head bolt
1- detent pin
1- five star knob
3. Cut open all corners of carton, lay flat, and remove
machine:
a. Remove two bolts from packing frame.
b. Lift tiller body from frame. DO NOT attempt to
remove the unit by yourself.
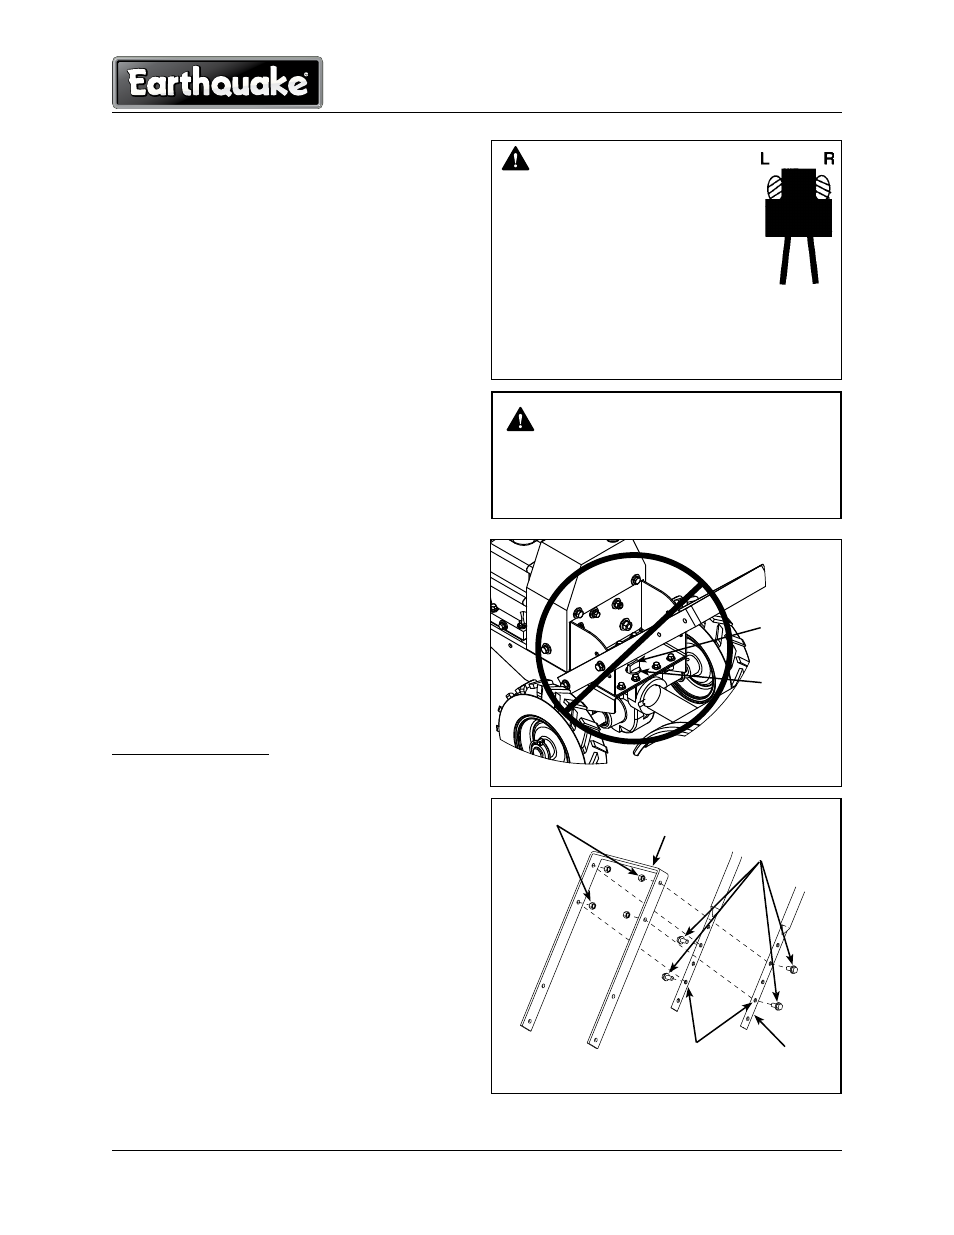
AttACh hAndLEBAR to tiLLER
1. Place handlebar stems on outside of lower handlebar
mount and align lower holes. (SEE FiGuRE 1)
. Insert one 3/8-16 x 3/4” bolt for each side in lower holes at
the desired handlebar height.
3. Start 3/8-16 nuts on each bolt.
4. Insert one 3/8-16 x 3/4” bolt for each side in upper holes.
5. Tighten all 3/8-16 nuts.
6. Proper belt tension is critical to good performance.
After 1/ hour of operation, all cables may have to be
adjusted due to initial stretch. Thereafter, check tension after
every hours of operation.
to increase belt tension: (SEE FiGuRE 5 on PAGE 13)
1. Loosen upper jam nut. Turn nut up cable in 1/8” increments.
. Tighten lower jam nut.
3. Check adjustment.
This procedure can be repeated until conduit adjust-
ment bolts are fully adjusted. If no more adjustment
can be made, belt may have to be replaced.
FiLL EnGinE CRAnkCASE
1. Add oil according to engine manual. Do not overfill. Use a
clean, high quality detergent oil. Container must be marked
A.P.I. Service SF - SJ. Use no special additives with recom-
mended oils. Do not mix oil with gasoline. Oil level must
be full. Check the oil level by removing oil fill plug. Oil level
should be up to the bottom of the fill plug opening.
. Always check oil level before starting engine. Refer to
engine manual for capacity and type of oil to use.
height
adjustment
holes
lower handlebar
mount
3/8-16
nuts
3/8-16 x 3/4”
bolts
handlebar
stem
iMpoRTanT
thE RiGht And LEFt SidES oF YouR Ro-
totiLLER ARE dEtERminEd FRom thE
oPERAtinG PoSition AS You FACE thE
diRECtion oF FoRWARd tRAVEL.
EnGinE iS ShiPPEd FRom FACtoRY
Without oiL. You muSt Add EnGinE
oiL BEFoRE StARtinG EnGinE.
tiLLER tRAnSmiSSion iS ShiPPEd FRom FACtoRY
With thE PRoPER Amount oF Liquid GREASE.
figure 1
gear case
dipstick
gear case
dipstick hole
no EnGinE oiL!
CauTion
DO NOT TRY TO LIFT THE ROTOTILLER FROM
THE CARTON.
DO NOT ADD ENGINE OIL INTO GEAR CASE
DIPSTICK HOLE.
AttACh WhEELS
1. Slide wheels onto axles.
. Insert lock pin into hole in axle.