Bonaire Vail User Manual
Bonaire Water equipment
1
2
3
4
Replace Rear Panel
Para volver a colocar el panel
posterior
5
Assemble Base and Casters
Para armar la base y las rueditas
6
Fitting Base and Castors to cooler
Para colocar la base y rueditas al
aparato
7
1.
Lay cooler face down on a flat surface protected by a towel.
2.
Align base assembly with tracks in tank and slide home until a
“click” is heard. This indicates base is locked securely into tank.
1.
Coloque el aparato cara abajo sobre una superficie protegida por
una toalla.
2.
Alinee el conjunto de la base con las ranuras en el tanque y
deslícelo hasta escuchar un “clic”. El “clic” indica que la base está
firmemente asegurada al tanque.
PORTABLE EVAPORATIVE AIRCOOLER
ENFRIADOR EVAPORATIVO DE AIRE PORTATIL
Operating and Maintenance Instructions
Instrucciones para el Uso y Mantenimiento
Safe Operation
Funcionamiento Seguro
KEY OPERATIONAL POINTS
1.
Your cooler must be positioned in front of an open window or door if it is to operate
effectively.
2.
Always ensure that there is another open window or door through which the air can exhaust
from the room.
3. Ensure the filter is kept clean throughout the summer season.
4.
At the end of each day run your cooler on FAN ONLY for 30 minutes to dry out filter.
5.
Prior to putting your cooler away for winter always:
(a)
Drain the tank and wipe out clean.
(b)
Clean the filter
(c)
Reassemble and run on FAN ONLY for 30 minutes to dry out the filter.
Location! Location! Location!
Having completed assembly of your cooler position the unit with its back to an open window or
door. This will allow fresh air to be drawn through the cooler and exhausted from the room.
Constant air change is essential and part of the fresh air benefit from evaporative aircooling.
Remember your cooler has been designed to operate even if it runs out of water.
No damage will be caused to the pump if your cooler runs out
of water.
ASPECTOS
IMPORTANTES DE SU
FUNCIONAMIENTO
1. Su enfriador TIENE que estar colocado
delante de una ventana o puerta abierta para funcionar
debidamente.
2. Asegúrese siempre de que haya otra puerta o ventana abierta para permitir que el aire
caliente salga de la habitación.
3. Asegúrese de que el filtro esté limpio durante todo el verano.
4. Al final de cada día haga funcionar su enfriador en la posición de FAN ONLY (ventilador
solamente) para secar el filtro.
5. Antes de guardar el aparato durante el invierno siempre debe:
(a)
Drenar el tanque y limpiarlo y secarlo con un paño
(b)
Limpiar el filtro
(c)
Volver a armar y hacer funcionar el VENTILADOR
SOLAMENTE (FAN ONLY) durante 30 minutos para que se seque el filtro.
¡Ubicación, Ubicación Ubicación!
Una vez que haya terminado de armar su enfriador colóquelo con la parte posterior delante de
una ventana o puerta abierta. De esta manera mantendrá un flujo de aire fresco. La circulación
constante del aire es esencial y es una característica de los beneficios obtenidos por medio del
enfriamiento evaporativo del aire.
Recuerde que su enfriador ha sido diseñado para seguir funcionando aún cuando se le
acaba el agua. La bomba no se dañará si el aparato sigue funcionando sin agua.
Location
Ubicacion
Assembly
Ensamblaje
Diagram 1
Ilustración No. 1
Rear of cooler
Parte posterior del enfriador
Diagram 2
Ilustración No. 2
Removal of Stand and Casters
Para retirar el pedestal y las
rueditas
Remove post
halves (2)
Retire las
mitades de la
columna (2)
Remove base
Retire la base
Remove
casters (4)
Retire las
rueditas (4)
Position rear panel as shown and close
ensuring all locks (2) are engaged
(reverse operation to section 3).
Coloque el panel posterior en la posición
ilustrada y ciérrelo asegurando que todos
los seguros (2) estén conectados (al
revés que la sección No. 3).
1.
Align post halves and snap together.
2.
Snap post into base, a “click” must be heard.
3.
Insert castors into base.
1.
Alinee las mitades de la columna y hágalas encajar.
2.
Encaje la columna a la base, debe escucharse un “click”.
3.
Inserte las rueditas a la base.
A.B.N. 13 001 418 042
26 Nylex Avenue, Salisbury, South Australia 5108 AUSTRALIA
Telephone No.: 61 8 8307 5100 Fax No.: 61 8 8283 0401
Part No. 6262201 issue A
Recycled Paper
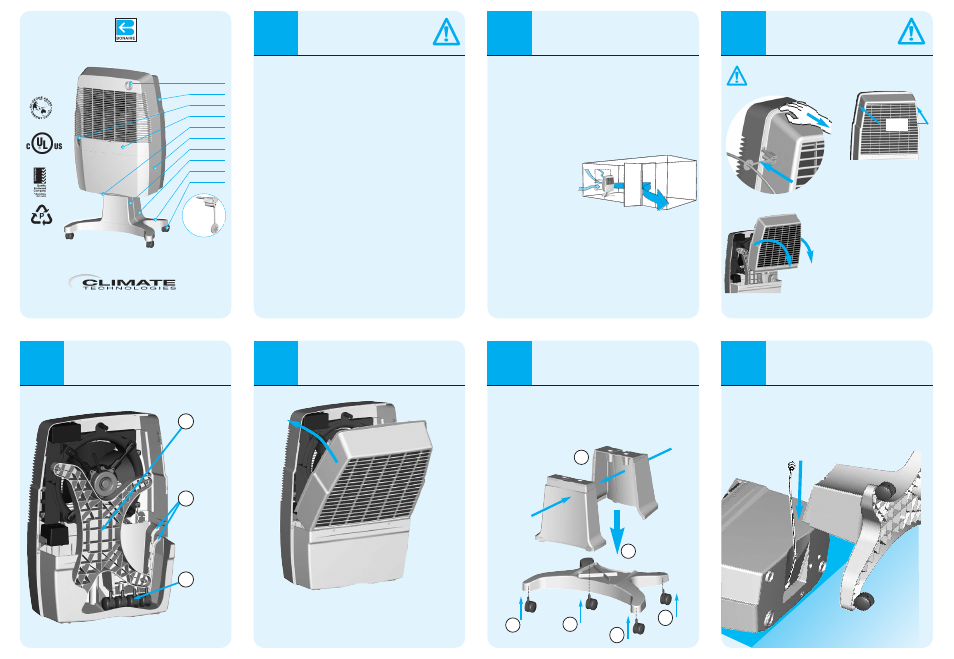
1
1. Take rear panel removal tool off power
plug.
2. With one hand insert tool into lock slot
(Diag. 1)
3. With the other hand pull rear panel back
4. Repeat for other side
5. Rear panel should then rotate
backwards and pull outwards (Diag. 2)
1
Desprenda la herramienta para retirar el
panel posterior del enchufe.
2
Inserte con una mano la herramienta en
la ranura del seguro (Ilustración No. 1)
3. Con la otra mano tire del panel exterior
hacia atrás.
4. Repita la misma operación para el otro
lado
5. El panel exterior debe rotar hacia atrás
y salir hacia delante (Ilustración No. 2)
Tank
Tanque
Base
Assembly
Conjunto de
la base
1
2
3
3
3
3
DO NOT CONNECT TO POWER SOCKET YET!
¡NO CONECTAR AUN A LA ELECTRICIDAD!
Rear panel
removal tool
Herramienta para
retirar el panel
exterior
Attached to power plug
Adherida al enchufe
Control knob
Rear panel & filter
Water level Indicator
Water filler door
Drain plug
Tank
Post half A
Post half B
Base
Castors (4)
1
3
2
Mando de control
Panel posterior y filtro
Indicador de nivel de agua
Puerta para el agua
Tapón de drenaje
Tanque
Mitad “A” de la columna
Mitad “B” de la columna
Base
Rueditas (4)
Locks
Seguros
IN ORDER TO REDUCE THE POSSIBILITY OF FIRES,
ELECTRIC SHOCK OR PERSONAL INJURY.
•
Please READ AND SAVE THESE INSTRUCTIONS prior to assembly or operation.
•
Use only with a 120V, 60Hz, Grounded outlet.
•
Do not use the cooler on uneven or unstable surfaces.
•
Unplug cooler during servicing or cleaning.
•
Do not operate cooler with the rear panel removed.
•
Do not use immediately adjacent to heat sources such as stoves or radiators.
•
Do not use the cooler immediately adjacent to sources of water, such as swimming pools,
hot tubs, bath tubs, sinks, etc.
•
Do not operate the cooler with a damaged cord, plug or other component.
•
Do not run the power cord under carpet or other floor covering.
•
Do not use the power cord with an adaptor plug that converts the three prong plug into a two
prong connector. Do not use an extension cord.
•
Do not use the cooler with an improperly grounded receptacle.
•
Do not overfill. Use water only.
•
Do not alter or modify this cooler.
•
Do not allow children to operate or service this cooler.
•
Save instructions for future reference. Keep them in a handy location. Do not throw them away.
PARA DISMINUIR LA PROBABILIDAD DE INCENDIO,
SHOCK ELECTRICO O DAÑOS PERSONALES.
•
Sírvase LEER Y GUARDAR ESTAS INSTRUCCIONES antes del armado o de ponerlo en
funcionamientto.
•
Usar solamente con un tomacorriente de 120V, 60Hz, conectado a masa.
•
No utilizar el aparato sobre superficies desniveladas o inestables.
•
Desenchufar el aparato antes de hacerle el servicio o limpiarlo.
•
No utilizar el aparato sin el panel posterior.
•
No utilizar muy cerca de fuentes de calor como cocinas y estufas eléctricas.
•
No utilizar el aparato demasiado cerca de fuentes de agua tales como piscinas, tinas de
agua caliente, bañeras, lavaderos, etc.
•
No utilizar el aparato con el cable, enchufe o alguna otro pieza dañada.
•
No colocar el cable de electricidad debajo de alfombras o algún otro tipo de cubierta para
el piso.
•
No utilizar el cable con un adaptador que convierte un enchufe de tres clavijas en enchufe
de dos clavijas. Tampoco utilizar cables de extensión.
•
No utilizar el aparato con un tomacorriente que no está puesto a tierra correctamente.
•
No Ilenar excesivamente. Utlizar agua solamente.
•
No se debe alterar o modificar de manera alguna este aparato.
•
No permitir que un niño haga funcionar el aparato, ni que le haga el ervicio.
•
Guardar las instrucciones para uso futuro. Las instrucciones deben colocarse en un lugar
de fácil acceso. No se deshaga de las instrucciones.