3 > installation - how to install 1u 20" lcd tray – Austin Hughes L120 User Manual
Page 8
UM-CV-751-L120-Q215V1 www.austin-hughes.com
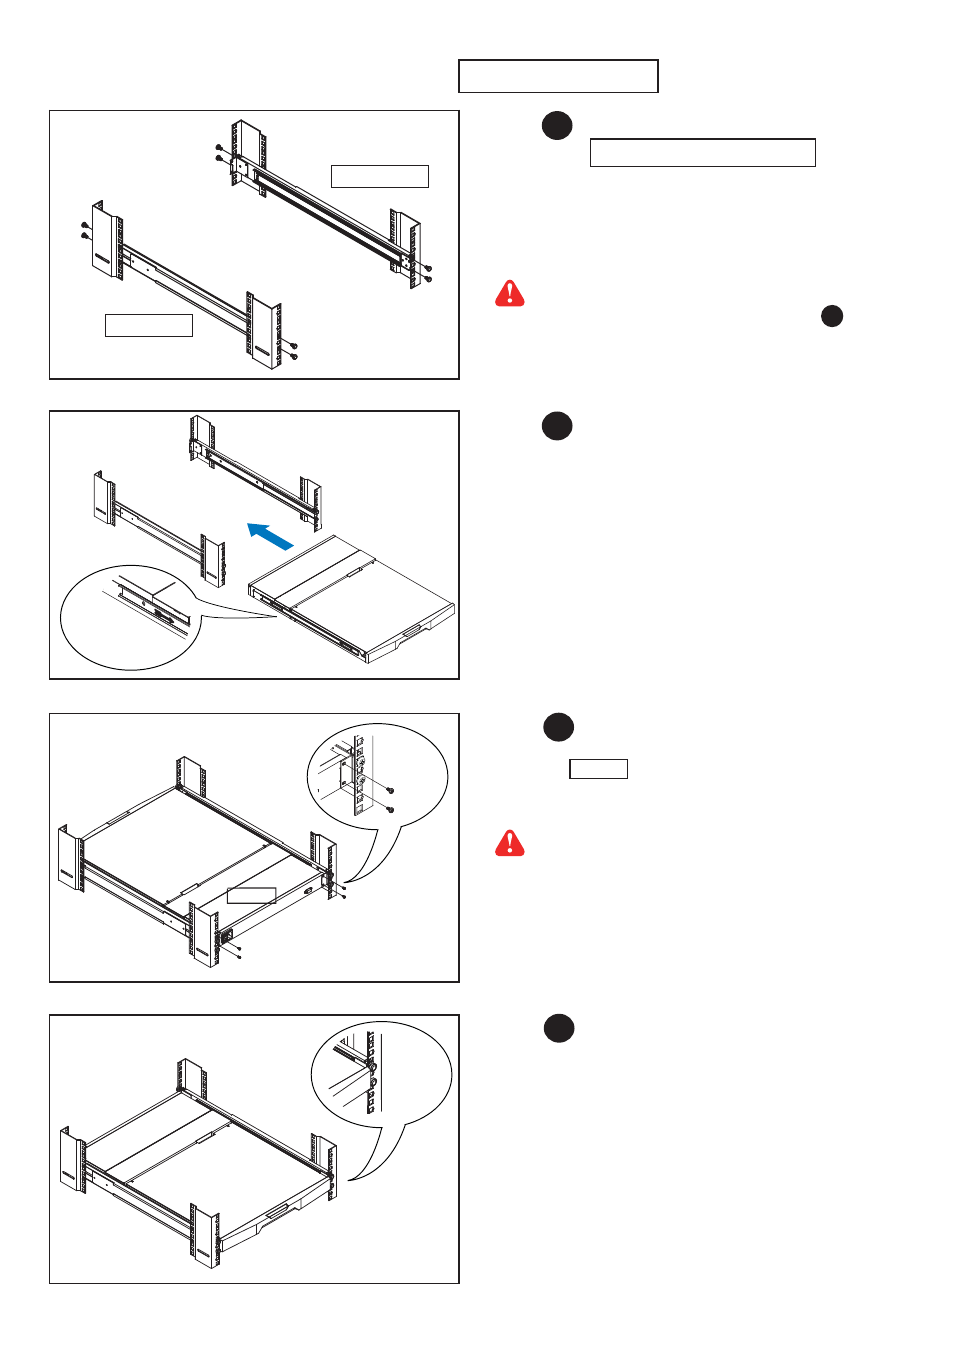
■
Tighten all 8 pcs of M6 screw to complete the
installation.
Complete the installation
Step
4
< 1.3 > Installation - How to install 1U 20" LCD Tray
P.3
Left bracket
■
Attach the left and right mounting bracket to
rack 19" mounting rails.
■
Adjust the mounting bracket to fi t your rack.
■
M6 screw x 8 pcs included.
Step
1
Right bracket
Front side
Rear side
Leave all M6 screws slightly loose, until
you complete the installation in step
3
Step
2
■
Pick up the LCD tray.
■
Insert the LCD tray into the mounting bracket.
■
Pull and hold the left & right black arrow buttons
on the rails.
■
Return the LCD tray to park position.
Mounting bracket
Black arrow button
■
Fix the rear kit to the mounting bracket with M3.2
screw x 4 pcs included.
Step
3
This step is necessary. Failure to complete this
will cause damage.
Front side
Rear kit
M3.2 screw
M6 screw
- MUIP1613 (28 pages)
- MIP813 (28 pages)
- IP802H (28 pages)
- 1201D (8 pages)
- 801 (12 pages)
- F117 (24 pages)
- X117 (28 pages)
- W119 (20 pages)
- RKP117 (20 pages)
- N117 (20 pages)
- RKP7 (16 pages)
- RKP1617 (16 pages)
- H117 (20 pages)
- DF117 (24 pages)
- DX117 (24 pages)
- D117 (20 pages)
- RKP2417 (20 pages)
- WS119 (20 pages)
- S117 (20 pages)
- NS117 (20 pages)
- DS117 (20 pages)
- RK-1e (12 pages)
- RK-1d (12 pages)
- RK-2e (12 pages)
- RK-2d (12 pages)
- RP-F617 (20 pages)
- RP-F821 (20 pages)
- RP-X617 (20 pages)
- RP-717 (24 pages)
- RP-W719 (20 pages)
- SP-717 (16 pages)
- RP-HF821 (20 pages)
- RP-H717 (20 pages)
- RP-HW719 (20 pages)
- RP-919QD (24 pages)
- RP-W819QD (24 pages)
- RP-F117 (16 pages)
- RP-X117 (20 pages)
- RP-117 (16 pages)
- RP-W119 (16 pages)
- RP-120 (16 pages)
- SP-117 (12 pages)
- SP-120 (12 pages)
- RP-H117 (16 pages)