Adjust hot limit stop, Hot limit safety stop adjustment, Handle installation install handle adapter – American Standard Moments Bath / Shower Trim Kits T50.50X User Manual
Page 3: Install adapter screw, Install handle, Install adpater, Service
Attention! The text in this document has been recognized automatically. To view the original document, you can use the "Original mode".
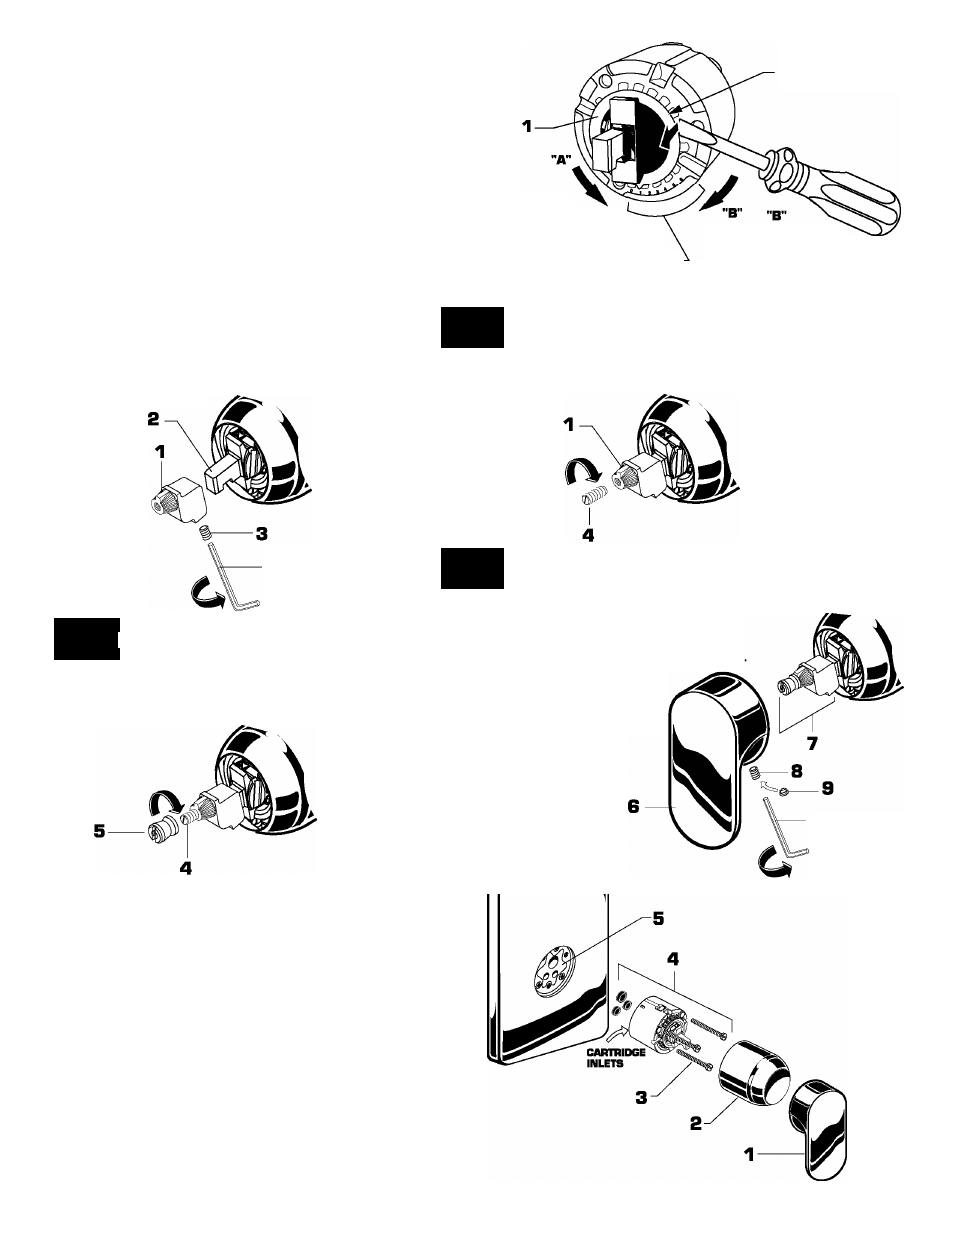
ADJUST HOT LIMIT STOP
HOT LIMIT SAFETY STOP ADJUSTMENT
By restricting handle rotation and limiting the amount
of hot water allowed to mix with the cold, the HOT LIMIT
SAFETY STOP reduces risk of accidental scalding. To set
the maximum hot water temperature of your faucets, all
you need to do is adjust the setting on the HOT LIMIT
SAFETY STOP
■ Use a flat blade screwdriver or your fingers to pull
up and rotate red HOT LIMIT SAFETY STOP (1).
Follow Step "A" or "B" to adjust min./max. discharge
temperature. "0" being the hottest to "7" the coldest
temperature setting. Factory set at "0".
"RED RING"- HOT
LIMIT SAFETY STOP
"A"
ADJUSTMENT WHEN
WATER IS TOO HOT
PRY RED RING
FORWARD AND ROTATE TEMPERATURE -
COUNTER-CLOCKWISE
SETTING
ONE CLICK
NUMBERS
ADJUSTMENT
WHEN
WATER IS TOO COLD
PRY RED RING
FORWARD AND
ROTATE CLOCKWISE
El
HANDLE INSTALLATION
INSTALL HANDLE ADAPTER
Push HANDLE ADAPTER
(1J
onto VALVE STEM
(2).
Tighten set screw
(3)
with 2.5mm hex wrench
supplied.
4a
INSTALL ADAPTER SCREW
With a flat blade screwdriver thread ADAPTER SCREW
(4)
into
HANDLE STEM ADAPTER
(1)
and tighten.
2.5MM
HEX
WRENCH
4c
INSTALL HANDLE
4b
INSTALL ADPATER
With a flat blade screwdriver thread ADAPTER
(5)
onto SET SCREW
(4)
and tighten.
Align HANDLE (6) and install onto
HANDLE ADAPTER ASSEMBLY
(7).
Tighten set screw (8) with 2.5mm
hex wrench supplied to secure HANDLE
Push PLUG BUTTON
[S)
into set screw access hole
in HANDLE (S).
2.5MM HEX
WRENCH
SERVICE
If faucet drips, operate handle several times
from "off" to "on". Do not apply excessive force.
Clogged CARTRIDGE
I4J
inlets may cause reduced
flow in "full on" hot or cold. To clean inlets, first turn
off water supply, then:
■ Remove HANDLE
(1).
CAP
(2)
and CARTRIDGE
(4).
■ Clean inlets and MANIFOLD
(5).
■ Reassemble CARTRIDGE
(4),
alternately tightening
SCREWS
(3).
Replace CAP
(2)
and HANDLE
(1J.
Check flow.
M968951