Important information, Safety rules for power tools, Switches – Black & Decker 97301 User Manual
Page 2: Operation, Drilling, Drilling in metal, Drilling in wood, Accessories
Attention! The text in this document has been recognized automatically. To view the original document, you can use the "Original mode".
IMPORTANT INFORMATION
Safety Rules for Power Tools
The use of the Safety Seal of the Power Tool Institute assures you that
this tool is produced and tested in accordance with applicable national
safety standards. Operational safety, however, depends to a great extent
upon the user of the tool. Please pay close attention to the following
rules.
1. KNOW YOUR POWER TOOL — Read owner's manual carefully. Learn
its applications and limitations as well as the specific potential
hazards peculiar to this tool.
2. GROUND ALL TOOLS - UNLESS DOUBLE-INSULATED. If tool is
equipped with three-prong plug, it should be plugged into a three-
hole electrical receptacle. If adapter is used to accommodate two-
prong receptacle, the adapter wire must be attached to a known
ground. Never
remove third prong.
3. KEEP GUARDS IN PLACE and in working order.
4.
KEEP WORK AREA CLEAN.
Cluttered areas and benches invite
accidents.
5. AVOID DANGEROUS ENVIRONMENT. Don't use power tool in damp
or wet locations. And keep work area well lit.
6. KEEP CHILDREN AWAY. All visitors should be kept safe distance
from work area.
7. STORE IDLE TOOLS. When not in use, tools should be stored in
dry, high or locked-up place — out of reach of children.
8. DON'T FORCE TOOL. It will do the job better and safer at the rate
for which it was designed.
9.
USE RIGHT TOOL.
Don't force small tool or attachment to do the
job of a heavy duty tool.
10. WEAR PROPER APPAREL.
No loose clothing or jewelry to get caught
in moving parts. Rubber gloves and footwear are recommended
when working outdoors.
11. USE SAFETY GLASSES with most tools. Also face or dust mask if
cutting operation is dusty.
12.
DON'T ABUSE CORD.
Never carry tool by cord or yank it to dis
connect from receptacle. Keep cord from heat, oil and sharp edges.
13. SECURE WORK. Use clamps or a vise to hold work. It's safer than
using your hand and it frees both hands to operate tool.
14. DON'T OVERREACH. Keep proper footing and balance at all times.
15. MAINTAIN TOOLS WITH CARE. Keep tools sharp at all times, and
clean for best and safest performance. Follow instructions for
lubricating and changing accessories.
16.
DISCONNECT TOOLS.
When not in use, before servicing; when
changing accessories such as blades, bits, cutters, etc.
17. REMOVE ADJUSTING KEYS AND WRENCHES. Form habit of check
ing to see that keys and adjusting wrenches are removed from
tool before turning it on.
18. AVOID ACCIDENTAL STARTING. Don't carry plugged-in tool with
finger on switch.
OPERATION------- - ------ ^------ ----- - ------ ------- —------- -
Switches
The Variable Speed Trigger Switch
permits "FREE HAND" speed control — the farther the
trigger is depressed, the higher the speed of the Drill. A Switch Locking Button permits
locking the trigger in the full "ON" position for continuous operation. To lock the trigger
"ON" depress trigger fully and push in locking button, then gently release trigger. To
release locking mechanism, depress trigger fully, then release It. Trigger can also be locked
"ON" in a position which gives less than full speed. Do not lock trigger "ON" for hand-held
drilling, so that you can release trigger instantly if bit binds in hole.
NOTE:
Use lower speeds for STARTING HOLES WITHOUT A CENTER PUNCH, DRILLING IN
METAL OR PLASTICS, DRIVING SCREWS, DRILLING CERAMICS, OR MIXING PAINT. Higher
speeds are better for DRILLING WOOD AND COMPOSITION BOARDS, AND FOR USING
ABRASIVE AND POLISHING ACCESSORIES.
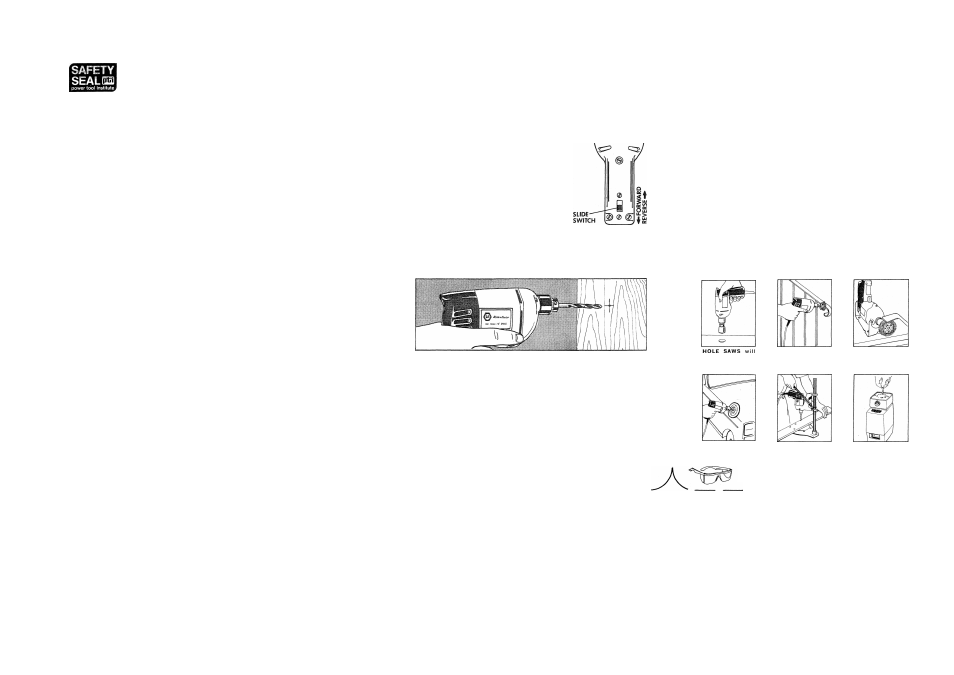
The Reversing Switch
is a slide switch located in the back of the
handle (See at right). For removing screws or easing drill bits out
of tight holes, release the trigger switch FIRST and then push the
slide switch up to reverse the drill motor. After any reversing
operations, return switch to forward position. Do not operate
reversing switch while unit is running. Do not run the Drill con
tinuously in Reverse — cooling fan functions most efficiently in
Forward.
It is possible that the slide switch will be in between the forward
or reverse position. In this case, the unit will not operate. Simply
push the slide switch fully to either the forward or reverse position
and the unit will operate when trigger is depressed.
CAUTION
Be sure to release the switch locking button before disconnecting the plug from the power
supply. Failure to do so will cause the too! to start immediately the next time it is plugged
In. Damage or Injury could occur.
OPERATION
Drilling
1. Always unplug the Drill when attaching or changing bits or accessories.
2. Use sharp drill bits only. For WOOD, use twist drill bits, spade bits, power auger bits, or hole saws.
For METAL, use high-speed steel twist drill bits or hole saws. For MASONRY, such as brick, cement,
cinder block, etc., use carbide-tipped bits.
3. Be sure the material to be drilled is anchored or clamped firmly. If drilling thin material, use a wood
“Dack-up’' block to prevent damage to the material.
4. With Variable Speed Drills there is no need to center punch the point to be drilled. Use a slow
speed to start the hole and accelerate by squeezing the trigger harder when the hole is deep enough
to drill without the bit skipping out.
5. Always apply pressure in a straight line with the bit. Use enough pressure to keep drill biting, but
do not push hard enough to stall the motor or deflect the bit.
6. Be sure to brace yourself against the twisting action of the drill.
7. IF DRILL STALLS, it is usually because it is being overloaded or improperly used. RELEASE TRIGGER
IMMEDIATELY, remove drill bit from work, and determine cause of stalling. DO NOT CLICK TRIGGER
OFF AND ON IN AN ATTEMPT TO START A STALLED DRILL-THIS CAN DAMAGE THE DRILL.
8. To minimize stalling on breaking through the material, reduce pressure on drill and ease the bit
through the last fractional part of the hole.
9. Keep the motor running when pulling the bit back out of a drilled hole. This will help prevent jamming.
Care in Drilling
Twist drills are brittle and will break if enough bending stress is applied To avoid
stress on the drill bit, try extending your index finger along the side of the drill
housing with your middle finger on the trigger. Remember — guide the tool, don t
force it! Should the tool become overheated, run it free of any load at maximum
speed. The drill will cool faster by running it without load.
Drilling in Metal
Use a cutting lubricant when drilling metals. The exceptions are cast iron and brass
which should be drilled dry. The cutting lubricant that works best is sulphurized
cutting oil. Aluminum is best drilled with kerosene.
Drilling in Wood
Holes in wood can be
made with
the same
twist drills used for metal.
These bits
may overheat unless
pulled out frequently to clear chips
from the
flutes. For
larger holes, use Power Drill Wood Bits with a shank size that will fit your drill's
chuck. Work that is apt to splinter should be backed up with a block of wood. Let
up on the pressure just before the tip cuts through, this will give a good clean hole.
Always leave the drill running when pulling it back out of a drilled hole, this
prevents jamming.
Accessories
Recommended accessories for use with your Drill are shown below and in Black &
Decker catalogs (CAUTION: The use of any other accessory might be more hazard
ous). For safety in use, the following accessories should be used only in the sizes
specified below:
BITS, METAL DRILLING — Up to V
a
" with DRILL, up to with ¥
b
" DRILL.
BITS, MASONRY DRILLING —Up to V
2
".
BITS, WOOD DRILLING — Up to
with
DRILL: up to ¥
4
" with
DRILL.
HOLE SAWS — Up to
IVa" with V
4
" DRILL*,
up to l»/
2'''with ¥
b
" DRILL.
WIRE BRUSHES & GRINDING WHEELS — up to 3" diameter.
BUFFING WHEELS —Up to 4" diameter.
BACKING PADS —4%" diameter.
We strongly recommend that your first purchase be the No. U-2106 Safety Glasses
which should be worn when using all drill accessories.
cut larger diameter
holes in wood up
to thick.
WIRE CUP BRUSH
removes rust, scale,
and old paint from
metal surfaces.
W I R E W H E E L
B R U S H E S c l e a n
and burnish metal,
remove
rust
and
paint.
POLISHING B O N -
NETS. For cleaning,
polishing, waxing of
cars, floors, etc.
B E N C H D R I L L
S T A N D
permits
steady, v e r t i c a l
drilling for accurate
work,
DRILL BIT SHARP
ENER enables you
to extend the use
ful life of your drill
bits.
SAFETY GLASSES (No. U2106). Lightweight, clear plastic with side
shields. Wear alone or over regular glasses.