How to install your home drinking water system – Sears WaterWorks RO 2000 User Manual
Page 8
Attention! The text in this document has been recognized automatically. To view the original document, you can use the "Original mode".
- HOW TO INSTALL YOUR HOME DRINKING WATER SYSTEM -
ASSEMBLE FAUCET AND INSTALL
- continued
B.
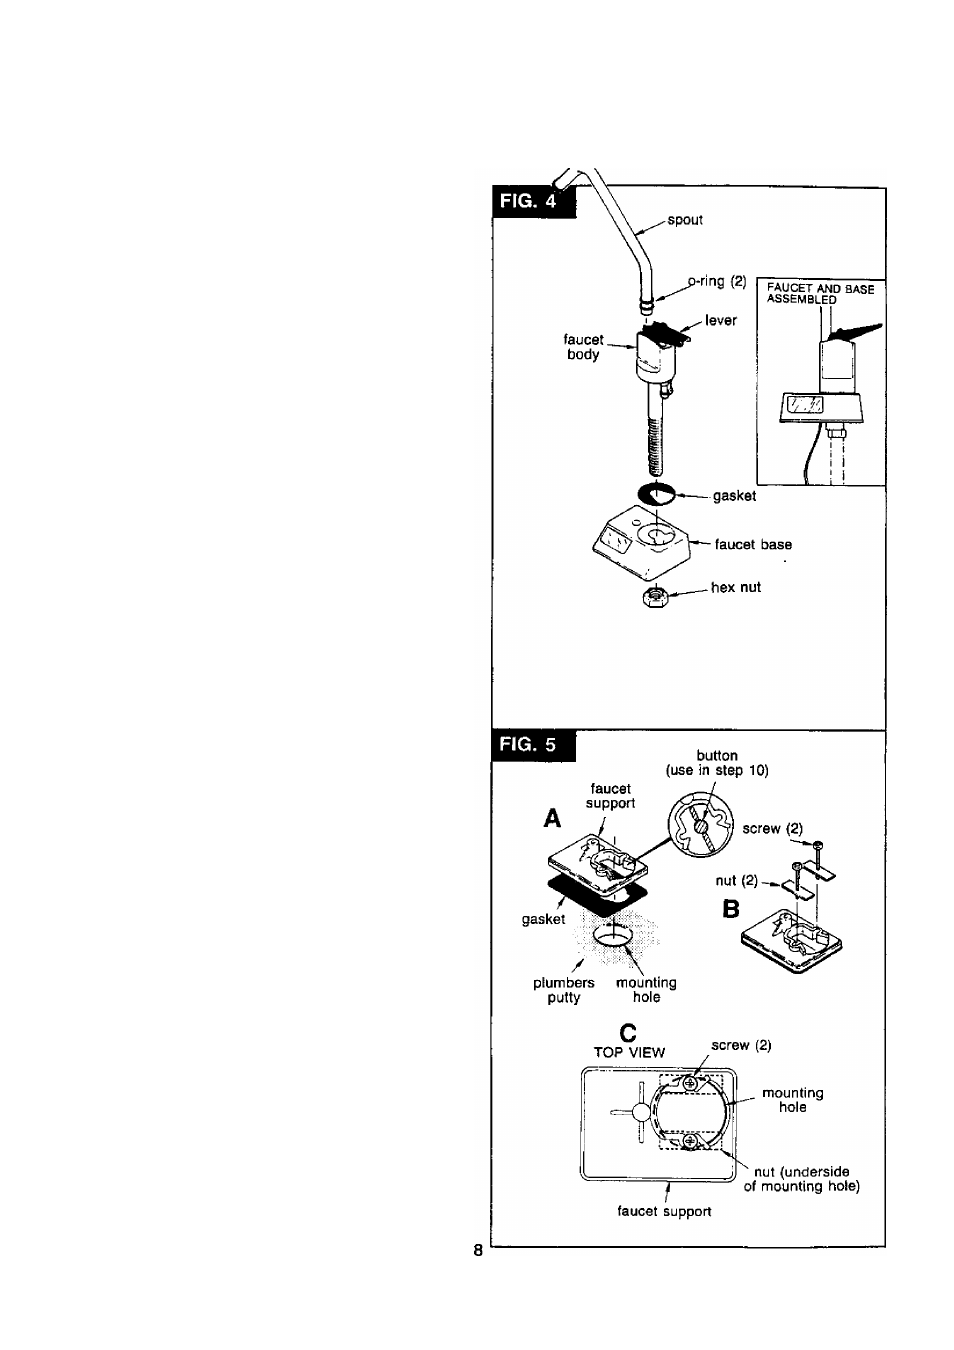
ASSEMBLE FAUCET (FIG. 4)
1. Remove the hex nut, and all other parts shown
in the dotted line box, FIG. 4.
2. Insert the faucet stud through the top gasket and
faucet base. Then, replace the hex nut and tighten.
DO NOT OVERTIGHTEN AND BREAK THE
FAUCET BASE.
NOTE: The faucet may include some small parts
that are not used.
3. Wet the o-rings (2) on the faucet spout. Push the
spout into the faucet body until it bottoms in the
cavity.
C.
FASTEN FAUCET IN PLACE
1. Looking at FIG. 5A, locate the faucet support and
gasket over the sink or countertop mounting hole.
NOTE: First, breakout small button and save for use
in step 10.
2. Turn the special nuts (FIG. 5B) a few turns onto
the 1-3/8" long screws.
3. Place a screw into a notch in the faucet support,
with the nut on the underside of the mounting hole
(FIG. 5C). Use a finger to hold the nut and tighten
the screw until snug. In the same manner, install
the second screw and nut. BE SURE THE SUP
PORT
IS
POSITIONED
CORRECTLY,
THEN
TIGHTEN BOTH SCREWS EVENLY UNTIL THE
SUPPORT IS HELD FIRMLY IN PLACE.
4. As shown in FIG. 6, insert the washer into the
tubing adaptor. Turn the adaptor onto the faucet
stud, and tighten.
5. Move the RO assembly into installation position
under the sink, or other desired location. Route the
2 lengths of tubing, marked “FAUCET”, and “1/4”
BARB ON FAUCET”, from the bottom, upward
through the mounting hole and faucet support (FIG.
6
).
6. Using the brass tubing nut, fasten the 3/8” tub
ing (marked “FAUCET”) to the tubing adaptor and