Upper shell removal, Electrical – Sears 583.35601 User Manual
Page 7
Attention! The text in this document has been recognized automatically. To view the original document, you can use the "Original mode".
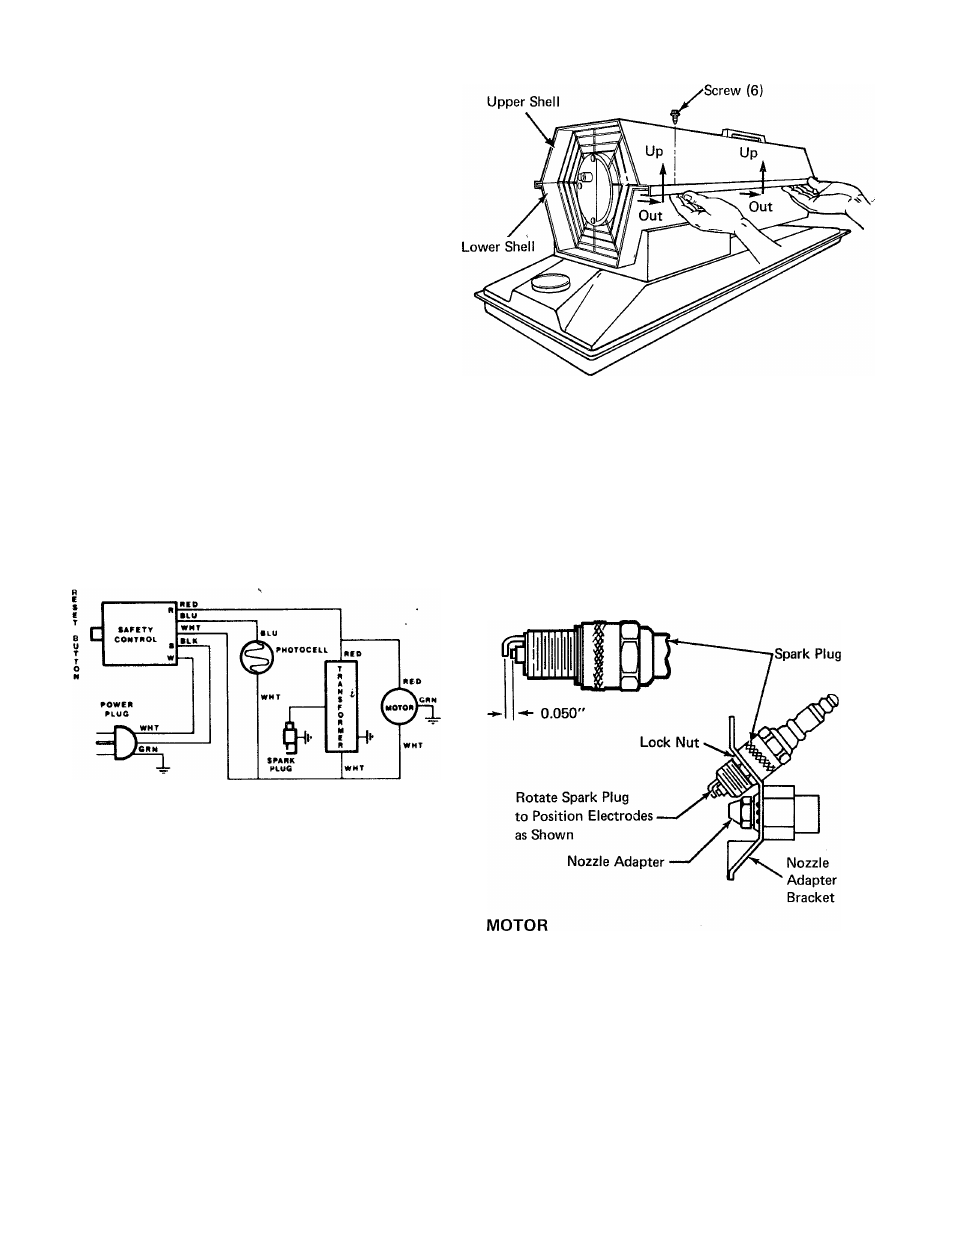
UPPER SHELL REMOVAL
NOTE: Upper shell removal is necessary when access to
internal parts of the heater is necessary.
1. Remove the six (6) screws from the upper shell, flanges
which run along each side of the heater.
2. Grip the upper shell flange along one side of the heater,
pull away from the heater to disengage it from the lower
shell flange, and lift up. Disengage the opposite-side
flanges and lift off the upper shell.
3. Replace the upper shell by engaging the upper and lower
shells' flanges on one side of the heater, then pull out
and press down the upper shell flange, on the opposite
side, to engage the lower shell flange.
4. Align the six (6) screw holes and install the screws.
ELECTRICAL
1. Remove the upper shell, as described in this manual,
and lift off the top fan shroud.
2. Check all internal wiring, for deterioration (hardness and
cracking), obvious component damage, and loose connec
tions. Repair or replace as necessary.
NOTE: When in doubt about your ability to repair your
heater, take it to your Sears Service Center.
Spark Plug
A
Always make sure the heater is unplugged before
attempting removal of spark plug.
NOTE: At the beginning of each heating season, and after
every 300 hours of operation, the spark plug must
be removed, cleaned, and gapped. If plug's electrodes
are burned or eroded, replace the plug.
3. Pull the spark plug wire terminal up and off of plug.
4. Remove two (2) screws and the nozzle adapter bracket
which mounts the spark plug and nozzle adapter.
5. Remove the lock nut retaining the spark plug in the
bracket and remove the plug from the bracket.
6. Clean and gap the plug's electrodes to 0.050", or replace
the plug if necessary, making sure the new plug is
properly gapped.
7. Insert the plug into the bracket and thread the locknut
onto the plug. Before tightening the nut, position the
plug so the gap between the electrodes faces the nozzle
adapter, as illustrated. Tighten the nut.
8. Position the nozzle adapter bracket so screw holes
align. Insert and tighten both screws.
9. Push the spark plug, wire terminal onto plug.
10. Set the top fan shroud in position and install the
upper shell.
The motor is a sealed unit and cannot be lubricated or
serviced electrically.