Philips Norelco Bodygroom 5100 Series 5000 wet & dry body groomer BG2038 Safe self-sharpening blades 3 combs 3 length settings 50mins cordless use-1h charge Back attachment User Manual
Important safety instructions, Danger, Warning
Attention! The text in this document has been recognized automatically. To view the original document, you can use the "Original mode".
ENGLISH
IMPORTANT
SAFETY
INSTRUCTIONS
When using an electric appliance, basic precau*
tions should atways be followed, including the
following:
Read all instructions before using this
appliance.
DANGER
To reduce the risk of electric shock:
1. Do not reach for a charging stand while
plugged in that has follen into water. Unplug
immediately.
2. Power plug and the accessories connected
to it are not for immersion or for use in
shower.
3. Do not use an extension cord with this
appliance.
4. Do not place or store charging stand where
it can fall or be pulled into a tub or sink. Do
not place or drop a charging stand into
water or other liquid while plugged in.
5. Always unplug the charging stand from the
electrical outlet immediately after use.
except when groomer is (re)charging.
6. Remove power supply cord from charging
stand before cleaning.
7. When discarding groomer, unplug charging
stand and remove groomer from charging
stand before removing rechargeable
batteries. See Battery Removal instructions.
8. The batteries used in this device may
present a fire or chemical burn hazard if
mistreated. Do not disassemble, heat above
100®C (212®F) or incinerate.
WARNING
To reduce the risk of bums» fire, electric
shock or injury to persons:
1. Close supervision is necessary when this
groomer/charging stand is used by. on. or
near children or invalids.
2. Use this groomer/charging stand for its
intended nousehold use as described in this
manual. Do not use attachments not
recommended by Philips Electronics North
America Corporation.
3. This appliance is only intended for shaving
and trimming body parts below the neckline.
Do not use it to shave or trim focial or scalp
hair.
4. Never operate this groomer/charging stand
if it has a damaged cord or charging plug, if
it is not working properly, if it has been
dropped or damaged, or dropped into water.
For assistance cairi*800*243»5050.
5. Keep the groomer, charging stand, cord and
charging jxug away from heated surfaces.
6. Never drop or insert any object into any
opening.
7. Never operate the groomer with the air
openings blocked or while on a soft surface,
such as a bed or couch, where the air
openings may be blocked. Keep the air
openings free of lint, hair, and the like.
8. Do not operate, charge or plug in groomer
outdoors or where aerosol (spray) products
are being used or where oxygen is being
administered.
9. Always check foil, cutters, and trimmers
before using the groomer. Do not use
the groomer If foil, cutters or trimmers are
damaged, as injury may occur.
10. Always attach plug to charangstand first,
then charging plug into ouuetTo disconnect,
remove charging plug from outlet.
11. Use only the cord and charging stand
provided to charge and (re)charge the
groomer.
12. K the appliance is subjected to a major
charge in temperature, pressure or
humidity, let the appliance acclimatize for
30 minutes before using.
13. Never put the groomer/charging stand in
direct sunlight or store at a temperature
above 140^.
14. Groomer is water>safe and can be rinsed
under running tap water or used in shower.
Do not submerge groomer in water.
15. To prevent possible damage to the cord, do
not wrap cord around the charging stand.
Do not store in a damp environment
16. Only use the power plug and other
accessories supplied with the groomer.
SAVETHESE
INSTRUCTIONS
IMPORTANT: The power plug contains a
transformer. Do not cut off the power plug
to replace it with another plug, as this will
cause a hazardous condition.
Registration
Congratulations on your purchase and welcome
to Philips Norelco!
To fully benefit from the support that Philips
Norelco offers, register your product at
Create Your Own Look
Your new Philips Norelco Bodygroom system
offers you a safe, gentle and quick way to trim
and sha^ every part below the neddine.
This unique combination allows you to create
your own look safely and with less irritation. The
trimming unit gives you multiple trimming combs
to choose from so you can control the exact
hair length you desire or use the shaving unit to
completely shave off body hair Use wet or dry.
your Bodygroom system with self-sharpening
blades will give you a precise trim and shave
anywhere, every time.
Like many new products, your №ilips Norelco
Bodygroom may take a little getting used to. If
you are shaving sensitive areas for
the first time,
your skin may need time to adapt. Give yourself
some time to acquaint yourself with your new
Bodygroom. If you are still not convinced. Riilips
Norelco will refund you the full purchase price as
long as the request is received within 45 days of
purchase.
Stick with it! If you alternate trimming or shaving
methods during
the adjustment period it may
nrake it more difficuh to adapt to the Riilips
Norelco Bodygroom system.
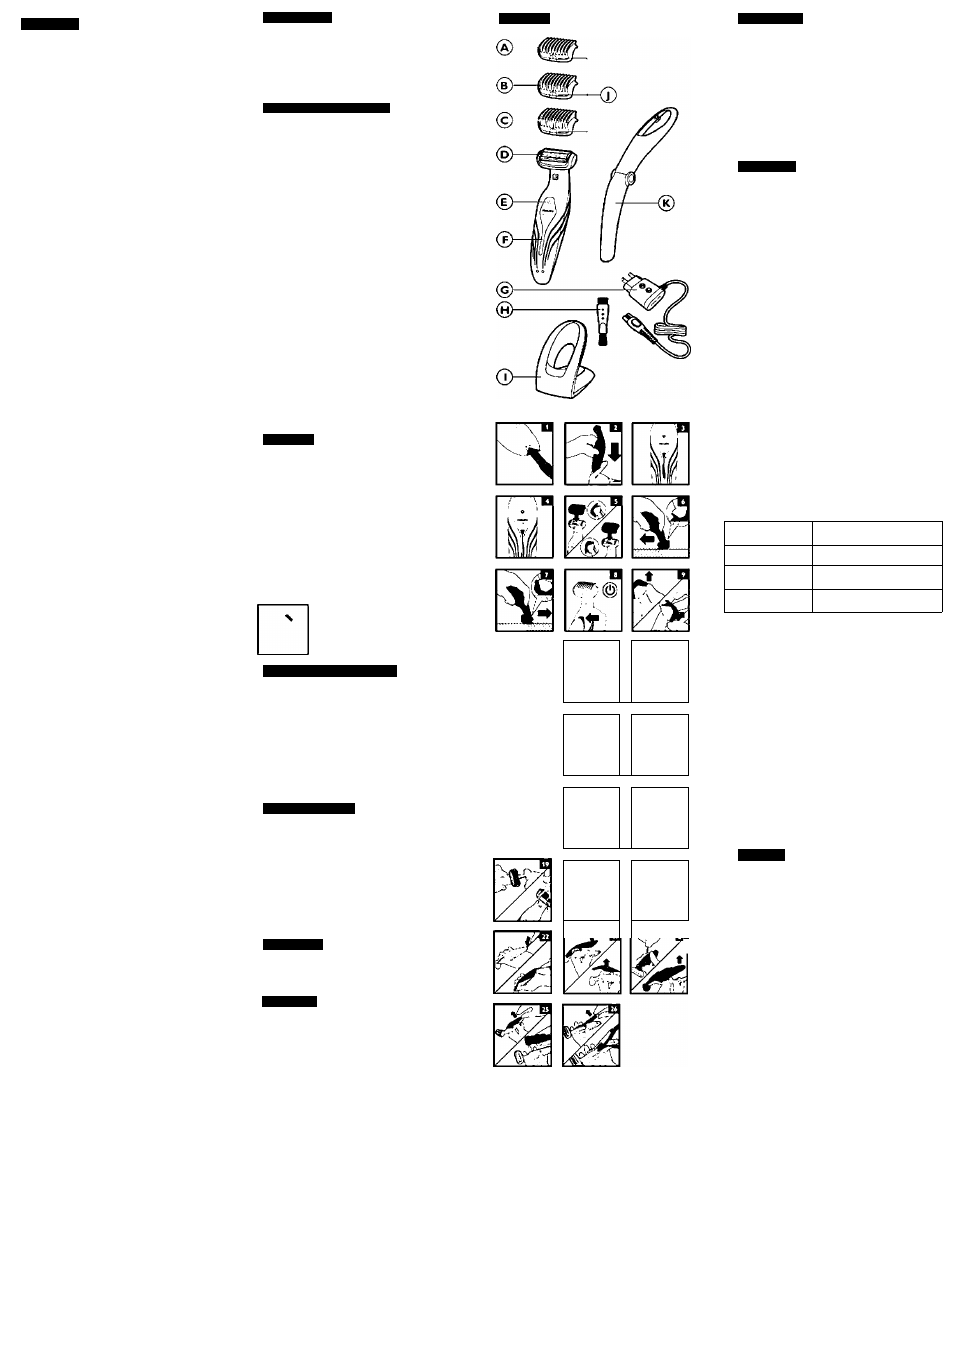
Features
A Trimming Comb 1 (1/8 inch/3mm)
B Trimming Comb 2 (3/16 inch/5mm)
C Trimming Comb 3 (9/32 inch/7mm)
D Shaving Head
E On/Off Button
F Battery Status Indicator
G Adapter
H Cleaning Brush
I Charging Stand
J Comb Size Indicator
K Back Shaving Attachment
Full Two-Year Warranty
45-Day Money-Back Guarantee
This symbol indicates that the
groomer can be used in the
bath or shower.
Battery Status Indicator
> The Battery Status Indicator on the Groomer
will flash green to indicate Groomer is
(re)charging.
I After approximately 1 hour the Battery Status
Indicator lights up continuously to indicate the
Groomer is fully charged.
I After Groomer is fully charged, the Battery
Status Indicator goes out after 30 minutes to
save energy.
Before First Use
I Charge the Groomer before you start using
it (see ‘Charging’). Make sure the Groomer is
switched off before you start chargir^ it.
I Before using, check foil, cutters, trimmers and
combs for wear or damage. If foil, cutters,
trimmers or combs show signs of wear or
damage, do not use Groomer as injury may
occur. Do not use Groomer until foil, cutters,
trimmers or combs have been replaced.
Important
I Only use the power cord provided to charge
the Groomer.
Charging
I Charging requires 1 hour.
I Use only the power cord and charging stand
provided.
I Charging, recharging or storing at temperatures
below 40“F or higher than 95®F adversely
affects lifetime of batteries.
I The Groomer can only be charged in the
charging stand.
□
Be certain Groomer is OFF.
□ Connect power cord to charging stand (Rg. 1).
□
Plug the adaptor into any 120V AC outlet.
Use only the power cord provided.
I An adaptor plug may be necessary for power
cord usage in some foreign countries. Use an
attachment plug adaptor of the proper
configuration for the power oudet.
Features
#
'vy
3
. . / ^ IQ
f
-----
_____¿1
^IS
>
1
: i ^ y ri
□ Put the Groomer in the charging stand
(Fig. 2). Make sure the charging contacts on
front side of the Groomer fit into the
charging stand correctly. When placed
correctly, the Battery Status Indicator will
flash green to indicate the Groomer is
(re)charging (Fig. 3).
□ A fully charged Groomer has a cordless
grooming time of up to 50 minutes.
□ When the battery is fully charged, the
Battery Status Indicator lights up green
continuously (Fig. 4).
Q Disconnect the power cord and unplug from
the electrical outlet.
Recharging
D
Recharge when the Battery Status Indicator
flashes orange. This indicates there is
approximately 10 minutes of operating
time left.
If the Battery Status Indicator flashes orange
quickly, the battery is completely empty. Charge
the Groomer before using.
□ When Groomer is fully charged, disconnect
the charging plug from outlet
Trimming
I Use this Groomer for its intended household
use as described in this manual.
> The Groomer comes with 3 trimming combs
to cut hair to 3 different lengths.
I If you are trimming for the first time, be
careful. Do not move the Groomer too fost.
Make smooth and gentle movements.
I Practice trimming with the trimming comb 3
first to prevent accidentally trimming hairs too
short.
I Trimming is easier and more effective when
skin and hair are dry.
D
Snap the desired trimming comb onto
Groomer. Make sure the teeth of the comb
point in the direction you will move the
appliance (Fig. 5).
- When you move the Groomer towards you.
the teeth should point toward >ou (Fig. 6).
- When you move the Groomer away from
you. the teeth should point away from you
(Fig. 7).
Trimming Length Setting Table
I The comb size (1,2 or 3) is indicated on the
back of the comb.
Trimming Comb
Hair length after trimming
1
1/8 in./ 3 mm
2
3/16 in. / 5 mm
3
9/32 in. / 7 mm
B Turn Groomer ON by pressing the on/off
button (Fig. 8).
o Move Groomer against the direction of hair
growth making sure the tips of the comb
point in the same direction as you are
moving the Groomer. Always make smooth
and gentle movements and be sure the
surface of the comb always stays in contact
with your skin.
NOTE; Since all hairs do not grow in the same
direction, you may want to try different trimming
positions (i.e. upwards, downwards, or across).
Practice is best for optimum results.
□ Turn Groomer OFF by pressing the on/off
button.
Shaving
I Do not use this Groomer to shave or trim
facial or scalp hair. The Groomer should only
be used on skin below the neckline.
I When shaving sensitive areas for the first time,
you may feel some discomfort, irritation or
reddening of the skin. This is normal as your
skin needs time to adjust to shaving.
t If your hair is longer than 13/32 in. /10 mm.
trim hair using trimmer comb 1 to a length of
1/8 in73 mm first for optimum shaving results.
I For dry use. be certain that your skin is clean
and dry before using the Groomer.
I For wet use, you may prepare your skin with
lathered soap or shaving foam before using the
Groomer.
t Make sure the shaving foil is in complete
contact with your skin for the closest shave
and minimum foil wear.
I Pressing too hard may cause skin irritations.
I Practice is best for optimum results.
□ Remove any trimming comb from Groomer
(Fig-9).
B Turn Groomer ON by pressing the on/off
button (Fig. 10).
B
Stretch your skin taut with your free hand
and gently press Groomer to skin and move
it slowly and smoothly against the direction
of hair growth. DO NOT press too hard.Too
much pressure can distort the foil and cause
skin irritation.
TIP: Stretching your skin can help prevent skin
irritation.