Unpacking, Unit preparation – Winco EC6010DR/S User Manual
Page 5
Page 3
60706-214
1335-00
Most fractional horsepower motors take about the same amount
of current to run them whether they are of Repulsion-Induction
(RI), Capacitor (Cap), or Split-Phase (SP) type. The chart below
shows the approximate current required to start and run various
types and sizes of 120 volt 60 cycle electric motors under
average load conditions.
RUNNING
STARTING AMPS
HP
AMPS SP
CAP
RI
1/6
3.2
16 TO 22
6 TO 13
5 TO 8
1/4
4.5
22 TO 32
9 TO 18
7 TO 12
1/3
5.2
26 TO 35
10 TO 21
8 TO 17
1/2
7.2
NOT MADE 14 TO 29
11 TO 18
1
13.0
NOT MADE 26 TO 52
20 TO 33
The figures given above are for an average load such as a
blower or fan. If the electric motor is connected to a hard
starting load such as an air compressor, it will require more
starting current. If it is connected to a light load, or no load such
as a power saw, it will require less starting current. The exact
requirement will also vary with the brand or design of the motor.
Self-excited generators respond to severe overloading
differently than the utility. When overloaded, the engine is not
able to supply enough power to bring the electric motor up to
operating speed. The generator responds with high initial
starting current, but the engine speed drops sharply. The
overload may stall the engine. If allowed to operate at very low
speeds, the electric motor starting winding will burn out in a
short time. The generator winding might also be damaged.
CAUTION: EQUIPMENT DAMAGE
RUNNING THE GENERATOR SET UNDER THESE
CONDITIONS MAY RESULT IN DAMAGING THE
GENERATOR STATOR AS WELL AS THE MOTOR
WINDING.
Because the heavy surge of current required for starting motors
is required for only an instant, the generator will not be damaged
if it can bring the motor up to speed in a few seconds of time. If
difficulty is experienced in starting motors, turn all other
electrical loads off and if possible reduce the load on the electric
motor.
Motor Starting Capacity - listed below you will find the motor
starting capability of your engine generator set.
Generator
Motor Size
Model
(code “G” capacitor start)
EC6010DR
3.0 HP
Trying to start a larger motor or higher code (ie. J or K) motor may
result in damage to both the generator and the electric motor
especially 120 volt motors.
CAUTION: EQUIPMENT DAMAGE
THIS UNIT HAS BEEN SHIPPED WITHOUT OIL. Failure to
maintain the engine oil at the proper level will result in serious
engine damage.
UNPACKING
When you unpack your new ENGINE GENERATOR, be sure to
remove all the information sheets and manuals from the carton.
1. This power plant was in good order when shipped. Inspect the
power plant promptly after receiving it. If damage is noted, notify
the transportation company immediately; request proper proce-
dures for filing a “concealed damage” claim. Title to the equip-
ment and responsibility for filing claim rests with you when a
generator is sent F.O.B. shipping point. Only you can legally file a
claim.
2. Before proceeding with the preparation of your new engine
generator set for operation, take a couple of minutes to insure
that the unit you have received is the correct model and review
the specification pages in this manual to insure that this unit fits
your job requirements.
UNIT PREPARATION
Before your engine generator was shipped from our factory it was
fully checked for performance. The generator was load tested to
its full capacity, and the voltage and frequency were carefully
checked and adjusted.
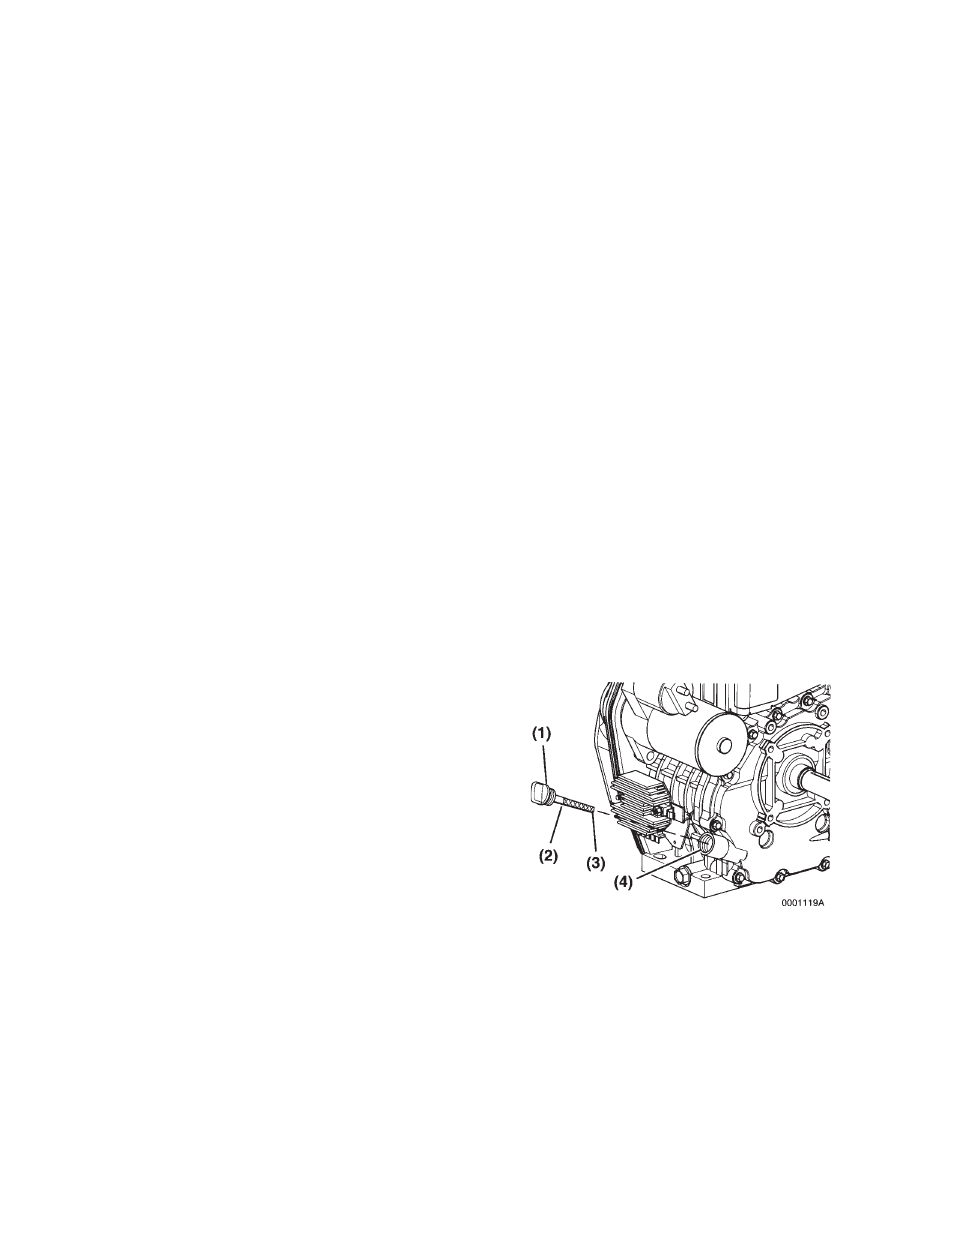
1. Lubrication - Before starting the engine, fill the crankcase to
the proper level with a good quality oil. The recommended grade
of oil and quantity of oil required is listed in the engine operators
manual. The necessity of using the correct oil, and keeping the
crankcase full cannot be overemphasized. Engine failures
resulting from inadequate or improper lubricant are considered
abuse and are not covered by the generator or the engine
manufacturers warranty.
a. Make sure the engine is level
b. Remove the oilcap/dipstick (ref 1) from either side of the
engine and wipe off with a clean cloth.
c. Fully re-insert oil cap/deipstick, but do not screw in.
d. Remove oil cap/dipstick. The oil level should be between
the upper mark (ref 2) and the lower mark (ref 3) on the oil
cap/dipstick.
e. Fill engine with proper grade and weight of oil.
f.
Fully reinsert oil cap/dipstick and hand tighten. Ove-
tightening the oil cap/dipstick will damage it.
Oil should be change after the first 50 hours of operation and
every 100 hours there after. It should be checked daily.