On the rear panel, Ca60 block diagram – Crate Amplifiers CA60 User Manual
Page 5
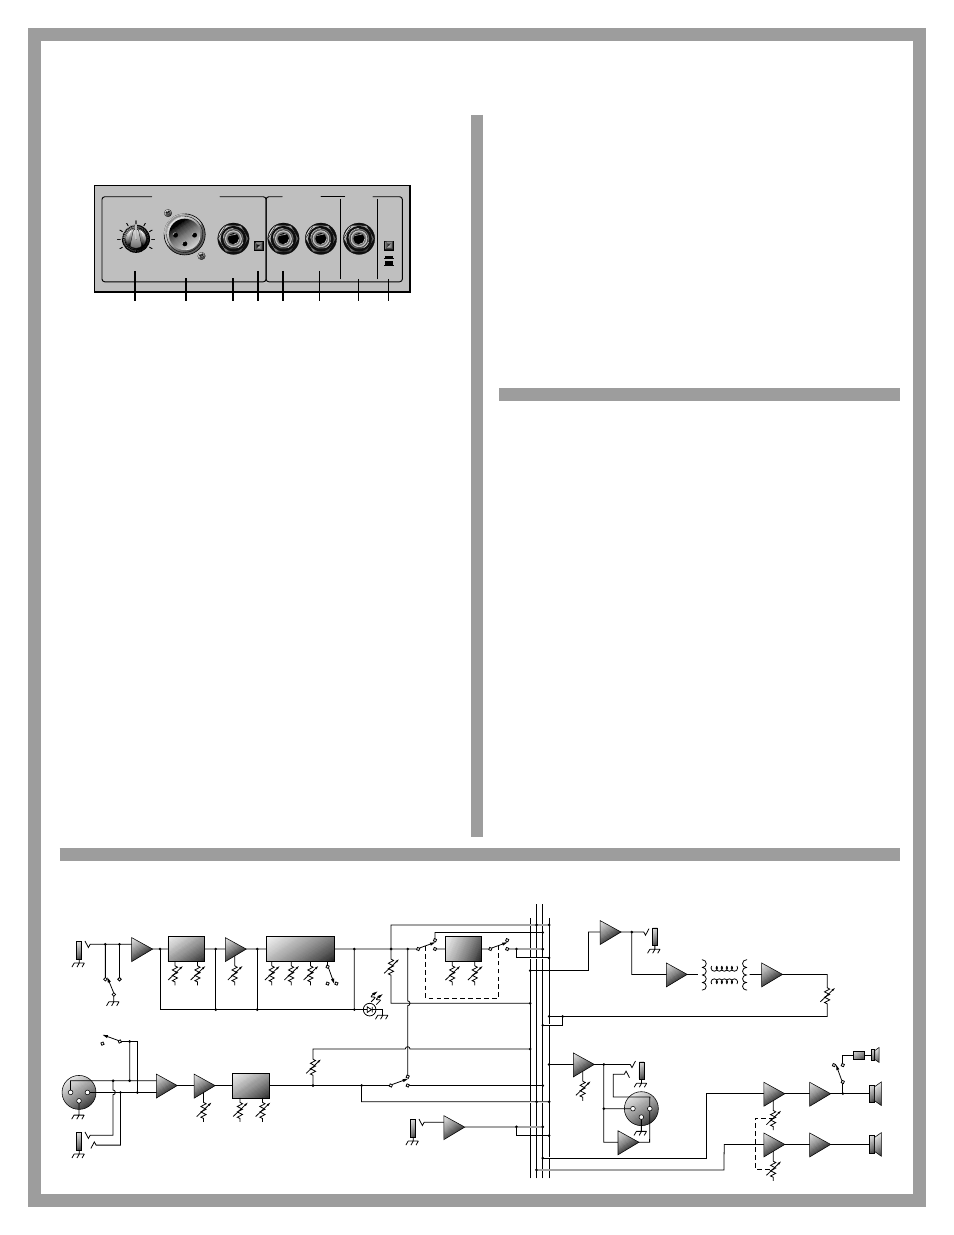
On the
Rear Panel:
0 10
Return
Send
Level
0 10
Low Z
Bal.
High Z
Bal.
Reverb/
Chorus
Line Outputs
Tweeter
Gnd
Lift
On
Off
Effects
Loop
Foot
Switch
33
32
31 30 29
28
27
26
26: Tweeter On/Off swtich.
This switch, when depressed, deactivates the
CA60’s internal tweeter.
27: Footswitch.
Connect the supplied two-button footswitch here for
remote on/off control of the internal reverb and chorus. (When connect-
ed, the footswitch overrides the front panel chorus on/off switch.)
Note:
This is a STEREO jack: tip controls the chorus, ring controls the
reverb, sleeve is ground. Use only a footswitch equipped with a stereo
1/4” plug.
28: Effects Loop Send.
When using an external signal processor, connect
this jack to the input of the effect by means of a shielded signal cable.
29: Effects Loop Return.
When using an external signal processor, connect
this jack to the output of the effect by means of a shielded signal cable.
30: Ground Lift.
This switch, when depressed, electronically disconnects
the low Z balanced output jack’s chassis ground connection. If you expe-
rience excessive noise when using the low Z balanced output jack,
depress this switch.
31: High Z Bal.
Use this jack to connect a high impedance, line level signal
to a house sound board, a recording console or an external power ampli-
fier by means of an 1/4” stereo plug-terminated cable. (Ring is signal +,
tip is signal -, and sleeve is ground.)
32: Low Z Bal.
Use this jack to connect a low impedance, line level signal to
a house sound board, a recording console or an external power amplifi-
er by means of an XLR-terminated cable. (Pin 1 is ground, pin 2 is signal
+, and pin 3 is signal -.)
CA60 Block Diagram:
instrument
channel
input
active piezo
freq
cut
filter
gain
low mid high
peak
shape
depth rate
chorus
rev/
effect
send
vocal/aux
channel
low-z
input
hi-z
input
phantom
power
tones
effects
line out
left right
rev/
effect
send
low high
tones
gain
effects
return
left
master
level
30w
low
right
30w
low
reverb
return
effects
send
spring reverb
low-z
bal.
hi-z
bal.
level
line out
chorus
on
on
chorus
on
high pass
filter
high
tweeter
on/off
To Eliminate Instrument Feedback:
One of the most common problems encountered when amplifying
acoustic instruments, especially in small environments, is feedback.
Acoustic instruments typically have inherent qualities which cause res-
onant feedback at specific frequencies. Instrument tone controls and
sound board equalizers are helpful in getting rid of the problem, but
they typically operate around relatively wide frequency bands. This
almost always means the musician must sacrifice sound quality in his
quest to do away with feedback. But since Crate’s feedback elimination
circuit isolates only the offending frequency, instrument feedback from
the CA60 can be eliminated without affecting the overall sound.
Chances are, you may not have a problem with feedback at all. In
that case, set the CA60’s Freq and Cut controls fully counter-clockwise.
However, if you do encounter feedback while playing, set the Cut control
to -30dB (fully clockwise) and adjust the Freq control until the feedback
is gone. Reduce the Cut to the 12 o’clock position and readjust the Freq
control as needed. Continue reducing the Cut control and readjusting the
Freq control until there is no more feedback with the Cut control as far
counter-clockwise as possible. This approach effectively eliminates
instrument feedback without sacrificing the quality of your sound.
33: Line Out Level.
Use this control to adjust the output level of the line out
signal. (This control works independently from the amplifier’s master
level control.)
Not Shown:
Power cord.
Connect the end of this cord to a suitable source of line volt-
age. Refer to the voltage information on the back of the amplifier for its
voltage and current requirements.
Note:
This is a grounded plug. To avoid the possibility of electric shock,
DO NOT defeat the ground connection in any way!